Did you just notice that the Administrative Tools folder is missing from your Start Menu, or can you not find crucial tools such as Event Viewer, Performance Monitor, or the Advance Firewall quickly from your start menu search? Here’s how to add it back in 10 seconds.
[box type="info"]This demo was done on Windows 7 Professional, but it works the exact same in all versions of Vista and Windows 7, and is almost the exact same in Windows XP.
Get your Administrative Tools
Right click on your start menu, and select Properties.
Alternately, you can click any empty area of the start menu itself, and select Properties.
Now, select the Start Menu tab, and click Customize.
Scroll down to the System administrative tools section, and choose whether you want to display it on the All Programs menu or on the front of the Start Menu as well. I personally keep it in the All Programs menu, but the choice is yours! Click Ok to save your settings.
Now, when you open the All Programs part of your Start Menu, you’ll see the Administrative Tools folder you were looking for, with all of your missing tools! You can also now quickly find anything in this folder from the Start Menu search.
Alternately, if you chose to add it to your Start Menu directly, here’s how it will look.
Now you’ve got quick access to your administrative tools back in your Start Menu where it belongs. This should be the default setting in Windows, especially in the Professional and Ultimate editions, but for some reason, it’s hidden by default. At any rate, it’s easy to get it back the way it should be. Enjoy!
Have you ever tried to use an Outlook plugin, and received a cryptic error message that you couldn’t resolve? Chances are, your PST file may be corrupt. Recently I was testing out Boomerang for Outlook, and couldn’t get it to work without crashing. Finally after some time of removing other addins, I was able to quickly solve the problem by just repairing my PST file. Here’s how you can do it so you can get back to Outlook quicker and keep all your data intact.
First, exit Outlook, then open the Run command (press the Windows key plus R on your keyboard) and enter the following, depending on which version of Outlook you have installed:
Outlook 2010:
32-bit version of Windows: C:\Program Files\Microsoft Office\Office14\scanpst.exe
64-bit version of Windows: C:\Program Files (x86)\Microsoft Office\Office14\scanpst.exe
Outlook 2007 and earlier:
Enter the same, substituting Office 14 with Office 12 for Outlook 2007, or Office 11 for Outlook 2003.
This will open the Microsoft Outlook Inbox Repair Tool. Make sure it has your correct Outlook file listed, then click Start.
Moments later, the tool will inform you if it found errors. If it did, click Repair to fix the file. It is likely a good idea to let it make a backup of your file first, as well.
This may take a few minutes, and the application may appear to not be responding, but just wait and it should be fine.
Once it’s finished, you’ll see a Repair complete notification. Click Ok to close it, and then run Outlook as before.
This time, Outlook should run faster and your addins should quit having errors. If they’re still having problems, now it’s time to start investigating which one of your addins has gone rouge!
Got any great Outlook tips? Share them with us below!
It’s been an exciting year for Techinch.com, going from a brand-new blog in January to having over 10,000 in a little over 8 months. We’ve outgrown our first hosting plan, tweaked the theme, joined a new ad network, and more! Here’s some of our recent changes:
New Hosting
Web hosting can be an infinitely frustrating thing to get figured out. There are thousands of hosting service, and for every one you can find reviews that say they’re the best service in the world and even more that say they’re the worst service in the world. This makes it almost impossible to find out if a hosting service will be really good.
Techinch.com experienced outages, often for several hours a week, almost ever since it was launched, so when I received an email from our old host saying that the site was using too much system resources on a shared account, I knew it was time to look for a new hosting service. I considered several, all of which were personally recommended to me by collegues and friends, including Media Temple, Rackspace, and DreamHost, as well as several hosted services such as Page.ly and Squarespace. In the end, I ended up going with DreamHost, and it has worked out great so far. Their support has been first-rate, we’ve had almost no downtime, and the site is loading faster as well. I plan to review DreamHost’s service soon, but if you’re looking for webhosting, go ahead and give them a try. During my search for a webhost, though, the support was great from many of the companies, and Media Temple especially does an awesome job at Twitter support. If I ever need a more advanced virtual server, and can afford it, I definitely would give Media Temple a try.
New Ad Network
Ever since I started Techinch.com, I wanted to be able to run ads on it that were useful, stylish, and still paid. I was inspired by The Deck ads, which I’d noticed on FeedDemon, 37signals’ Signal vs. Noise blog, and Daring Fireball, among other apps and sites, and wanted to do something similar on my sites.
I was thus very excited that Techinch was accepted in the Yoggrt ad network in August. You’ll notice the Yoggrt ads on the top right corner of Techinch’s sidebar … just a rectangle image ad, with a text description underneath. The ads look very nice, and are often for services and products you’ll find interesting. I find myself looking at the ads to see what new awesome products are being advertised, which is so much better than Adsense which left you wondering what old, stale junk was being advertised. We’re proud to be part of the Yoggrt ad network, and hope to grow together.
By the way, if you happen to be looking for a great way to advertise your new webapp or stylish, modern PC app, Yoggrt would be a great network to run your ads on. It currently gets over 1 million impressions per month across the entire network, which includes a variety of sites including T3chH3lp, another awesome tech site you should check out if you haven’t already.
New Site Features
Although the site itself hasn’t changed much over the past few months, I’m constantly making little tweaks to the site that should make it more fun and useful. Some of the changes include:
WordPress 3.0 … Techinch started out with WordPress 2.9.whatever, and changing over to WP 3.0 was a breeze. WordPress is still the best CMS available in my opinion, and 3.0 just made it even better.
Awesome new buttons and content boxes, with more to come, all thanks to Elegant Themes’ new Shortcodes integration. They’re easy to work with, and only another reason I think Elegant Themes is one of the best WordPress and Tumblr theme subscriptions available. You can see the buttons and content boxes in action on the Digging into WordPress 3 review.
Social media integration. You can Like or Tweet any post from the Facebook and Twitter buttons on the bottom of every post, or remember the post with Evernote. If you have a favorite social network you’d like to have a quick share button for, let me know.
Disqus comments, which is the best comment systems I've used. Leave a comment on this post and test it out ;)
There’s more to come, too. Stay tuned for more awesome content, tips, reviews, and giveaways from Techinch over the upcoming months! And thanks for reading; you’re the reason this site exists, and I never forget that. If there’s anything you’d like to see reviewed more or need to learn how to use, please mail and let me know or send me a tweet or DM, and I’ll try to get it covered.
Have you ever read an article online that you’d like to make sure you remember? Several months ago I wrote about how the Evernote Chrome addon with Site Memory had entirely changed how I use Evernote. In fact, now I use Evernote as the primary way I bookmark sites, since I can tag the bookmarks, include clips from the page, and easily find all my favorite pages in one site. The only problem is, the Chrome web clipper only works in Chrome, so if you’re browsing the ‘net on friend’s computer or at a library you might not be able to use it.
Last week, Evernote made it easier again to clip content from the internet with the new Evernote Site Memory button. This is a new button that web publishers can add to their pages to let readers easily clip their content. Techinch was one of the first sites to integrate the new Evernote button, so now you can easily save any article you read here to your Evernote notebook.
Here’s how it works. Say you read our article on student discounts on Office 2010, and wanted to make sure to not lose the info. So, scroll to the bottom of the article, and click the Remember button with the elephant icon.
This will open the Evernote web clipper in a smaller popup window. If you’re not already signed into Evernote, enter your username and password, and click Sign in. Alternately, if you’ve never used Evernote before, click Sign up now and create a new account.
Now, you can edit the title of the note, add tags, select the notebook you wish to store this note in, and add a text note of your own.
When adding tags to web clips, you’ll be able to quickly select from tags you’ve already used as you start typing.
Once you’re finished adding the info you want, click Clip. Evernote will then prepare the note, which may take a few moments, depending on the size of the page you clipped.
You’ll then see a small preview of the note in the window. You can now just close the window and go back to browsing, or you can choose to view the note in Evernote online. Your note will automatically be synced to any devices you use Evernote on, so you could alternately check your favorite Evernote app.
Here’s the note in Evernote web. Note that it included all the content from the article, including images and links, so you can now find the info you needed quicker than ever. You can also click Go to source to look the page back up.
Now, let’s say you came across our review of Evernote Essentials, and wanted to save it as well. Just click the Remember button as before. This time, you’ll notice a button on the bottom of the web clipper that says Clips from Techinch.com.
Click this to see all the notes you’ve clipped from Techinch. Now you can easily go to the other pages you’ve clipped, or open the notes about them in Evernote.
You’ll see the same Site Memory in the Chrome Web clipper, so this will keep all of your notes and clips available whether you’re at home or in an internet café on the other side of the globe, using your laptop, a public computer, or your smartphone!
If you’re running your own website and would like to integrate Evernote into your articles, check out the Evernote button builder as well as their detailed instructions for integrating the button with WordPress and Tumblr sites. If you run into a problem adding it to your site, leave a comment below and I’ll try to help you get it working! Or, if you’ve already added it to your site, leave the link below so we can check it out!
And don’t forget … whenever you want to remember an article you read on Techinch, click the Remember button at the bottom. Feel free to tweet or Like the article on Facebook, too!
Regular readers may have noticed that I haven't posted my HowtoGeek.com articles on Techinch lately. This isn't for lack of articles; I wrote more article than ever last month, though I'm doing less during the semester. Actually, I simply haven't posted them because I haven't found the time. So, if you'd like to keep up with all my HowtoGeek.com writing, be sure to follow me on Twitter ... I retweet all the article I write, so you shouldn't miss anything.
Want to check out some of the latest features in calculator in Windows 7? This quick video will help you get a quick overview of how it works and some of the new features it includes. Enjoy!
I made this video actually just to test out Camtasia Studio 7, but it worked so good that I hope to do more videos here in the near future. If you have any input or suggestions, please let me know!
Are you wanting to learn more about WordPress? From mainstream websites to personal blogs, WordPress is one of the most important and powerful publishing platforms today. There’s a wealth of information of information available online, but it can be very difficult to learn everything there is to know about something as big as WordPress from scattered blog posts and articles. That’s where Digging into WordPress fits in. Keep reading for our review of the latest version of this impressive book, and for an opportunity to win one of 2 copies we’re giving away this week!
Digging into WordPress is a great eBook that gives you a through WordPress education in a fun and exciting way. It is aimed at users that know at least some HTML, CSS, and PHP, but if you even have the slightest knowledge of web design and have a strong desire to push on and learn more, you’ll be able to learn a lot from this book. Best of all, it was recently updated for WordPress 3.0! Whether you’re still trying to learn your way around WordPress, are trying to hack your favorite Elegant Theme or WooTheme to work the way you want, or are trying to become the new 3rd most important person in WordPress, this is the book for you. It covers all the following and more:
Unique ways to secure your WordPress site
Great ways to incorporate Twitter and other social media into your site
In depth SEO information
Using WordPress as a CMS with custom Taxonomies, fields, post types, and more
Creating and using WordPress child themes
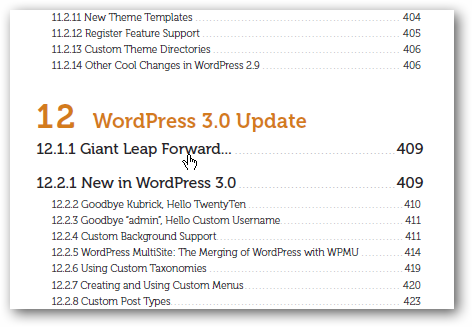
Over 20 pages devoted to the latest WordPress 3.0 features, including WordPress MultiSite, custom menus, and more, with WP 3.0 specific updates throughout the book
With all that content, Digging into WordPress is a massive eBook, with nearly 450 pages of tips, tricks, and instruction. It’s also a beautiful book that looks great on your netbook or eReader screen!
If you’re a visual learner, Digging into WordPress will be especially helpful. It frequently includes screenshots of websites and WordPress admin screens to illustrate what its talking about. The whole book is beautifully designed, which makes it a pleasure to read while still giving you a ton of WordPress instruction.
The book is filled with sample code that can help you do exactly you want to with your WordPress themes and backend PHP, even if you only have a basic understanding of PHP coding. You always learn more when you learn by doing, so be sure to try out the code on your own site or WordPress test install so you’ll really understand how it works. And if you’re already an advanced WordPress developer, it can be a great resource of code snippets for those little, hard-to-remember functions.
But it’s not all code, work, and study … Digging into WordPress is fun, too. It’s filled with funny and inspirational quotes, pointers, and off-the-wall remarks that break up the monotony of studying. This book is as informative as a textbook, but if you’re any bit into web development, it’ll be as fun to read as a tech book can be.
As mentioned before, the book has been fully updated with WordPress 3.0 information, so you’ll be armed with the latest tools when you set off to create your own new themes. Best of all, if you purchase a copy of Digging into WordPress (or have purchased one in the past), you’ll receive free updates to the book when they’re published! So you’ll learn about WP 3.0 today, and will also get the latest information when new versions of WordPress are released in the future. Technology changes daily, so too often, books are outdated as soon as you buy them. Not Digging into WordPress … it’s a living eBook :)
We’re very impressed with the content and quality of this book, and highly recommend it. If you’d like to see more, be sure to check out the free sample chapter. Or take a look around the companion site, DigWP.com; it includes an amazing amount of WordPress tips and tricks, such as this great tip on using Tumblr-style link posts in WordPress!
Usually, when I finish reading a tech book, I think I wish it’d covered whatever better, but this book left no room for missing information. You’re supposed to point out where books came short in reviews, but I couldn’t find anything to critique. 450 pages of content, up to date information, full-color graphics, and free updates in the future … what’s not to love? If you’re wanting to learn more about WordPress, this is the book to get!
Win a Free Copy of Digging Into WordPress
[box type="info"]Update: Our contest is now closed, and the winners are Roger and jawshua. Thanks everyone for participating!
Best of all, we’re giving away 2 PDF copies of Digging Into WordPress! To enter, simply leave a comment below and let us know why you want to read Digging into WordPress, or follow us on Twitter (@techinch for just Techinch posts, or @maguay for more random tech stuff and interesting posts), and tweet the following or just click Tweet at the bottom of this post:
Important: Make sure to mention @maguay or @techinch in the Tweet, or we may not see it and won't be able to count it in this contest!
Want a better chance at winning? Leave a comment and retweet this post for 2 entries! The contest closes at midnight Friday, September 10th, EST time, so make sure to comment before then.
If you don’t win the contest, don’t despair. You can still purchase a copy and learn all the great tips yourself. The eBook version costs $27, and comes with fully free updates. Digging into WordPress has already gone through 3 major versions, and if you purchased a previous version, you automatically got a new copy for download as soon as it came out. It even includes several WordPress themes for free! This all makes it one of the best WordPress book deals available. You’ll be able to take advantage of all the tips and information in the current version, and will be able to keep your knowledge up to date as WordPress evolves!
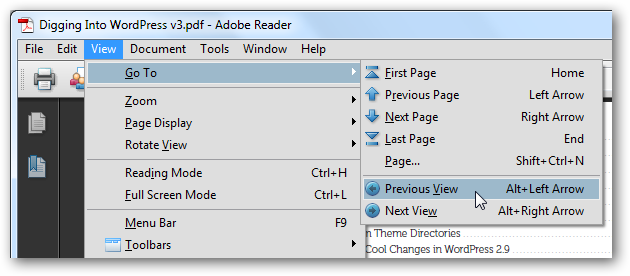
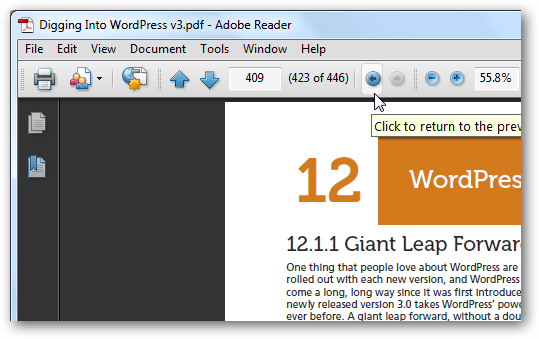
Have you ever clicked a link to another page in a PDF, only to have to scroll for forever to find the page you started at when you were done? If you’re using Adobe Reader, there’s no back or forward button in the toolbar, so without digging there’s no way to just go back. You could click View > Go To > Previous View, but that’s way too much trouble.
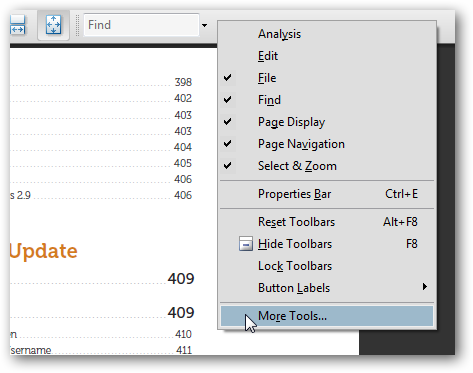
You might notice that the Go To menu shows you keyboard shortcuts for going back and forward: Alt+Left Arrow or Alt+Right Arrow, respectively. Or, you can just add the Previous and Next buttons to the toolbar. To do this, right-click the toolbar and select More Tools.
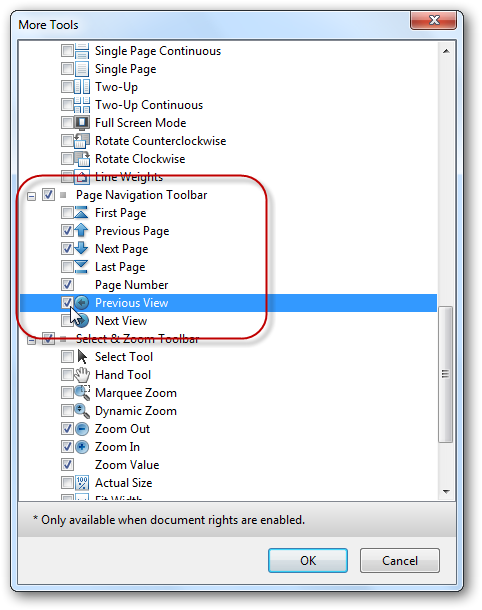
Scroll down to Page Navigation Toolbar, and check the Previous and Next button’s boxes to select them.
When you’ve made your selections, click Ok to close the dialog. Now you’ll see new Back and Forward buttons in your toolbar.
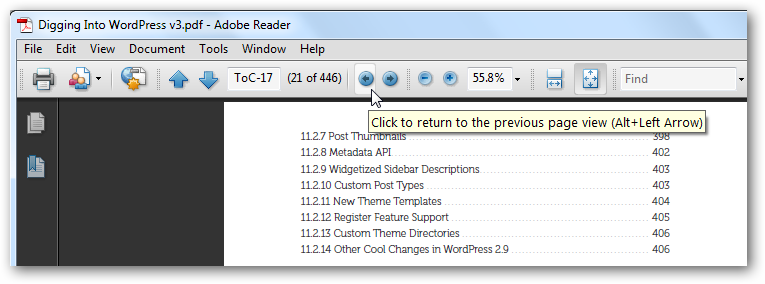
So let’s see how this works. Here I’m looking at the index for Digging into WordPress, and I clicked a link to jump to that page in the PDF.
Nice. Now I’ve seen what I needed, and want to go back to the Table of Contents. A click Back click, and I’m back where I started.
Once again, this isn’t an amazing, breakthrough feature, but it is a small thing that can make Adobe Reader a little nicer. As I find myself spending more time using my netbook as an eBook reader, these are the kinds of things that can make study, research, and more easier and simpler.
Do you have any Adobe Reader tips that are often overlooked? Feel free to let us know in the comments!
Would you like to backup your computer to make sure your data is always available no matter what happens? There are many ways to backup your computer, but the only way to make sure your data won’t get lost or destroyed is to store it in the cloud. Cloudberry makes it easy to backup your whole computer to a variety of online storage services, so let’s see how you can use it to backup your computer to Amazon S3.
Cloudberry Backup is a great application that makes backing up your data online as easy as backing it up to a DVD or external hard drive. We’ve previous covered how you can use Cloudberry to Backup Your Data to Windows Azure. We’re now going to look at backing up your computer to Amazon S3, which previously required a different version of Cloudberry Backup. The new 1.7 update, however, added all the backup options to all versions of Cloudberry backup, so you won’t have to worry about which version to buy. If you’re just getting started, you can get this version today, or if you’ve already purchased Cloudberry, you’ll have access to the new features for free once you’ve updated.
Setting Up Cloudberry Backup
Of course you’ll first need to install Cloudberry backup on your computer. Once you’ve purchased it or downloaded a trial, install it as normal.
Then, when you first run it, enter your email address and license key, and click Activate. Alternately, if you’re installing it as a trial, click Request Trial at the bottom instead of entering your license key.
After a few moments, you’ll be notified that your copy of Cloudberry is activated. Click Ok to get started.
You’ll be greeted with the launch screen as it loads. Note that now it doesn’t say what storage service it’s designed for, as the new 1.7 version includes support for all of the available storage options.
Now you’ll see the Cloudberry interface, where you can start your backup and keep your data secure.
Start Your Backup on Amazon S3
Now you can start backing up your computer online. Click Setup Backup Plan to get started.
Click Next to start setting up your backup plan.
Select the backup plan you’d like to use. Advanced Mode offers many special Cloudberry features, such as backing up files larger than 5Gb, resuming failed uploads, and encrypting data. The Simple mode, on the other hand, offers less features, but you may find it preferable since you can access your files on S3 with any S3 tools.
Once you’ve chosen the plan you want, select the Cloud Storage service you’d like to use. We’re selecting Amazon S3 in this test, but again, you can now use the same version to backup to Azure and several other services as well. Select Create a new account if you haven’t added your Cloud Storage info to Cloudberry yet.
For you S3 account, you’ll need to enter your Display name, Access key, and Secret key. If you don’t know where to find this info, or still need to setup your Amazon S3 account, checkout our article about How to Setup Your Amazon S3 Account.
Now, select the files and folders you’d like to backup. Most of the files you’ll want to backup will be in your Users folder, though feel free to select any folder that’s mission-critical for you!
You can then select to backup all the files in the folders, or to skip certain files. If you already have an existing backup and only want to backup new files, the new 1.7 version now lets you choose to only backup files created after a certain time.
Next you can choose to compress your files to save storage space, and if you chose Advanced mode previously, you can choose to encrypt your files as well. You can also select to use Reduced Redundancy Storage on Amazon S3 from this page. This lets you store files for only $0.10/Gb/month, versus the standard $0.15/Gb/month, though your files will not be stored as redundantly on S3. This is generally a fine option for standard personal backups, and I personally use it.
The next page is one of the most interesting. You can choose to keep multiple versions of files so you can access previous versions and revert changes, and you can also select to have files that were deleted locally deleted online after a certain amount of time. This is a new option to the 1.7 version, and is a great help at keeping your backups manageable while still letting you recover accidently changed or deleted files.
Now choose the schedule you want your backup to run on, and you can specify the time down to the minute. This is another new feature in the 1.7 version, and it’s very nice to be able to plan your online backups this much.
Cloudberry can automatically send you an email when you backups are complete or fail. Enter your info if you’d like to activate this feature.
You’re almost finished now. Enter a name for your backup plan, and click Next.
CloudBerry will now present you with an overview of your backup plan. If everything looks correct, click Next to finish.
You’ll now see your new Backup plan listed under the Backup Plans tab. Click Run Backup Now to start backing up your data immediately.
You’ll be able to see CloudBerry’s progress as it uploads and backups your files to Amazon S3 or other cloud storage accounts you may have chosen. You can pause or stop backups as well if you realize something is wrong. Do note that uploading your entire backup may take a fair amount of time, especially if you have a lot of data on your computer. It may be a good idea to start your backup at night or another time you don’t need your computer, and let it run unattended as it will take several hours to upload the files.
You can also follow the backup progress from your taskbar. Simply hover over the CloudBerry icon to see how the backup is going.
Once your files are backed up, you can browse them from the Backup Storage tab. Here you can see each individual file and folder stored in your Amazon S3 account.
If you realize later you don’t need some of the files on your backup, simply select them, right-click and select Delete Selected Items so they’ll stop taking up space in your online storage. You can also restore individual files this way, so if you accidently delete a file you can always quickly restore it.
For the most part though, you shouldn’t need to worry too much about your data taking up too much space. Amazon S3 storage costs $0.15/Gb/month, and an equal amount for uploading and downloading data. And, if you chose the reduced redundancy option, you’ll only pay $0.10/Gb/month for data storage. This means you’ll spend the most the first month, but after that you’ll likely spend at most a couple dollars a month on S3. You can store 20Gb for $2/month on the reduced redundancy plan, or $3/month on the standard plan. Not too bad, considering you’ll be almost absolutely certain you’ll never lose your backups!
Conclusion
No matter how wired your home and office are, today most of us keep some of our most valuable documents and memories in digital form. There’s no reason to risk your computer dying and losing all of your important files; with cloud computing, you can make sure you can still get your important files even if you lost all of your backup files since you can never lose the cloud. CloudBerry makes it affordable and simple to get started backing up your files online. Amazon S3 generally works out the cheapest right now, but Windows Azure is very similarly priced and is easy to setup for backup as well. Now you can backup to either service you want, or even both, from the same version of CloudBerry, so you don’t have to worry about making the wrong choice. The only wrong choice now is to not backup your files!
CloudBerry Backup costs $29.99, and updates are free, so if you’ve already purchased CloudBerry you’ll be able to get the latest 1.7 version absolutely for free! Amazon S3 and Azure are both free to setup, and will only cost once you have data stored in them.
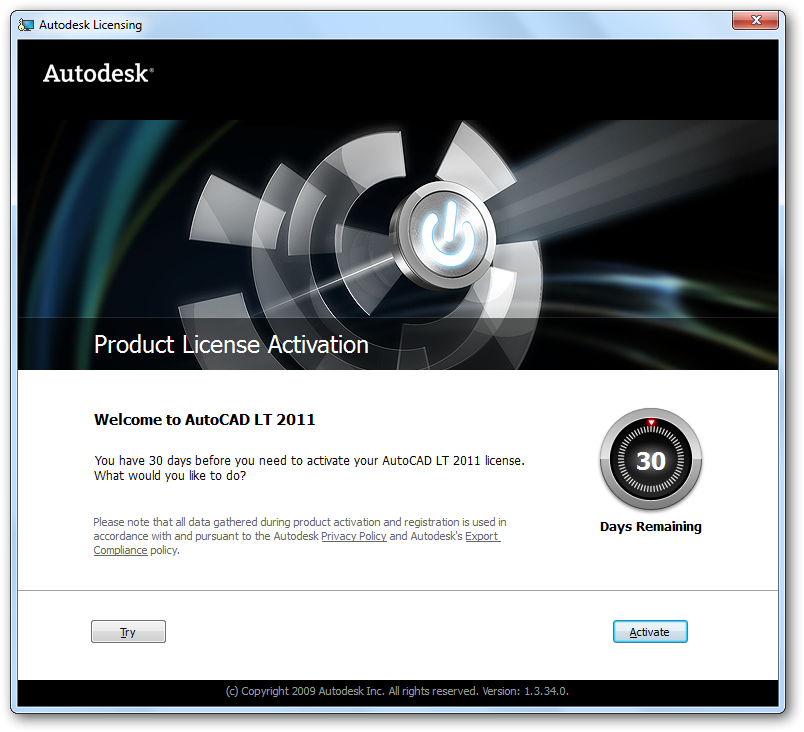
AutoCAD LT 2011 nicely offers a 30 day trial that’s full-featured, and even if you already own a full copy of AutoCAD LT 2011 it may be a good idea to run on the trial for a bit to make sure everything is set up perfectly. As mentioned in the article on Installing AutoCAD, you’ll be prompted to activate or continue in trial mode each time you open the program. You’ll be able to see how many days you have left until you’ll have to activate your copy.
You can click Try to continue in Trial mode, but you’ll see the prompt the next time you launch the program. Once you’re ready to activate, simply click the Activate button on the bottom right of this dialog. AutoCAD will immediately start the activation process over the internet.
Login with your Autodesk User ID, or if you don’t have one, click Create User ID Now.
Fill out the form with your personal information, and select a User ID and Password. Near the bottom, you can choose if you’d like to receive news and updates from Autodesk. Click Next to continue.
You may have to wait a few moments while AutoCAD activation contacts the servers and makes sure your user ID is available.
Next, select whether this copy of AutoCAD is being registered to an individual or a company, and enter the correct information.
Autodesk may send back a corrected version of your address with a full, extended zip code or corrected street names. Accept the corrections if they’re ok, or go back to edit your info.
Now that your account is setup, select it and click Next to activate your software to this account.
Moments later, you’ll see this screen letting you know that your product has been successfully licensed. If you’d like to see your registration information, click the html link on the left; otherwise, click Finish to close the window.
You’ll now notice that AutoCAD now says NOT FOR RESALE on the top of the window, instead of Unregistered.
Now that your copy of AutoCAD is fully licensed, you can use it as long as you want without restrictions. This copy is now registered to the computer it’s installed on, but you can move your license temporarily or permanently to another computer if you need. We’ll show you how to do this with the License Transfer Utility in an upcoming article.
If you haven’t already read our other AutoCAD article, be sure to check them out, and check back for more soon!
![sshot-2010-07-14-[13-23-18]](https://techinch.com/wp-content/uploads/2010/09/sshot20100714132318.png "sshot-2010-07-14-[13-23-18]")
![sshot-2010-07-14-[13-23-05]](https://techinch.com/wp-content/uploads/2010/09/sshot20100714132305.png "sshot-2010-07-14-[13-23-05]")
![sshot-2010-07-14-[13-23-25]](https://techinch.com/wp-content/uploads/2010/09/sshot20100714132325.png "sshot-2010-07-14-[13-23-25]")

![sshot-2010-07-14-[13-24-15]](https://techinch.com/wp-content/uploads/2010/09/sshot20100714132415.png "sshot-2010-07-14-[13-24-15]")
![sshot-2010-07-14-[13-25-00]](https://techinch.com/wp-content/uploads/2010/09/sshot20100714132500.png "sshot-2010-07-14-[13-25-00]")


![sshot-2010-08-18-[15]](http://techinch.com/wp-content/uploads/2010/09/sshot2010081815.png "sshot-2010-08-18-[15]")
![sshot-2010-08-18-[16]](http://techinch.com/wp-content/uploads/2010/09/sshot2010081816.png "sshot-2010-08-18-[16]")
![sshot-2010-08-18-[17]](http://techinch.com/wp-content/uploads/2010/09/sshot2010081817.png "sshot-2010-08-18-[17]")


![sshot-2010-08-11-[3]](https://techinch.com/wp-content/uploads/2010/08/sshot201008113.png "sshot-2010-08-11-[3]")
![sshot-2010-08-11-[7]](https://techinch.com/wp-content/uploads/2010/08/sshot201008117.png "sshot-2010-08-11-[7]")
![sshot-2010-08-11-[8]](https://techinch.com/wp-content/uploads/2010/08/sshot201008118.png "sshot-2010-08-11-[8]")

![sshot-2010-08-11-[10]](https://techinch.com/wp-content/uploads/2010/08/sshot2010081110.png "sshot-2010-08-11-[10]")

![sshot-2010-08-11-[13]](https://techinch.com/wp-content/uploads/2010/08/sshot2010081113.png "sshot-2010-08-11-[13]")
![sshot-2010-08-11-[14]](https://techinch.com/wp-content/uploads/2010/08/sshot2010081114.png "sshot-2010-08-11-[14]")
![sshot-2010-08-11-[19]](https://techinch.com/wp-content/uploads/2010/08/sshot2010081119.png "sshot-2010-08-11-[19]")

![sshot-2010-08-11-[29]](https://techinch.com/wp-content/uploads/2010/08/sshot2010081129.png "sshot-2010-08-11-[29]")
![sshot-2010-08-11-[30]](https://techinch.com/wp-content/uploads/2010/08/sshot2010081130.png "sshot-2010-08-11-[30]")
![sshot-2010-08-11-[31]](https://techinch.com/wp-content/uploads/2010/08/sshot2010081131.png "sshot-2010-08-11-[31]")
![sshot-2010-08-11-[32]](https://techinch.com/wp-content/uploads/2010/08/sshot2010081132.png "sshot-2010-08-11-[32]")
![sshot-2010-08-11-[33]](https://techinch.com/wp-content/uploads/2010/08/sshot2010081133.png "sshot-2010-08-11-[33]")

![sshot-2010-08-11-[36]](https://techinch.com/wp-content/uploads/2010/08/sshot2010081136.png "sshot-2010-08-11-[36]")

![sshot-2010-08-11-[39]](https://techinch.com/wp-content/uploads/2010/08/sshot2010081139.png "sshot-2010-08-11-[39]")
![sshot-2010-08-11-[40]](https://techinch.com/wp-content/uploads/2010/08/sshot2010081140.png "sshot-2010-08-11-[40]")
![sshot-2010-08-11-[41]](https://techinch.com/wp-content/uploads/2010/08/sshot2010081141.png "sshot-2010-08-11-[41]")
![sshot-2010-08-12-[72]](https://techinch.com/wp-content/uploads/2010/08/sshot2010081272.png "sshot-2010-08-12-[72]")
![sshot-2010-08-12-[77]](https://techinch.com/wp-content/uploads/2010/08/sshot2010081277.png "sshot-2010-08-12-[77]")
![sshot-2010-08-19-[16]](http://techinch.com/wp-content/uploads/2010/08/sshot2010081916.png "sshot-2010-08-19-[16]")
![sshot-2010-08-19-[17]](http://techinch.com/wp-content/uploads/2010/08/sshot2010081917.png "sshot-2010-08-19-[17]")
![sshot-2010-08-19-[18]](http://techinch.com/wp-content/uploads/2010/08/sshot2010081918.png "sshot-2010-08-19-[18]")
![sshot-2010-08-19-[19]](http://techinch.com/wp-content/uploads/2010/08/sshot2010081919.png "sshot-2010-08-19-[19]")


![sshot-2010-08-19-[23]](http://techinch.com/wp-content/uploads/2010/08/sshot2010081923.png "sshot-2010-08-19-[23]")
