Are you wanting to start a new WordPress-powered website, but need more power and flexibility than WordPress.com offers? WordPress.com is a great place to start out blogging, and it even works great for simple, small business websites, but if you want to take advantage of the ecosystem of amazing themes and plugins available for WordPress, you’ll have to move to self-hosted WordPress.org. This means you’ll need to find a hosting company, install WordPress, and then configure it to be as secure as possible. It’s not too hard if you’re a geek, but if you’re just wanting a website that just works, it’ll likely take way more configuration and tweaking than you’ll want.
Enter Page.ly. Page.ly is a dedicated WordPress.org hosting service that let’s you setup a full WordPress website in minutes. It’s as easy purchasing a book from Amazon; simply enter your info, and seconds later your WordPress site will be setup. And it’s not limited like WordPress.com; you’ve got the full power of WordPress.org at your fingertips, running on secure FireHost with nighly backups. You won’t need to setup MySQL databases, change .htaccess files, or even install standard plugins … everything’s setup for you and maintained automatically! WordPress is famous for being easy to install, but it’s only easy to install if you know what you’re doing; otherwise it can be rather difficult.
So how does it really work? Check out this video from Page.ly to see how easy it is to setup a new WordPress-powered site:
That’s easy! Signup, get extra premium themes and features, add some posts, and you’re set!
Now, if you already know the ins and outs of running webapps, or want to learn more and put your knowledge to the test, then running your own WordPress setup on a hosting account (such as DreamHost) may be the best option. But most users simply want to get a website up and running, and don’t care about the technical details. Page.ly is a great option for this. You get the power and simplicity of WordPress without the headache of managing a hosting service and keeping your site secure.
Page.ly costs $14.95/month, which for full hosting, support, and backup is not a bad price. But, you just might not have to even pay that, because Page.ly is currently running a 1st year birthday giveaway, including 2 free iPads and several free-for-life Page.ly accounts. Head over to their blog for more info, so you can get a shot at a free site and an iPad!
Or, if you’d like to go ahead and get your new site on Page.ly, feel free to Signup Today!
P.S. - I haven’t personally tried it out (though I’d love to if I won the contest ;) ), so let me know how Page.ly works for your! Here at Techinch I aim to make technology simpler for everyone, and Page.ly has definitely made WordPress.org simpler to use. That’s always a good thing!
Want to start designing the next skyscrapers, green cars, or blockbuster animated films? Here’s how you can get all the Autodesk tools you need absolutely for free while you’re in college!
With the rising cost of college tuition and textbooks, students are being squeezed for funds on every end. Thankfully there’s one major area that being a student really can help you save money: software. Most companies offer steep discounts on software for students. Lately, though, many companies have began offering programs for free to students online. We’ve already covered how you can get free design and development programs from Microsoft with Dreamspark, so let’s look at Autodesk’s similar program that lets college students get an amazing amount of programs for free!
Get Signed Up
It’s easy to register for the Autodesk Education Community if you’re a currently enrolled student or facility member of a college or university. Head to the Autodesk Student website (link below), and click the Join the community today link on the front page.
Enter your information in the form as normal. Make sure to select Student in the drop-down menu if you’re a current student, and enter your student email address and ID number. Click Submit at the bottom of the form to finish your registration.
You’ll now be informed that your registration is complete, so go check your email for the activation link.
You should receive the email within minutes, though if you don’t see it, check your spam folder. Once you’ve got the email, click the link in it to activate your account.
Congratulations … you’re now a member of the Autodesk Education Community! Autodesk will ask you to invite your friends to the program, but you can skip this if you want. Click the Take me to the website! button at the bottom to access your new account.
You may see a notification informing you of the new features in the Education community. You can select to make your profile public as well so you can share your Autodesk design work with family, friends, and more. Or, just click Continue to access the student website.
Downloading Autodesk Software
Once you’re signed in, you’re all ready to start getting new software to use. Click the Go to Download Center link to get started.
You’ll be presented with 25 different Autodesk products to choose from, and you can download and install as many of them as you like! As you may notice, some of the programs are available from both Windows and Mac OS, though most Autodesk software is only available for PCs right now.
Once you’ve found a product you want to download, select the version you want to get it.
Now you can download the program you’ve selected, and get a serial number to activate your product. Most of these downloads are very large, so they may take several hours to download, depending on your internet connection.
Many of the programs are not time limited, but they are all student editions and are only licensed for educational and personal use. Some of them, however, such as 3ds Max and Maya, are limited to a 13-month license. This is still plenty of time to use it in several classes and advance your 3d modeling skills.
The Autodesk Education Community
The Autodesk Education Community is more than just a place to get free software. It’s also a great portal to learn more about how to use Autodesk programs so you’ll have the edge in your field when you graduate. You can also network with fellow students here, share your designs and portfolios, and learn from your peers.
You can even find out which programs are popular at your school, and see profiles of your classmates and what programs they’re using. This might be a great way to find students with similar interests to collaborate on projects!
Conclusion
No matter what you’re wanting to design, the 25 products available from Autodesk for free should give you a huge jumpstart on your education and future career. As noted before, these programs are only licensed for educational and personal use, and will mark your saved files as such, but it’s still an amazing amount of programs. Whether you’re required to use one of these programs in your classes or would simply like to try it out and expand your knowledge, there’s tons here to explore. Check out our recent reviews of AutoCAD 2011 LT for more info about Autodesk programs as well! Let us know in the comments what Autodesk programs you’re excited about trying out!
Were you disappointed to find that Photoshop Elements doesn’t contain some of the features you need? Photoshop Elements is a great, economical solution to full Photoshop, but it’s missing some vital tools you may need to use with your images. Whether you’re trying to view layers inside groups, edit color curves directly, or use layer masks, you may have already been frustrated at some of the limitations in this otherwise excellent program.
That’s where Elements+ comes in. Elements+ is a $12 addon for Photoshop Elements that unlocks some hidden features and gives your copy of Elements new functionality. Elements+ is available for all versions of Photoshop Elements for Windows and Mac OS X, so even if you’re still using an older version you can take advantage of the extra features this tool will unlock for you. Let’s look at how you can setup and use these tools in Photoshop Elements.
Please Note: Here you’ll see Elements+ running in Photoshop Elements 8 on Windows 7, but the process is the same on any OS or version of Elements.
Setup Elements+
First, you’ll need to purchase a copy of Elements+. Head over to their website (link below), select the version of Photoshop Elements you own, and purchase as normal. Once the purchase is done, you’ll receive an email with a link to download your copy; click the link in the email and save the installer to your computer.
If you’re not certain which version of Photoshop Elements you’re using, open Photoshop Elements, select Help in the menu, and then click About Photoshop Elements.
This will open a splash screen that shows which version you’re running. As mentioned before, I’m using Photoshop Elements 8 in this article as you can see below.
Once it’s downloaded, you’re ready to install Elements+ on your computer. Close Photoshop Elements if you have it open, and then run the installer as normal.
Note that Elements+ will install itself into the main Photoshop Elements program folder so Photoshop Elements can access the new tools.
The installer will also ask to create a desktop icon for the Elements+ documentation. It may be a good idea to let the installer place this icon on your desktop even if you don’t usually, as this will be the easiest way to see the Elements+ help files. Feel free to move the shortcut elsewhere after the install is finished if you like.
The installation only took a few minutes, and once it’s finished you can run Photoshop Elements and check out your new tools. Let Photoshop sit for a few minutes after opening it, as it has to rebuild its icon cache before you can use it. This took about 5 minutes for me, but this may vary depending on your computer. You’ll know it’s ready when your computer quits showing the program is busy (clever trick, I know!).
Using Elements+
To find the new tools from Elements+, select the blue square Photo Effects button in the Effects gallery on the right side, and then select Elements+ in the drop-down menu.
This will show 8 new effects in the pallet that you can choose from, though each of these effects actually contain a number of tools. Photoshop Elements doesn’t let you see the effect names, so you’ll need to hover over each one to see what it does. The tools include:
Just like any other Photoshop Elements Effect, click the Elements+ effect you want, drag it and then drop it on the image you’re editing.
Unlike most effects, the Elements+ effects will open a dialog where you can select extra tools. Some of these are custom-built tools included in Elements+, while others simply activate hidden features in Photoshop Elements. Depending on the effect you selected, a different Elements+ dialog will appear; here you see the dialog that opens when you drag the Color & Tone effect to your image. Double-click the option you want to activate it.
Photoshop Elements includes a hidden Curves tool that you can activate with this tool. Notice in the above dialog that you can select RGB or the individual colors, and then double-click Curves to open the nice curves tool you see below. Not as advanced as the full Photoshop Curves tool, but still much nicer than the built-in Elements curves tool.
There are tons of tools you can explore in Elements+. Want to quickly create a layer mask, or isolate an image from its transparent background? Try the Selections effect.
Double-click on Load Layer Opacity, and the non-transparent part of your image will be selected.
With another double-click, we can mask the selection. Very useful, and it only took a couple seconds.
One problem I quickly hit in Photoshop Elements was using layered PSD files. I enjoy tweaking WordPress themes, and most professional themes included layered PSD files that you can edit and tweak to style your theme like you want. Only problem is, most layered PSDs include the layers in layer groups, and Photoshop Elements can’t open layer groups by default!
Elements+ fixes this problem. Drag the Layers effect onto your layered PSD file, and a new Layers dialog will open. You’ll see all of your layer groups on the left side. Double-click Ungroup Current Set to see all the layers in this group.
Do note that this tools is somewhat resource intensive, and took a few minutes to load on larger PSD files.
After a few moments, you’ll see your new layers open under the Layer Group folder on your Layers panel. You can now tweak and edit them as you wish, and even re-group them with the Layers tool when you’re finished! This tool alone is more than worth the cost of the plugin if you need to edit layered PSD files from others often.
Another nice feature for web designers is the Text tool in Elements+. Here you can convert text into a path or shape, set anti-aliasing settings, and more.
The Scripts effect gives you the ability to extend Elements+ with your own scripts or those you find online. There are some handy pre-installed scripts included as well that can let you batch process images, stamp images with meta data, and more. You’ll also find some Elements+ stuff in here too, such as Options and a link to the website.
That’s just a quick sampling of the features included in Elements+. Feel free to explore Elements+’s online help to see more, or just go ahead and purchase it so you can take advantage of the features for yourself!
Conclusion
While Elements+ won’t turn your copy of Photoshop Elements into a full-blown copy of Photoshop CS5, it does unlock some handy features that will make your design life easier. I’ve been amazed at how powerful and fast Photoshop Elements 8 is, and use it as my primary image editor for personal photos and images I use in writing. One problem I’d run into with web development was working with layered PSD files in WordPress theme files in Elegant Themes and other themes, so Elements+ has let me take full advantage of my themes by letting me open layered PSD files. Try it out, and let us know in the comments what Elements+ feature is essential for you!
Last fall, Microsoft launched Windows with commercials stating that Windows 7 was my idea,so it seems like a good idea to let Microsoft know what we the users want to see in Windows 8. A number of technology blogs are currently running a survey from Michael Pietroforte to let their readers all give feedback on different features they’d like to see in the next version of Windows, and I’m excited to let Techinch readers join in as well.
Features:
Here’s the features that’ve been featured in this poll. Read through them if you’re not sure what to vote, or just skip ahead and vote if you’re a Windows geek and already are certain what you want.
New user interface
Android and iOS are good examples of operating systems with innovative user interface models. Even more revolutionary will be Windows 7 Phone. These examples show that OS interfaces beyond the Windows Start Menu and the Windows Taskbar are possible.
Support for different form factors
Support for different form factors, such as tablets and netbooks, includes the ability to run Windows with minimal hardware requirements and on devices with small screen sizes (as small as 5''). Optimization for touch, the ability to run Windows without mouse and keyboard, and orientation detection are other essential features.
More modularity
Linux is a good example of a modular operating system. It allows you to install only those OS components you really need. This would require a package manager that resolves software dependencies. The advantages of more modularity are lower hardware requirements, a reduced attack surface, and simplified patch management.
Third-party patch management
Third-party management would allow you to update common Windows applications of third-party vendors through Microsoft's online update service. Linux has this feature for as long as I can remember.
Bare metal hypervisor
A bare metal hypervisor would enable you to run multiple Windows installations simultaneously on a PC. You could move your virtualized Windows installation with all applications to another PC or to a VDI environment by simply copying the virtual system drive.
Application virtualization
Virtualized applications run in an isolated environment that ensures no modifications to the OS are made during installation and at runtime. Application virtualization can solve compatibility issues and improves security.
Application streaming
Application streaming allows you to launch a Windows application from a remote server, for example, through the web, without the need to install the application manually. Application streaming solutions usually leverage application virtualization. An application streaming Windows API would enable third-party software vendors to offer Windows applications through the web.
Windows Store
Like Apple's App Store, Windows Store would allow you to buy and download third-party applications that have been approved by Microsoft.
Windows Restore Button
If you messed up your Windows installation, this feature would enable you to restore Windows to its original state without losing your data and without the need to reinstall all your applications.
Cloud APIs
Third-party software vendors could allow you to use cloud APIs to add cloud features to their applications. For instance, a web browser vendor could store your bookmarks, plugins, and browser settings in Microsoft's cloud or in the cloud of a third-party provider. That way, all your settings and data would automatically be available on every Windows machine you log on to.
New authentication methods
Wouldn't it be cool if you could log on to Windows or an online service with a smile at your web cam (facial recognition), with a friendly "Hi, it's me" (voice recognition), or by just touching your beloved PC (fingerprint recognition)? Biometrics applications have already been available for a while, but they will only have a fair chance of being adopted in the Windows ecosystem if Microsoft fully integrates these functions into Windows.
Instant-On
Instant-On means that Windows wouldn't have to boot up when you turn on your PC. Considering that computers are becoming more and more an integral part of our daily life, this could be an interesting feature for home users in particular. It is probably a must-have feature for tablets.
Malware protection
If Windows were delivered with integrated malware protection, every PC would be protected right after the installation, which would make the whole Internet a safer place. Third-party vendors could offer services such as antivirus signatures and antivirus applications that run on top of the Windows malware scanning engine. This would also reduce notorious compatibility problems with antivirus scanning engines and would even allow you to run multiple antivirus applications at the same time.
Better UAC
Compared to Sudo in the Linux world, UAC (User Account Control) is a fairly simple security privilege solution. A UAC with more configuration options could improve security, especially in business environments.
Migration from Windows XP
Windows XP is a very popular operating system and it will still probably run on many computers even when Windows 8 is released. These Windows customers would appreciate a seamless migration from Windows XP to Windows 8.
Better compatibility
Better compatibility includes better hardware and software compatibility with legacy hardware and software.
Better security
If you think that Microsoft should focus on improving the security features of Windows 8, then you should vote for this option.
Better performance
Speed is always important. If it matters most in your environment, then you should tell Microsoft now.
Less hardware requirements
If you intend to run Windows 8 on old computers, then you need a Windows 8 which requires only minimal hardware.
Less bloat
Some people think that Windows already has too many features and would prefer a slim Windows 8.
Vote!
Ready to vote? Select the number of stars you want by each item to show how important it is to you. Don’t care about a feature? Give it one star. You’ll die without this feature, or switch to a Mac? Better give that feature 5 stars. Here you go:
Thanks for Voting!
This exact same poll is being run on all the following sites, so if you’ve already answered there, please don’t vote again. Otherwise, sound off, and let’s tell Microsoft what we want in Windows 8. If you’d like, tell us in the comments what you chose so we can discuss the most popular features!
And thanks for creating this poll and letting us all participate, Michael Pietroforte!
Whether you’re developing a website with millions of daily viewers or simply are trying to keep your college finals from getting lost, it can be hard to always have your files accessible. High traffic sites need plenty of storage and bandwidth to keep their sites accessible no matter what, and the rest of us need our personal files and documents to be saved and backed up so we’ll always be able to access them even if disaster strikes our hard drives.
Amazon S3 is an online file storage service that manages to meet the needs of all these groups and more. S3 stands for Simple Storage Service, and it truly is easy to use once you’re started. You can store as little or as much data as you need, download it as many or few times as you want, and make it fully private or accessible to the public, all with this one service. And it’s priced to work for everyone. Storage costs start at $0.15/Gb/month for standard, 99.999999999% guaranteed storage, or just $.10/Gb/month for 99.99% guaranteed storage. Uploading and downloading files start at $.15/GB of transfer as well. The more you store or transfer, the more your prices will go down. So whether you’re wanting to backup your family pictures or host the images on your website, S3 can scale to fit your needs.
The great thing is, it’s not hard to use. Let’s see how to get registered for an S3 account, and then we’ll look at how to take advantage of your cloud storage in upcoming articles.
Signup For Amazon S3
When you’re ready to signup for an S3 account, head over to the Amazon S3 webpage and click the Sign Up button. You can also look around at the information on the page before you signup to get a better feel for what Amazon S3 has to offer.
Sign in with your Amazon account, or if you don’t already have one, click I am a new user and signup for a new Amazon account.
Now you’ll be asked to enter your contact information. If you already have purchased items through Amazon, your address may be pre-entered, though you can click Select a different address if you wish to use a different one on this account. You’ll also need to enter your company or website name; you can use any personal site here, or even a free WordPress.com or Tumblr blog if you don’t have a professional website. Finally, accept the AWS Customer Agreement, and click Continue.
You’ll now be asked to enter your payment info, though again, if you have an Amazon account it may show the cards that you have listed on your account already. Do note that you will not be charged for setting up your account; in fact, you will not receive any charge until you are storing files in the service.
Finally, review everything you’ve entered, and if it is correct, click Complete Sign Up.
Once you’re finished, Amazon will let you know that it’s activating your S3 service, and will email you when your account is ready. My account was activated within minutes, but this can take up to a few hours depending on your circumstances.
As soon as your account is ready to use, you’ll receive an email letting you know.
Access Your S3 Account Online
It’s easy to get started using your online storage. Just head back to the Amazon S3 site, but this time, click the Sign in to the AWS Management Console link on the top of the page. Or, click the link below to access the S3 Management Console directly.
Enter your Amazon account info you used to signup for the account, and click Sign in.
If you clicked the link in the Amazon S3 page, by default it will take you to the Amazon EC2 dashboard, so click the Amazon S3 tab to access your S3 account. The direct link listed below will take you to S3 directly.
Create a Bucket to Store Files In
Most of us only use buckets for water and sand, in S3, you use Buckets to store your files as well. You can think of a bucket like a drive on your computer, such as C: on your computer. You’ll need to create a bucket before you can use your account, so click the Create Bucket button on the left.
Enter a unique name for your bucket, and choose a location in the world to store your data. Amazon has servers around the world to store your data in, so choose a region near you for faster access, or near your customers or visitors if you’re serving files for a website. If you can’t find a name that works, check the S3 Bucket Naming documentation.
You can choose to setup logging so you’ll always know when files are uploaded and downloaded, or just click Create to continue.
Wait a few moments as Amazon S3 creates your bucket.
Once it’s created, you’ll see it in the list on the left side. You can now upload files to it from the blue Upload button, or right-click it to see the bucket’s properties or to delete it. We’ll explore more about the S3 Management Console in an upcoming article.
Getting Your Amazon S3 Access Identifiers
To use your S3 account with backup and archival applications such as CloudBerry Backup and Jungle Disk or website plugins such as W3 Total Cache or BackupBuddy, you’ll need to get your S3 Access Identifiers. Click the link in the email you received from Amazon, or click the link below to get your S3 Access Identifiers. Login as before, and then scroll down to see your Access Key ID. Copy it, and paste it into the application you need to use with S3.
You’ll usually need your Secret Access Key as well, so click the Show link and then copy this code from the popup as well. Make sure to keep these keys private, as they’re the secret pass to access your account through an application.
Conclusion
So that’s you you can get started with Amazon S3. It’s quite easy to get started with S3, and we didn’t have any trouble getting our account setup and running. We’ll be looking at ways you can use this online storage in upcoming posts, so experiment with it and check back here soon for more S3 info!
Or, if you’re interested in Microsoft’s new Windows Azure cloud computing system, check out our post about Getting Started With Windows Azure. It works great for backing up your files online, too, with CloudBerry for Windows Azure. There’s lots of options in the cloud today, so you can pick the solution that works best for you!
eBooks have one major advantage over their paperbacked cousins: they’re updatable. It’s impossible to update a paper book without printing a new edition or issuing correction sheets. But with eBooks, publishers can easily send out updates to book owners if they need to make a correction to a book. The problems with this, of course, are that some readers might want to keep their original eBooks even if they have been corrected, perhaps to prevent the absolute original book from disappearing. Amazon hit a nerve on this very issue last year when they deleted purchased books off of users devices over copyright issues, including, ironically enough, George Orwell’s 1984. Amazon publically apologized about the way they handled the incident, and promised to never automatically delete books without the customer’s permission.
This week I was able to experience how Amazon now handles updates for Kindle books. Earlier this week I received an email from Amazon stating that one of my books had recently been updated. The email asked me to reply if I wished to received the updated book, and basically read as follows:
Greetings from Amazon.com.
We're writing about your past Kindle purchase of the book. The version you received contained some errors that have been corrected.
An updated version of the book is now available. It’s important to note that when we send you the updated version, you will no longer be able to view any highlights, bookmarks, and notes made in your current version.
If you wish to receive the updated version, please let us know via e-mail at amazonkindle-feedback@amazon.com.
If you prefer, you can reach us by phone directly and toll free from many countries by clicking the Contact Us option in the right-hand column of our Kindle Support pages at:
http://www.amazon.com/kindlesupport
We apologize for any inconvenience caused and thank you for your business with Amazon.
Nice support! I figured I might as well get the updated version of the book, and replied to let them know. They replied to let me know that the book had been updated on my account, and to manually sync if I did not see the changes. Interestingly enough, the email included instructions to manually update the Kindle Device, and didn’t mention the other Kindle Apps, which was funny since I only use Kindle for PC.
At any rate, this shows that Amazon is definitely veering on the side of caution with eBook updates now. I would have been fine with a simple notification in the app stating that an updated version is available; perhaps they could implement this system in the future. Having to receive individual approval emails would seem like an administrative nightmare, but it is nice to know that Amazon is trying their hardest to keep the customer happy and not repeat the 1984 incident again!
For a number of reasons, mainly the wide variety of devices that are now compatible with Kindle content, Kindle is my preferred eBook solution and I always check it for books first before I check other retailers. If you haven’t given it a try, download Kindle for PC and download a free eBook or purchase one you’ve been wanting to read to see how it works for yourself.
Now that you’ve got AutoCAD LT 2011 out of the box, let’s get it installed on your computer. AutoCAD LT is a rather large program, so it may take several minutes to get it installed, but you can easily start it installing and work on other projects while it finished. Here’s how the setup process goes.
Getting AutoCAD Setup
First, you’ll need to know which edition to install. As mentioned in the unboxing article, you’ll find 2 DVDs containing the 32-bit and 64-bit editions, respectively, in the box. The 64 bit version is the best option if you’re running a 64 bit version of Windows, but if you’re running a 32 bit version, make sure to use the 32 bit installer. If you don’t know what edition of Windows you’re running, here’s how you can find out.
Quick Tip: If you’re running Windows in a virtualization program such as Parallels or VMware Fusion on a Mac, or VMware Player or Workstation on Linux, then you’re most likely running a 32 bit edition of Windows in it. Still, you may want to check to be on the safe side. AutoCAD is an intensive application, but AutoDesk does support it on Parallels for Mac.
Once you’ve decided which edition to run, insert the correct DVD into your computer. If the installer doesn’t automatically open, run the Setup.exe file on the disk.
Setup may take a few moments to initialize.
If you’re just wanting to install AutoCAD LT 2011 normally on your computer, click the Install Products link on the left side. You can also create specialized deployments for enterprise and network use, but for standard individual use you’ll just want to select Install.
Now, select the language and products to install. Your AutoCAD LT installer should additionally include Autodesk Design Review 2011, a program that can display files from other Autodesk products so you can review and mark them up. It will not be checked by default, but we recommend that you go ahead and check the box to install it.
If you’d like more info about the installation or Design Review, click the links on the left to open the appropriate help topics. Otherwise, click Next at the bottom to continue.
You may notice a progress bar on the bottom left as the remainder of the installer opens.
Once its loaded, accept the license agreement and click Next.
Enter your name, organization or business, and your AutoCAD LT Serial number and Product key. Alternately you can select I want to try this product for 30 days to install with a full-featured trial.
Note that you must enter a name for your organization, so if you’re installing it for personal or educational use or a self-employed job, you could enter your personal website or even your name in the organization field.
Now review your installation settings, and if everything looks correct, click Install on the bottom.
If you simply accept the defaults and don’t change anything, you may be prompted for confirmation. Click Yes to go ahead and install it.
That’s all! Now you can sit back and wait, and AutoCAD LT will install. The installer is very beautiful, and inspired us to want to go design a bicycle as soon as we got done installing it! If only we had a clue where to start…
You can follow the installation progress from the left side, which shows which components have been installed as they are installed. Do note that Autodesk Design Review is a 32 bit application, so you’ll notice that it installs both 32 bit and 64 bit components on 64 bit systems, but this is fine and will work the exact same.
If you want, you can even check out the installation progress from the window preview on your Windows 7 taskbar.
After a few minutes, the installer will inform you that the installation is finished. It took about 15 minutes in our test to install, though this may vary depending on your computer. Click Finish to exit the installer.
Running AutoCAD LT 2011 the first time
Once the installation is finished, you’ll be able to easily find your new AutoCAD products installed under Autodesk in your start menu.
Here’s the splash screen that displays while AutoCAD LT is loading.
You’ll need to activate AutoCAD LT 2011 within 30 days of installation, so you’ll be prompted to go ahead and activate it when it first loads. Click Activate Now to go ahead and activate it, or click Try to activate it later.
Then, you’ll be asked to submit data about your computer and product usage to help improve the product. You can choose to enter your email address as well if you like.
On the bottom of the dialog, you can select to see what data will be transmitted for the customer improvement program. If you select to preview your CIP Data, you’ll be directed to a page online that will show your system stats compared to those of other users around the world. This can be interesting even if you don’t want to participate in the program.
Finally you’ll see the welcome screen. This gives you several options to preview some of AutoCAD LT’s newest features.
Mouse over the entries to view more information, or click the play button that appears to open a screencast in your browser explaining the feature in detail.
Now you’re ready to start designing in AutoCAD LT 2011. This version features a slick and functional ribbon interface that takes great advantage of the Aero interface in Windows 7 and Vista. We’ll explore more features and how it integrates with the latest Windows features in the next article. Stay turned for more soon!
Ready to get started with AutoCAD LT 2011? AutoCAD is one of the larger programs you’ll install on your computer, just like Photoshop or Microsoft Office. But that doesn’t mean it’s difficult; in fact, we were pleased that the installer was so simple and easy to use, and in fact inspired us to go design as soon as it was installed. Let’s look at a quick unboxing, and then we’ll dive into the setup process.
AutoCAD LT 2011 Unboxing
AutoCAD LT 2011 is still sold by default as a packaged product, which is good for most users as it includes 2 DVDs in the package. This can take a long time to download, depending on your internet connection, so even if you prefer to purchase software electronically you might be better to go for the disk with this. You can purchase it as a boxed copy from Amazon.com or from select software retailers in your area. Or, you can get it directly from AutoDesk via download or DVD.
Here’s our copy fresh out of the FedEx envelope. Shiny!
Here’s a nicer, stock shot of the box cover:
On the back, you’ll see your Serial Number and Product key, as well as some copyright info about AutoCAD. Note that AutoCAD LT 2011 is fully Compatible with Windows 7, and we can confirm that it runs great on it.
Once you open the DVD case, you’ll see 2 DVDs as well as some support literature. The first disk on the top is the 32 bit installer, and the second is the 64 bit installer. Do note that you should remove the top, 32 bit disk before removing the lower 64 bit one.
Here’s everything out of the case. Our copy included a support brochure in 6 languages listing websites and phone numbers for technical support, as well as extended support options.
64 bit editions of Windows are quickly becoming the standard on new computers as more computers are sold with 3Gb or more of ram. Almost all computers sold nowadays, including netbooks with Intel Atom N45x processors and newer, are 64 bit capable, and most programs work just as good on the 64 bit version of Windows as they do on the 32 bit editions. Many new programs, including Photoshop CS5, Office 2010, AutoCAD 2011, and more are available in 64 bit editions to take full advantage of your hardware. If you’re wondering if your computer is running the 64 bit version of Windows to see which programs to install, here’s how you can tell what your computer is running.
See What Edition of Windows 7 or Vista You’re running
64 bit versions of Windows 7 and Vista are fairly popular, so if you have a newer computer running either of these you have a fair chance of your computer running the 64 bit version. If your computer came with 3Gb ram or more, it most likely came with the 64 bit edition preinstalled; otherwise, you likely have the 32 bit edition.
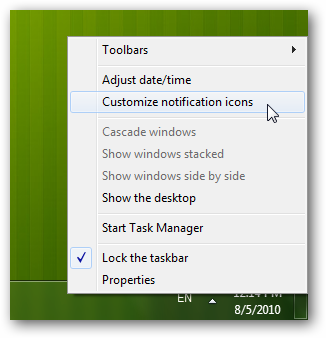
To find out for sure, open the Start Menu, right-click on Computer, and select Properties.
Fun Fact: Windows Server 2008 R2 is only available in 64 bit, so if your system is running it you’ll know for sure you’re running a 64 bit edition without checking.
This dialog will show what version of Windows you’re running near the top; this computer is running Windows 7 Home Premium as you can see in the green circle. Then, under System on down, you’ll see what processor your computer is running, as well as how much Ram you have. Underneath that you’ll see if you’re using a 32 bit version of Windows beside System type. This computer includes 1Gb of ram and is running a 32 bit edition of Windows as you can see in the red circle.
And here’s what it looks like on a computer running a 64 bit edition:
See if Your Computer Could run a 64 bit Edition
If your computer is running a 32 bit edition of Windows 7 or Vista, you can quickly see if your computer is capable of running a 64 bit edition. To do this, click your Experience Score rating; if you haven’t updated the score in a while, the link may say that the score needs to be refreshed, but it will still work fine for this check.
Click View and print detailed performance and system information to get more info.
Now, under System, you’ll see if your computer 64 bit capable or not. Here we see that this netbook is 64 bit capable!
See if Your Running a 64 bit Version of XP
The 64 bit version of Windows XP was seldom used, as it had to be purchased as a separate version and was not included by default. If you’re still running XP, most likely you’re running the 32 bit version, but you can check to be sure if you’d like.
Fun Fact: XP Mode on Windows 7 uses a 32 bit version of XP even if you’re using it on a 64 bit edition of Windows 7. So if you’re wanting to install a program in XP Mode, you’ll need to use the 32 bit version. If you’re using a program that does have a 64 bit version, you’d likely be better off to run it directly in Windows 7 anyhow.
To check, right-click on My Computer in the start menu and select Properties. This window will show you your system properties, including the version of Windows. If you’re running the 64 bit version of XP, it will say Microsoft Windows XP Professional x64 Edition.
Conclusion
As more programs are designed to take advantage of 64 bit computers, it’ll be increasingly needful to know what edition of Windows you’re using. I’ve been using the 64 bit edition of Windows 7 since the first beta in January 2009, and haven’t had problems with any standard programs in it. Plus, you can always run older, 32 bit programs in XP Mode if you have any that won’t work in the 64 bit edition of Windows 7.
Microsoft has recently been been focusing on cloud computing more than ever. Its new We’re all in cloud mantra has the company focusing on cloud computing more than ever. Recently over at How-to Geek I wrote about Getting Started with OneNote 2010 along with an earlier article about Syncing OneNote 2010 to the Office Web Apps. OneNote 2010 is a very nice application, and I believe the ribbon interface was a great addition to it. Additionally, the OneNote Web App is one of the nicest and most full-featured of the Office Web Apps.
However, all along I’d been missing out on one thing. I felt that Microsoft had left the Web Apps out as a second thought, and not integrated them into Office 2010 as much as they could have. On OneNote, you had to select notebooks individually to sync, rather than them being synced by default.
It turns out, however, that my misconception came from having used OneNote 2007 previously. Apparently OneNote 2010 will pick up your 2007 settings if you upgrade, and so will work more like a traditional desktop application. I recently had to reinstall Windows, Office, and everything else after my 3 month old hard drive died, and I was surprised to see how integrated OneNote is with the web app. Here’s what the first run experience is like if you’ve never had another copy of OneNote installed on the computer:
OneNote 2010 First Run Experience
When you first run OneNote 2010 on a new computer or install of Windows, it will ask you if you want the notebook to be synced to the web or simply stored on your computer. The Synced to the Web option is the first and recommended option, which shows how much the focus is on the OneNote web synchronization.
You’ll need to sign in to Office Live with your Windows Live ID, so click Sign In to continue.
Enter your Windows Live ID, and be sure to check Sign me in automatically so you won’t have to enter this info every time.
Now OneNote will connect to the server and sync your first notebook before you enter anything in it.
Everything you enter in the default notebook will be synced with Office Live so you can access it from anywhere. And, if you choose to share a notebook with friends or coworkers, you can edit in real-time on your desktop in OneNote 2010 even if they’re editing in the OneNote Web App. This makes OneNote work almost like the now-defunct Google Wave or the equally dead Etherpad, except that it’s live, current technology that’s fully supported and works great.
The great thing is, the online synchronization is enabled and recommended to new users from the start, which means many more people should start taking advantage of it.
Conclusion
It’s exciting to see Microsoft embrace the cloud and bring more web services to their traditional products. They, as well as all tech companies, need to rapidly innovate to stay relevant today, so hopefully both their cloud and mobile efforts this year will pay out over time.
And, again, this is one area that makes OneNote more like Evernote, though I increasingly think of them in two totally separate categories. OneNote excels at rich editing in an almost free form wiki, while Evernote excels at keeping your sniplets of info, from blog drafts to software info to contacts, synced and accessible from all your devices. I think you might just find space for both of them in your life and workflow!
If you don’t have Office 2010 yet, check out the current Office deals on Amazon or the amazing student discount for Office. OneNote is included in every retail Office 2010 suite, so no matter which version of Office you get you’ll be sure to get to try out OneNote.
![sshot-2010-08-10-[3]](https://techinch.com/wp-content/uploads/2010/08/sshot201008103.png "sshot-2010-08-10-[3]")
![sshot-2010-08-10-[4]](https://techinch.com/wp-content/uploads/2010/08/sshot201008104.png "sshot-2010-08-10-[4]")
![sshot-2010-08-10-[5]](https://techinch.com/wp-content/uploads/2010/08/sshot201008105.png "sshot-2010-08-10-[5]")
![sshot-2010-08-10-[3] (2)](https://techinch.com/wp-content/uploads/2010/08/sshot2010081032.png "sshot-2010-08-10-[3] (2)")
![sshot-2010-08-10-[4] (2)](https://techinch.com/wp-content/uploads/2010/08/sshot2010081042.png "sshot-2010-08-10-[4] (2)")
![sshot-2010-08-10-[5] (2)](https://techinch.com/wp-content/uploads/2010/08/sshot2010081052.png "sshot-2010-08-10-[5] (2)")
![sshot-2010-08-10-[6] (2)](https://techinch.com/wp-content/uploads/2010/08/sshot2010081062.png "sshot-2010-08-10-[6] (2)")


![sshot-2010-08-16-[87]](https://techinch.com/wp-content/uploads/2010/08/sshot2010081687.png "sshot-2010-08-16-[87]")
![sshot-2010-08-16-[89]](https://techinch.com/wp-content/uploads/2010/08/sshot2010081689.png "sshot-2010-08-16-[89]")
![sshot-2010-08-16-[90]](https://techinch.com/wp-content/uploads/2010/08/sshot2010081690.png "sshot-2010-08-16-[90]")
![sshot-2010-08-16-[93]](https://techinch.com/wp-content/uploads/2010/08/sshot2010081693.png "sshot-2010-08-16-[93]")


![sshot-2010-07-09-[21-21-55]](https://techinch.com/wp-content/uploads/2010/08/sshot20100709212155.png "sshot-2010-07-09-[21-21-55]")
![sshot-2010-07-09-[21-22-14]](https://techinch.com/wp-content/uploads/2010/08/sshot20100709212214.png "sshot-2010-07-09-[21-22-14]")

![sshot-2010-07-09-[21-28-58]](https://techinch.com/wp-content/uploads/2010/08/sshot20100709212858.png "sshot-2010-07-09-[21-28-58]")
![sshot-2010-07-09-[21-31-03]](https://techinch.com/wp-content/uploads/2010/08/sshot20100709213103.png "sshot-2010-07-09-[21-31-03]")


![sshot-2010-08-11-[20]](https://techinch.com/wp-content/uploads/2010/08/sshot2010081120.png "sshot-2010-08-11-[20]")
![sshot-2010-08-11-[21]](https://techinch.com/wp-content/uploads/2010/08/sshot2010081121.png "sshot-2010-08-11-[21]")
![sshot-2010-08-11-[22]](https://techinch.com/wp-content/uploads/2010/08/sshot2010081122.png "sshot-2010-08-11-[22]")
![sshot-2010-08-11-[23]](https://techinch.com/wp-content/uploads/2010/08/sshot2010081123.png "sshot-2010-08-11-[23]")
![sshot-2010-08-11-[27]](https://techinch.com/wp-content/uploads/2010/08/sshot2010081127.png "sshot-2010-08-11-[27]")


![sshot-2010-07-28-[15]](http://techinch.com/wp-content/uploads/2010/08/sshot2010072815.png "sshot-2010-07-28-[15]")
![sshot-2010-07-28-[19]](http://techinch.com/wp-content/uploads/2010/08/sshot2010072819.png "sshot-2010-07-28-[19]")
![sshot-2010-07-28-[27]](http://techinch.com/wp-content/uploads/2010/08/sshot2010072827.png "sshot-2010-07-28-[27]")
![sshot-2010-07-28-[25]](http://techinch.com/wp-content/uploads/2010/08/sshot2010072825.png "sshot-2010-07-28-[25]")
![sshot-2010-07-28-[28]](http://techinch.com/wp-content/uploads/2010/08/sshot2010072828.png "sshot-2010-07-28-[28]")
![sshot-2010-07-28-[26]](http://techinch.com/wp-content/uploads/2010/08/sshot2010072826.png "sshot-2010-07-28-[26]")
![sshot-2010-07-28-[29]](http://techinch.com/wp-content/uploads/2010/08/sshot2010072829.png "sshot-2010-07-28-[29]")
![sshot-2010-07-28-[30]](http://techinch.com/wp-content/uploads/2010/08/sshot2010072830.png "sshot-2010-07-28-[30]")
![sshot-2010-07-28-[32]](http://techinch.com/wp-content/uploads/2010/08/sshot2010072832.png "sshot-2010-07-28-[32]")
![sshot-2010-07-28-[33]](http://techinch.com/wp-content/uploads/2010/08/sshot2010072833.png "sshot-2010-07-28-[33]")
![sshot-2010-07-28-[34]](http://techinch.com/wp-content/uploads/2010/08/sshot2010072834.png "sshot-2010-07-28-[34]")
![sshot-2010-07-28-[36]](http://techinch.com/wp-content/uploads/2010/08/sshot2010072836.png "sshot-2010-07-28-[36]")
![sshot-2010-07-28-[37]](http://techinch.com/wp-content/uploads/2010/08/sshot2010072837.png "sshot-2010-07-28-[37]")
![sshot-2010-07-28-[40]](http://techinch.com/wp-content/uploads/2010/08/sshot2010072840.png "sshot-2010-07-28-[40]")
![sshot-2010-07-28-[41][3]](http://techinch.com/wp-content/uploads/2010/08/sshot20100728413.png "sshot-2010-07-28-[41][3]")
![sshot-2010-07-28-[42][3]](http://techinch.com/wp-content/uploads/2010/08/sshot20100728423.png "sshot-2010-07-28-[42][3]")
![sshot-2010-07-28-[43][3]](http://techinch.com/wp-content/uploads/2010/08/sshot20100728433.png "sshot-2010-07-28-[43][3]")
![sshot-2010-07-28-[44][3]](http://techinch.com/wp-content/uploads/2010/08/sshot20100728443.png "sshot-2010-07-28-[44][3]")

![sshot-2010-07-28-[46][3]](http://techinch.com/wp-content/uploads/2010/08/sshot20100728463.png "sshot-2010-07-28-[46][3]")
![sshot-2010-07-28-[47]](http://techinch.com/wp-content/uploads/2010/08/sshot2010072847.png "sshot-2010-07-28-[47]")


![sshot-2010-08-09-[14-15-05]](https://techinch.com/wp-content/uploads/2010/08/sshot20100809141505.png "sshot-2010-08-09-[14-15-05]")


![sshot-2010-08-02-[1]](https://techinch.com/wp-content/uploads/2010/08/sshot201008021.png "sshot-2010-08-02-[1]")
![sshot-2010-08-02-[2]](https://techinch.com/wp-content/uploads/2010/08/sshot201008022.png "sshot-2010-08-02-[2]")
![sshot-2010-08-02-[4]](https://techinch.com/wp-content/uploads/2010/08/sshot201008024.png "sshot-2010-08-02-[4]")
![sshot-2010-08-02-[5]](https://techinch.com/wp-content/uploads/2010/08/sshot201008025.png "sshot-2010-08-02-[5]")
