eBooks are one of the hottest topics this year, with eReaders, tablets, netbooks, and even smartphones making it easier than ever to read your favorite books wherever you are. Unfortunately, it’s not just as simple as deciding to purchase an eTextbook and then getting it. The system right now is somewhat a mess, but we’ll help you wade through it and see what’s best for you.
What’s Available?
eTextbooks are just digital copies of the normal paper textbooks students have carried around on campuses for decades. Unlike dead-tree books, however, eTextbooks are often only available from one store, and then can only be used on certain programs and devices. Additionally, many eTextbook systems only rent their eBooks; you’ll pay for the book, but only be able to access it for 180 days or so.
Some of the most popular eTextbook systems with the most books available are Amazon Kindle, B&N’s NOOKstudy, CourseCompass, and CourseSmart. Between these, you can find almost any standard textbook you need. I’ve personally used textbooks from all of these systems for classes I’ve taken, and here’s what I’ve found with each:
CourseCompass:
CourseCompass is an online course system from Pearson education. It’s designed to offer extra study aids to go along with your courses, which you’ll usually access via an access code from the back of a book (a trick publishers invented to try to curb the used textbook market … another frustration I have with textbook publishers). Alternately, you can also purchase a CourseCompass subscription directly for your class. These usually include an eTextbook, and since it was cheaper than other options, I chose this for my Accounting textbook this past year since I was required to use the CourseCompass extra study aids for the class.
Unfortunately, CourseCompass eBooks are almost unusable. They are only available online, and are powered by Adobe Flash. You first have to jump through several clicks just to open the online textbook.
Once it’s open, you’ll be hard pressed to make the book comfortable to read. The fonts are somewhat blurry, and it’s hard to get the reader window the size that works best for you since the reader is Flash based.
Switching to another section of the book can be difficult, and there’s no built in search or links in the index to help you quickly jump to the section you want.
Simply switching to the next page takes several seconds. You can’t easily keep the book offline, either, since you’re only allowed to print one page at a time.
Since CourseCompass books are tied to your class, you’ll only have access to them while the class is active. Once the class is finished, you won’t be able to access the book again. I personally recommend staying away from CourseCompass eBooks as much as possible, and even if you need to use their online course companion resources, I would not recommend using it for textbook access.
CourseSmart:
CourseSmart is currently the leader in eTextbooks, as they offer over 90% of the standard textbooks used in colleges across America. CourseSmart eBooks look just like they would on paper, including images, sidebars, indexes, and more. All of their eTextbooks are available for an 180 day rental period, and you can choose to either purchase on online subscription or download a special app and have your book offline. The online reader is all HTML based, so you can read the book easily, copy text, highlight, and more.
One great advantage is that you’re allowed to print up to 10 pages at a time, and up to a total of 150% of the total number of pages in the book, so if you need a hard copy of the book or want to keep it offline, CourseSmart lets you have it.
If you purchase an online subscription to a CourseSmart book, you can access it on your iPhone, iPod Touch, or iPad with their free CourseSmart eTextbooks for the iPhone app. Unfortunately, the books are very difficult to read on iPhone or iPod Touch since they render the entire page of a textbook just like it would appear on paper, making it hard to read on a small screen. Additionally, you have to be online to access CourseSmart books from your device.
While CourseSmart is still not perfect, it’s my second choice after Kindle, and with the amount of textbooks they currently have available, you’re almost guaranteed to find some of your textbooks there.
Kindle:
Amazon Kindle is my personal favorite eBook platform, and it currently offers more books and runs on more devices than any other eBook system. They now offer an increasing number of eTextbooks, and would be my first choice when purchasing an eTextbook for a number of reasons. First, all books are sold, not rented, so you can keep them forever. Second, they work great on a multitude of devices, and the new Kindle for PC lets you search, highlight, and bookmark content in books.
The only problem I’ve had with Kindle eBooks is that they reflow to fit your screen, so you don’t know what the current page number is. This generally is not a problem with reading books, but makes it difficult to cite books. If this does become the standard, though, I expect that citation rules will change to accommodate this.
Kindle’s best advantage is that you can read your textbooks anywhere. They’ll work on a Kindle device, in the Kindle for PC reader, or your mobile device such as an iPod Touch or iPhone. Since Kindle books reflow to fit your screen, it’ll be easy to read your book no matter where you are, even without an internet connection. This is one case where having a book locked to a platform doesn’t limit you at all!
NOOKstudy:
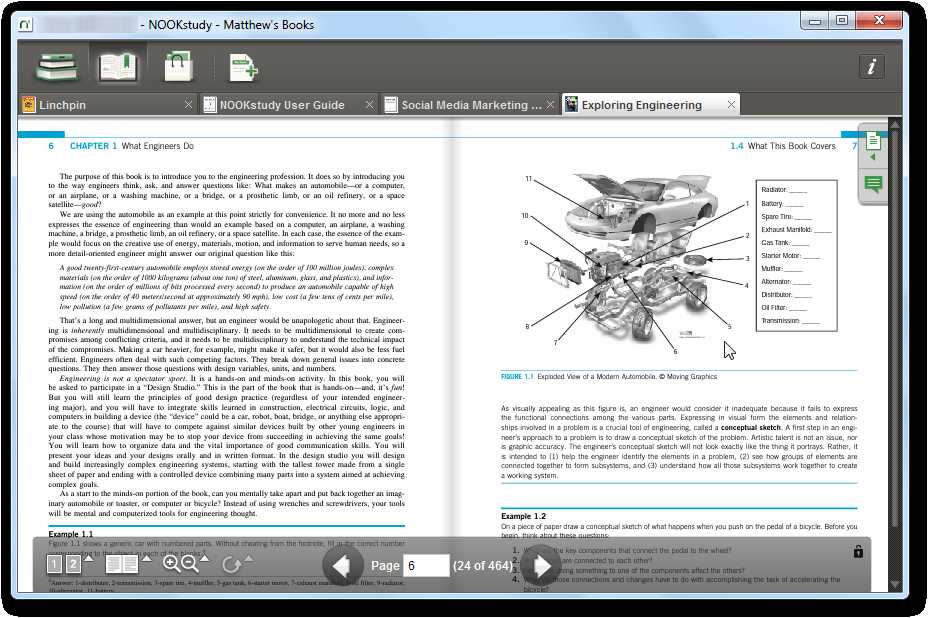
Barnes & Noble has been ramping up their eBook offerings with their NOOK eReader device, and they’re also a leader in eTextbooks. They offer a very nice eBook reader for Mac and PC, the NOOKstudy, which lets you read full-quality textbooks offline on up to 2 computers. You can search for content in books, highlight and copy text, and even print a portion of the book, depending on publisher restrictions. Textbooks look very much like they do on CourseSmart, and many popular ones are avilable.
The only problem is, most of their textbooks are rentals just like CourseSmart, so you’ll only be able to use your book for 180 days. Additionally, one very odd thing is that NOOKstudy books do not work on the NOOK device or on B&N’s mobile apps, so they’re only accessible on a Mac or PC. For more info about NOOKstudy, check out my review on HowtoGeek.com.
Other Options
Thankfully, in addition to these eTextbook publishers, there are some other options becoming available. Some publishers are selling eBooks directly in more open formats such as ePub or PDF, or via an online reader. O’Reilly Press offers almost all of their books in open PDF and ePub formats, while MIT Press offers many of their books via an online flash-based reader. Many tech, design, and business eBooks are also available through Safari Books Online, a subscription-based online library. Then, some newer publishers such as Flat World Knowledge are perusing even more adventurous publishing models, offering eBooks that are free to read online but cost to download or get the audio version. Hopefully we’ll se even more innovation in this area over the coming years, and maybe we’ll start seeing textbooks that are easier to obtain and cheaper for everyone.
Conclusion
No matter what subject you’re studying, the chances that you’ll find the textbook you need in digital format is better now than ever before. Unfortunately, varied formats, platforms, and eBook features make what would be an ideal situation into a confusing mess. And if there’s one eTextbook system to stay away from, it’s CourseCompass. Their eBooks are almost unusable, especially if your internet connection is any bit slow, and it’s painful to move through their books and find what you’re looking for. All of the other eTextbook systems are much better, so whenever possible, pick them.
Have you used an eTextbook? Please share your experiences below! We’re looking forward to the future of eBooks, and hope to see it get easier and cheaper to get the eTextbook you need.
Would you like to be able to post Tumblr-style image, link, quote posts, and more from your blog? Here’s how you can give your WordPress blog a makeover and give it the Tumblog power and simplicity you need.
Tumblr is a popular hosted blogging service that helped popularize Tumblogs, a type of blogs typically filled with short posts. Tumblr makes it dead simple to post images, videos, quotes, or links on your blog, and many users prefer this to full blog posts. Whether you’ve wanted to switch to a simpler blogging style or simply wanted to add some Tumblog-style posts to your existing blog, there’s now a way to do this without leaving WordPress behind. WooThemes recently released a free plugin, WooTumblog, that makes it easy to transform your WordPress blog into a perfect Tumblog. It’s slightly complicated to integrate with your site, so let’s see how it works.
Installing WooTumblog on Your WordPress Site
First, you’ll need to add the WooTumblog plugin to your site. Simply open the Add new Plugins page on your WordPress dashboard, search for WooTumblog, then install and activate it.
Now, open your Permalinks settings page under Settings on your WordPress Dashboard. Click Save on the bottom of the page without making any changes to register the custom taxonomies that WooTumblr added to your site.
You can also tweak your Tumblog settings from the Tumblog Options link under Post on your Dashboard.
There’s one more thing you’ll need to do … you need to add some code to your theme files to get WooTumblog fully integrated in your site. Here’s how to do it.
Editing your Theme Files
You’ll need to edit two of your theme’s PHP files to get the Tumblr functionality working on your site. Depending on your theme, you’ll need edit your index.php or loop.php file, as well as single.php. Open the Editor page under your WordPress Appearance menu, then select the appropriate file and make the following changes, or edit the files in your favorite offline text/code editor and upload the files once you’ve added the new content.
Editing loop.php
First, you’ll need to change your title style. Find the line that contains <?php the_title(); ?>, and replace that line with:
<?php woo_tumblog_the_title("entry-title"); ?>
You can do this easily by searching for the_title on the editor page; now just replace that whole line with the code above. Do note on some themes, including most themes from Elegant Themes, you’ll need to edit entry.php instead of index or loop.php, so you may need to look through your theme a bit to be sure. Alternately, if you’re using the WordPress 3.0 default theme, TwentyTen, just replace line 126 with that.
Now, scroll down a bit, and add the following code in a new line above both <?php the_excerpt(); ?> and <?php the_content:
<?php woo_tumblog_content(); ?>
These are located on lines 134 and 139, respectively, in the TwentyTen theme.
Once you’ve made the changes, be sure to save your file with the button on the bottom of the editor, or in your code editor program.
Editing single.php
Switch over to single.php, and add the same code as before. Replace the title line the same as above, then add <?php woo_tumblog_content(); ?> above the line containing <?php the_content(); ?>. These will be located on lines 23 and 30, respectively, on the TwentyTen theme.
Save your changes again, and if you’ve been editing your theme offline, go ahead and upload the changes.
If you need more help adding the Tumblog support to your theme, click the Help tab in your WordPress Dashboard Tumblog Options page.
Adding Tumblog Posts
Your site won’t look any different until you start adding new Tumblog style posts. The good thing is, WooTumblog makes it easy to do that. Directly from your Dashboard, you can start adding new Quote, Image, Video, or other Tumblog-style posts via the new Tumblog widget. Simply select the article type you want, start adding your new content, and click Submit when you’re ready to publish your content.
If you’re adding a picture post, you can upload the picture directly from the Tumblog widget. Quick and simple!
Alternately, if you have an iOS device, including an iPhone, iPod Touch, or iPad, you can purchase the Express for WordPress app, which lets you post Tumblog posts with images, links, quotes, and more directly from your device. Since Tumblog posts are generally shorter than full blog posts, this is a great way to keep your blog updated on the go. We plan to review the app soon, but if you try it out, let us know what you think!
Once you’ve got some Tumblog-style posts up and running, visit your site’s homepage to see how the new posts look. With those few changes, you’ve just added a ton of functionality to your site!
My favorite Tumblr feature is the Link posts, which let the title of your article link directly to the site or article you’re mentioning. And this works the exact same on your WordPress blog with WooTumblog.
See it in action
Want to see WooTumblog in action? Here’s the official video showing how to add it to your site and create tumblog posts:
Use a Theme With WooTumblog Built In
Although it’s not too hard to get WooTumblog integrated with your existing theme, sometimes it’s easier to just get a pre-existing theme that’s ready to use out of the box and go with it. WooThemes already offers 5 themes that include tumblog functionality already, so you won’t have to do anything extra to get it working. These include Retreat, Slanted, Cinch, and Crisp, my personal favorite. Canvas, WooTheme’s popular theme that lets you tweak it to no end, now also includes tumblog support. If you’d like to see how any of these themes work before you purchase one, be sure to test them out for free on the WooThemes Playground.
Conclusion
There’s a great reason WordPress is such a popular option for building blogs and websites of all shapes and sizes. The WooTumblr lets you keep using WordPress’ power while taking advantage of the simplicity of Tumblr. There’s a ton of uses for Tumblog themes, so let us know in the comments how you end up using your WordPress Tumblog … feel free to leave a link to your Tumblog site so we all can see it.
Would you like to keep up with your Backpack notes, to-do lists, and more, no matter where you are? Let’s take a look at Satchel, a great iOS app that lets you keep your Backpack with you, even if you’re offline.
We’ve covered many ways you can use 37signals Backpack to make your life simpler. It’s a great way to work together with a team or throw together a quick free website. It’s also one of the best to-do list apps, since you can create lists, move them between pages, rearrange them, and add notes to notes. I use Backpack to keep up with my college class info, coordinate team projects, and keep track of article ideas for my blogs, and more.
The only problem is, Backpack is only available when you’re online. Even if you’re online on a mobile device, the webapp doesn’t scale well to small screens. That’s where Satchel comes in. This app lets you keep your full Backpack account with you at all times on your iPhone, iPod Touch, or iPad. You can view and edit your pages, to-do lists, calendar, and journal, and even create new pages. If you don’t have an internet connection, Satchel will save your edits and new content and then sync the next time you’re online. In fact, it just might be one of the best iOS to-do list apps available since it’s so full featured.
Getting Started
When you first run Satchel, you’ll need to enter your Backpack account info or create a new account. Satchel works great with free or paid Backpack accounts, and for most personal uses, the free account will be plenty.
Enter your username, password, and the name of your Backpack account (yourname.backpackit.com), or enter your OpenID to sign in if you’ve added one to your account. Satchel may take a few moments to login as it’s downloading the content from your Backpack pages.
As soon as it’s finished, you’ll see your pages listed in alphabetical order. You can also browse pages by tag, or search the contents of the pages from the search bar. Press Edit to delete pages if you wish. From the bottom toolbar, you can access your Backpack alerts, calendar, and journal, or add a new page via the plus button.
Journal seems infinitely more useful on a mobile device, since you can quickly update what you’re working on within seconds without opening your browser.
The Accounts button on the top left takes you to your accounts list. Here you can add or remove your Backpack accounts so you can keep up with everything all together. This page also lets you access your Satchel settings, where you can choose how much data is saved on your device and more.
Putting Satchel to Use
Satchel makes it quick to get to what’s most important in your Backpack pages. Press a page name to see everything included on the page. Notes and to-do list sections on a page will be identified with different icons, so you can quickly jump to that section. The only thing that’s missing is Writeboards; unfortunately, you can’t view or edit Writeboards from Satchel.
Alternately, press one of the buttons on the bottom to view all lists, notes, or images together. Here in the Notes tab you see all of the notes from the page together; press the title of a section to edit the note section, or press the blue arrow to access any links in the section.
Editing a note works just like you’d expect, and you can even include Textile markup to format text like you would in Backpack online.
To-do lists are where Satchel truly shines. You can quickly browse through all of your to-dos on the Lists page, or simply browse to one to-do section from the first page. Press the blue arrow to browse to links in the to-do item. Once you’ve done a task, just press the circle to check it off, and it’ll fall to the completed section of your list. Adding new lists and tasks is quick and simple, and you may find yourself storing more data on one Backpack page than you ever imagined since it’s so easy to organize in Satchel. The only thing that’s missing is to-do item notes; you can’t view or edit any notes attached to a to-do item.
Backpack makes it easier than most service to organize your tasks and notes like you want by dragging and dropping them around on a page. Satchel supports this, too. Just press Edit on the top of a page, and then you can remove sections or drag and drop items to the order you want. Most to-do list apps only let you keep items in the order you added them, but I find it very helpful to rearrange items to their current priority, and this works great in Satchel.
Satchel worked great in our tests on iPod touch running iOS 4, and didn’t lag even when syncing online. We weren’t able to test it on an iPad, but if you’ve got one you can use Satchel to keep up with your Backpack, tasks, and notes on it, too.
Conclusion
Satchel is a great app that makes one of the best webapps feel at home on your iOS device, both online and off. If you’re already a heavy Backpack user, Satchel is an app you’re sure to want. If you’ve already been using Backpack but not too seriously, you may find yourself using it more than ever with the great notes and lists support on your iOS device. It’s still missing a few features, such as notes attached to to-do list items, sharing pages, and Writeboards. All in all, though, it works great and is fast and fluid.
Satchel is available in the App store for iPhones, iPod Touches, and iPads running iOS 3.0 or newer, and costs $9.99. If you’re not sure you’re ready to spend that much on an app, you can try out Satchel View for free, which works the exact same as Satchel but doesn’t let you edit any items, check off to-dos, or add pages, but is still a great way to keep your Backpack data with your all the time. If you want fully editing, though, and want to use it as an advanced to-do list and note manager, Satchel is the way to go. Along with the official Campfire and Highrise apps, it’ll be easy to keep your all of your 37signals apps on your iOS device!
Computers are amazing machines. What started out as crude scientific instruments turned into the main way we store most of our memories, important documents, to-dos, and more. For years, people have been telling us we need to keep our computers backed up, but it’s usually something we put on a to-do list and then forget about it. That’s often because it’s difficult to keep your backups up to date, plus it requires you to keep up with DVDs, portable hard drives, or other media.
The good news is, there are some easier ways to backup your computer. There are many popular online backup services today that can automatically backup all your important files to the cloud. No DVDs to mess with, and even if you lost everything, your files would still be ready for you to download and start using again quickly. We’ve been evaluating many online backup solutions, and have found several that work great, are economical, and protect all your most important files without much effort on your part. Today we’re going to look at one of our favorites, Backblaze.
Backup Your Computer With Backblaze
Backblaze is an online backup service that makes it amazingly simple to backup your computer. It finds all the important files, pictures, music, and more on your computer, then encrypts it to protect your privacy and uploads it to their secure servers. Whenever you need to restore your files, they’ll be waiting for you to download and restore them within minutes. Let’s see how it works.
First, download the Backblaze installer from their site, and run the installer on your computer. It’s available for Windows and Mac OS X, so download the correct version for your computer. Then, enter your email address and a password of your choice to create a new account, and click Install Now to get started.
Backblaze will now install and scan your computer for files to backup. This may take a few minutes, but you’ll only need to do it this first time.
Once it’s done, Backblaze will show you how much data it found to backup. Click Ok to finish installing Backblaze and let it get to work protecting your data.
And that’s it! Within seconds, Backblaze will start backing up your files to their secure servers. It’ll backup all files under 9Gb on your computer other than program files, virtual machines, and other files that would be installed by your operating system and programs. All of you data files, documents, music, and more will be automatically backed up, and you don’t need to do anything else. If you’d like, you can open the settings and select specific folders to backup or skip, but for most users, the default settings will work great. Just note that the first backup can take a long time to complete, but you don’t need to worry about it. Just use your computer as you normally would, and it’ll do its backups in the background whenever the computer’s running.
Whenever you open the Backblaze window to check on your backup or change settings, you may see a small tip on the bottom. But for the most part, Backblaze should live quietly in your system tray, happily keeping your files safe as you’re saving memories, meeting, memos, and more on your computer.
Encrypting Your Backup Files
By default, all of your files are encrypted on your computer, uploaded over SSL, and then secured on a protected and encrypted server. The backup key used, however, is accessible by Backblaze, so if you’d like an extra layer of security, you can add your own private encryption key. Simply open the Backblaze preferences, select the Security tab, and click Enter your private encryption key.
Here you can add and confirm a second password for your Backblaze account that is not stored on Backblaze’s servers. This encryption key is required to access your data, and you’re the only one who knows it, so make sure to remember it. If for some reason you can’t remember the key, your backup data will be lost as even Backblaze can’t access it.
Now your files are as secure as the can possibly be. Just make sure to never lose the encryption key you set, as otherwise you won’t be able to access your backups in the future.
Getting Your Files Back
If disaster strikes and you’ve lost all your files, or if you just accidently deleted the PowerPoint you were supposed to present today, Backblaze is ready to help you get your content back. Just head over to the Backblaze account page on their site, and login with your account info.
Alternately, open the Backblaze app and click and click Restore Options, then click Sign in in the popup window that opens.
Here, you can select to download a zip file of your backed up files for free, or order a DVD or USB hard drive with your full backup for a fee. Select the option that’ll work best for you.
Underneath this, you’ll see a file browser to let you select your files to restore. If you added an encryption key, enter it first to unlock your files.
You can now browse through your files and folders online, just like they appeared on your computer. Select any files, folders, or even the data from whole drives you want to download.
If you happened to make a change to a file, and want to download the older version, you can easily do that too. Click the Files backed up till menu, and select the time you want to view. Then select your files from that time snapshot.
Once you’re finished selecting the files you needed, click Continue with Restore to download your backup files or order a backup disk.
If you selected the download option and chose to download a large amount of files, you may be asked if you’re sure. Do note that it can take a very large time to download a full backup, so you may be better to download data from individual folders and restore them individually.
Once you’ve selected the files you wish to download, Backblaze will generate zip files for you to download. This may take some time, so Backblaze will email you when the files are ready. Just click the link in the email you’ll receive to go get your files.
Now just download the zip, extract your files, restore them to where you want them saved, and get back to work. Easy! Alternately, of course, if you selected to order a DVD or USB drive, you’ll need to wait for them to get to you, and then you’ll be able to quickly restore your computer.
Conclusion
Backblaze takes the guesswork out of backing up your computer, and lets you keep your data secure. It ran great in our tests, and unlike many backup programs, it used very few system resources. It also didn’t slow down our internet usage much even when creating the initial backup, as it automatically throttles its internet use based on current internet speeds and traffic. Most importantly, it made it easy to get our files back, even offering previous versions of files we’d edited.
Backblaze runs on recent versions of Windows and Mac OS X, and costs $5/month or $50/year per computer for full, unlimited backup. If you’d like to give it a try first and see what you think before installing it, feel free to download the free 15 day trial and give it a spin. Let us know how you like Backblaze, or if you have another favorite online backup service.
Have you ever wanted to quickly access an app in your Windows system tray but didn’t want to grab your mouse? Here’s how you can use anything in your system tray directly from your keyboard.
There are keyboard shortcuts for almost anything you want to do on your computer. Most of use know the shortcuts for copy, paste, and other common tasks, but there’s tons of useful ones that are slightly less known. Recently I was wanting a way to quickly access apps in my system tray directly from my keyboard. Low and behold, there is an easy shortcut to access your system tray from the keyboard. Here it is:
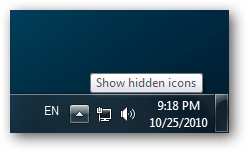
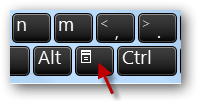
Simply press Win + B on your keyboard (the Windows key and B at the same time) to select your system tray.
Please Note: This trick only works in newer editions of Windows, including Windows Vista and 7, so it won’t work in Windows XP.
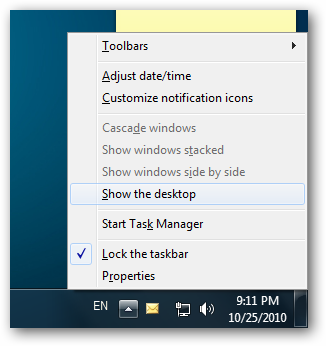
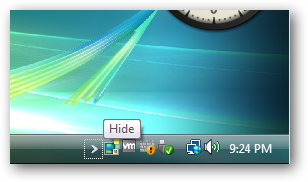
Here’s how it works. On Windows 7, I pressed Win + B, and it automatically selected the Show hidden icons button in the system tray.
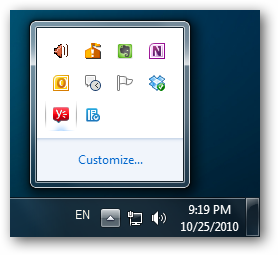
Press enter to see your hidden icons. Then, move between your tray icons with your up and down arrows. When you’ve selected the icon for the app you want to open, just press the Enter key on your keyboard.
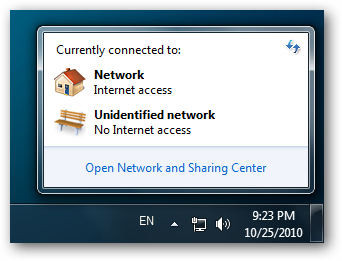
Pressing Enter on a system item, such as the Network icon, will open the preview window just like it would when you left-click it normally.
Or, to see the options for an item like you’d usually see by right-clicking, press the menu button on your keyboard (usually located beside the right Ctrl button, or press Shift + F10.
This works with the Windows tray elements such as the expand button and clock as well. Here we’ve pressed Win + B, then pressed the menu button to get the system tray menu, all without leaving the keyboard. Just press the up and down arrows to access the various options, and press Enter to select the highlighted option.
And, as mentioned before, it works in Windows Vista as well. Here, though, it’ll just expand your tray since Vista doesn’t include the nice hidden icons popup.
Keyboard shortcuts are a great way to make your tech life simpler, and there’s tons of useful keyboard shortcuts in Windows 7. This shortcut is a welcome addition to our keyboard shortcut arsenal, and I regularly use it to view the time in other time zones or view my to-dos in GeeTeeDee without leaving the keyboard.
Need a lightweight, easy to use tool to keep up with all the things you need to do each day? Although dozens of apps we use daily can be great for storing tasks we need to do, sometimes a dedicated app that just shows what you need to do is best. One app that does this really well is GeeTeeDee, a new to-do list app for Windows. Let’s take a look at how you can use GeeTeeDee to stay on top of what you need to do.
Getting Started
First, you’ll need to setup GeeTeeDee on your computer. You can download it either as an installable app or a portable app. If you want to only use it on one computer, simply select the Desktop Installer and install as normal. Otherwise, if you’d like to keep up with your tasks on multiple Windows computers, download GeeTeeDee Portable. Then, extract the files and save them to your flash drive or in your Dropbox so your tasks will automatically sync between your computer. I actually have an Apps folder in Dropbox just to save portable applications so they can sync between my desktop and netbook.
When you first start GeeTeeDee, you’ll be presented with a blank Inbox to store your tasks. You can click the link on the front page to add some default tasks, or just click New at the bottom to start adding a new task.
You can add a name, notes, and a due date to tasks. Once you’re done adding a task, click elsewhere and it will be condensed to just the title. Double-click a task to view or edit the due date or notes, or double-click in any blank area to add a new task.
If you’d like an even more streamlined interface, click the Compact button on the bottom. This will give you just a list of your tasks without the sidebar on the left. As you finish tasks, just check them off to show their completed. You can then click Cleanup to remove finished tasks from the list.
Organizing Tasks
Whether you’re trying to follow a plan such as Getting Things Done or you’re simply wanting to keep up with your tasks in an orderly manner, you’ll want to organize your tasks into groups. GeeTeeDee starts with a default Inbox, but you can double-click or right-click and select Add group on the left sidebar to add a new group to organize your tasks.
Select an icon for your group, then enter a name and click Ok to add the new group..
Now you can create new tasks in the group, or move existing tasks from your inbox into your new group. And, of course, you can make as many groups as you need to keep up with everything you need to do.
One complaint I’ve had with many to-do list programs is that you can’t move your task around easily. GeeTeeDee makes it very simple to move your tasks; simply click and drag a task to reorder them. You can drag them to the position you want in your task list, or drag them to a different group. This makes it easy to simply create all your new tasks in the Inbox, then sort them later when you have time. Now you can easily keep track of all your tasks in an orderly, efficient, and elegant manner.
Pros and Cons
Does GeeTeeDee include all the features you need right now? Here’s a quick overview of where it’s great and where it still needs work, though hopefully we’ll see new features added soon in upcoming updates:
No webapp or mobile device support (though mobile apps are planned)
[/one_half_last]
Conclusion
Could you just use your favorite note app like Evernote, or the task list built into Outlook or Gmail? Sure you could. But with a dedicated task management tool, you’ll be sure to not miss anything important, while keeping yourself focused on what needs done. GeeTeeDee lets you do this in an elegant and simple way, and we’re excited to see such a solid competitor to Things or OmniFocus on Windows. Sometimes an app comes along, and you wonder how you got along without it before: for me, GeeTeeDee was one of those apps. It’s my favorite new Windows app, and has helped me stay on top of all of my work and college tasks. Hopefully future updates and mobile apps will fill in the current gaps, but until then, it’s still a great simple way to manage the things you need to do from your PCs.
Are you looking for a great theme for your new site or blog, but can’t quite decide on which one? Here’s how you can try out any WooThemes WordPress theme for free to see how it works before you purchase it for your site.
WooThemes is one of the most popular WordPress theme developers, and they have themes that cover almost any use. From a simple and stylish blog theme to a customized frontpage for your new app to a full-blown real estate site, WooThemes has nearly 100 themes that you can choose from, including some very nice free themes. Actually, the problem usually isn’t finding a theme that will work great for your site; the problem is deciding which one will work best for your site. Most WordPress themes let you preview them before your purchase or download, but this doesn’t let you see how easy or difficult they will be to use and customize.
WooThemes takes this to the next level, and lets you try out all of their WordPress themes on your own temporary blog for free before you purchase a theme. Let’s get started and see how you can play with WooThemes for free.
The WooThemes Playground
To testdrive any WooTheme for free, you’ll need to register for the WooThemes Playground. You can signup at this link, or from the link on the Try Before You Buy link on any theme’s page.
Before you can get started, you’ll need to make a new account. Simply enter the username of your choice and your email address, and click Sign up.
Now, enter a name and title for your test site, and click Signup. This will create a temporary blog for you that will run for 24 hours, but the great thing is, it includes every WooTheme available so you can try them out on this test site.
Moments later you’ll receive an email with a link to activate your test blog, so click the link to activate it.
Once it’s activated, you’ll receive a new email with the password for your site and a link to login. Click the link, then login with your username and the password you received in the email.
Once you login, you’ll be greeted with the default WordPress dashboard. The only difference is, this WordPress install includes every WooTheme available. To get started trying out themes, click the Appearance button on the left sidebar.
Trying Out WooThemes
Your test site’s Appearance page will include every available WooTheme for you to try. Just click the Activate link under the theme you want to try to see how it looks.
Once the theme is activated, it will automatically open the theme’s preferences page. Alternately, you can click the new Woo button with your theme’s name on the left sidebar to open it. Now you can try for yourself and see how easy WooThemes are to customize.
Some of the themes will have tons of options. Here you see the theme options for Estate, WooTheme’s real estate site theme, which lets you easily list properties, agents, maps, and more.
You can even try out Canvas, WooTheme’s increasingly popular framework theme that lets you design your own unique theme without messing with code. Canvas is an especially good theme to try out in the WooThemes playground, as it’s hard to know if you’ll really like it until you can try tweaking it yourself.
Take Your Customizations To Your Own Blog
Once you’ve tweaked a theme to perfection, click your test site’s name on the top of the dashboard to preview your work.
If you like your customizations, you can save them and import them to your site once you’ve purchased your WooTheme. Go back to your test site’s WordPress dashboard, and click Framework Options under your theme’s name.
Select the Export Options tab in the WooThemes panel that opened, and copy the code in the textbox. Now save this code in a safe place, as you’ll need it to import your settings on your site.
Now, head back to WooTheme’s main site, purchase and download the theme you were trying out (make sure you purchase the same theme you were using), and then install it on your own WordPress site. Then, open the Framework Settings page on your own site as before, and this time select the Import Options tab. Paste the code you copied from your test site into the Import box, click Save, and your customizations will be live on your own site. Now That’s a great way to try out and then use a theme!
The WooThemes Playground is a great resource, and I was very impressed with their backend features after trying them out this way. It’s a great way to see what their themes offer before you make a purchase, so give it a try and let us know which WooTheme is your favorite. Clinch and Canvas are my personal favorites at the moment ;) .
AutoCAD 2011 includes a beautiful UI with a very nicely customized Office 2010 style ribbon. Everyone’s not a fan of the ribbon interface, though, so here’s how you can switch AutoCAD back to a traditional File menu without loosing any AutoCAD 2011 functionality.
The AutoCAD Ribbon Interface
By default, when you first run AutoCAD 2011, you’ll notice a prominent Office 2010 style ribbon interface, complete with an A button to access AutoCAD options and more.
In fact, AutoCAD improves on the default Office ribbon style with very helpful tooltips that explain features and functions when you mouse-over an element and wait a few moments.
The AutoCAD menu also includes some unique features, including a search box that makes it quick to find any function in the ribbon. These features are all helpful at getting new users used to the ribbon interface.
Switch Back to the File Menu
If you still can’t get used to the new ribbon interface, don’t despair. You can easily re-activate the traditional file menu interface so you know where everything is as before. To do this, click the drop-down menu on the top left beside the AutoCAD button and select AutoCAD Classic (or AutoCAD LT Classic if you’re using AutoCAD LT as we are).
Moments later, your ribbon will change to the traditional file menu and toolbar setup, including toolbars on the sides and pop-out palettes as before.
Menus and toolbars work just as you would expect from previous versions.
Even with the File menu classic UI, you’ll still have the new AutoCAD button so you can take advantage of the search box to find functions without wasting time looking through menus.
The File menu interface also looks great if you’re still using XP or are using the Windows Classic theme on Vista or 7.
This tip should help you stay productive, no matter which edition of AutoCAD you’re using. Once you’re used to AutoCAD 2011, you just might want to spend a little time with the newer ribbon interface, as I think it can help you work faster and be more productive than before. Either which way, it’s great that you can switch back to the File menu interface if you want; in Office 2010, you’re stuck with the Ribbon interface unless you install a 3rd party tool like UBitMenu. That said, if you’d like to get the file menu back in Office 2010, that’s a great tool to try out, too. That way, you can use the latest software with the interfaces you’re used to!
Whether you're looking for a way to make friends, find the current time anywhere on earth, create documents, entertain yourself or your kids, or almost anything else, there's likely a webapp for it. Mobile devices and apps get most of the attention in the tech press today, but webapps are an equally exciting field. From 37signals to Google to independent developers you've never heard of, there are thousands of new webapps avilable online for you to try out. There's tons of great ones, but unfortunately there's also quite a few that aren't very nice.
If you'd like to quickly find out about the greatest new webapps that are stylish, functional, and fun to use, then check out GreatWebApps.com. Great Web Apps is a new site from Haloweb and Techinch that showcases a new webapp each weekday. We've recently featured apps to help you learn to program in Ruby, read books to your kids, chat with your colleagues, login to all your online accounts easily, convert icons, and more. And it's all presented on an easy to read page that lets you quickly scan the latest webapps and find ones that interest you.
Be sure to check out GreatWebApps.com, subscribe to its RSS feed, or follow @gr8webapps to keep up with the latest and greatest webapps. If you have a favorite webapp, be sure to submit it as well and we might feature it in a future post. And, as usual, I'll keep writing tutorials here at Techinch to help you get the most out of these webapps and other tech tools. Enjoy!
Whether you’re running a small, personal blog or a major news site, WordPress is a great platform to build your website from. It currently powers over 8% of all sites across the ‘net, including Techinch.com, HowtoGeek.com, and many other sites you likely regularly read. You can run WordPress on your own server or hosting account, or get started with a free blog on WordPress.com, which is a very popular way to get started blogging. Microsoft announced recently that Windows Live Spaces is shutting down and that all Spaces blogs will be migrated over to WordPress.com. If you have a Spaces blog and are nervous about the transition, or are just wanting to start a new blog and aren’t sure where to start, here’s some articles I’ve written on HowtoGeek that should make the transition smooth and seemless for you.
You’ll want to make sure your readers can easily find and remember your blog, and a custom domain name is one of the best ways to do this. Plus, if you ever move your blog, you can always easily move your domain name … after all, Techinch.com started out as a WordPress.com blog, and I was able to easily move my content to a new hosting account and redirect my old blog’s address here with this trick.
Whether you’re using WordPress.com or have WordPress installed on your own hosting account, here’s how you can easily post quality content to your blog from anywhere
WordPress.com doesn’t just have to be about blogs … the P2 theme (which you can use for free) lets you setup a message board or chat-style site to keep your group in touch
And if you need more help getting started with WordPress or moving your old blog, feel free to leave a comment and I’ll try to help. Or, if you recently moved your Spaces blog to WordPress.com, feel free to leave your blog’s address in a comment so we can check it out.


 Thankfully, in addition to these eTextbook publishers, there are some other options becoming available. Some publishers are selling eBooks directly in more open formats such as ePub or PDF, or via an online reader. O’Reilly Press offers almost all of their books in open PDF and ePub formats, while MIT Press offers many of their books via an online flash-based reader. Many tech, design, and business eBooks are also available through Safari Books Online, a subscription-based online library. Then, some newer publishers such as Flat World Knowledge are perusing even more adventurous publishing models, offering eBooks that are free to read online but cost to download or get the audio version. Hopefully we’ll se even more innovation in this area over the coming years, and maybe we’ll start seeing textbooks that are easier to obtain and cheaper for everyone.


 You’ll need to edit two of your theme’s PHP files to get the Tumblr functionality working on your site. Depending on your theme, you’ll need edit your index.php or loop.php file, as well as single.php. Open the Editor page under your WordPress Appearance menu, then select the appropriate file and make the following changes, or edit the files in your favorite offline text/code editor and upload the files once you’ve added the new content.


![sshot-2010-08-31-[1]](https://techinch.com/wp-content/uploads/2010/10/sshot-2010-08-31-1.png "sshot-2010-08-31-[1]")
![sshot-2010-08-31-[5]](https://techinch.com/wp-content/uploads/2010/10/sshot-2010-08-31-5.png "sshot-2010-08-31-[5]")
![sshot-2010-08-31-[6]](https://techinch.com/wp-content/uploads/2010/10/sshot-2010-08-31-6.png "sshot-2010-08-31-[6]")


![sshot-2010-08-31-[11]](https://techinch.com/wp-content/uploads/2010/10/sshot-2010-08-31-11.png "sshot-2010-08-31-[11]")
![sshot-2010-08-31-[14]](https://techinch.com/wp-content/uploads/2010/10/sshot-2010-08-31-14.png "sshot-2010-08-31-[14]")
![sshot-2010-08-31-[12]](https://techinch.com/wp-content/uploads/2010/10/sshot-2010-08-31-12.png "sshot-2010-08-31-[12]")


![sshot-2010-08-19-[26]](http://techinch.com/wp-content/uploads/2010/10/sshot-2010-08-19-26.png "sshot-2010-08-19-[26]")

