Computers are supposed to help us be more productive. That's how we justify huge investments into computers, office software, desks, and more. Yet all too often we find ourselves frittering time away, checking the latest RSS feeds, social network updates, Google Analytics stats ... oh, and someone just popped up on IM to say Hi.
That's not exactly a productive environment.
OmmWriter is an app that seeks to bring concentration back to computing, or at least to writing on a computer. It's been a popular app on Macs for the past year, and now it's finally been released for Windows 7. PC users can now write in one of the few distraction free writing apps available on Windows.
In the tradition of WriteRoom and the many plain text editors on iOS such as iA Writer, OmmWriter offers a full-screen, distraction free environment to help you concentrate on your writing. Unlike these other writing apps, however, OmmWriter also includes calm background wallpapers, soundtracks, and typing sounds to accompany your writing. As its splash-screen says, OmmWriter is best enjoyed with headphones.
For the most part, OmmWriter doesn't have a traditional program interface. There are some tools on the side, and an iOS style scroll bar on the right. You can change the font, chosing from a serif, sans-serif, script, or monospaced font, as well as choose from 3 font sizes. On the bottom, you'll be able to save your file in plain text format or open a new document.
The main thing is the rectangle where you can type in text. As you start typing, the rectangle itself will fade away, leaving you only with your text, the background you've selected, and the soundtrack keeping you motivated in your headphones. Elegance, meet writing. Move your mouse, and the box and tools reappear, along with a word count on the bottom. Again, simple and easy; all you need to think about is your text.
But wait ... wouldn't the background sounds make it distracting? Actually, I've personally always found that I write the best with an instrumental soundtrack playing in the background. OmmWriter's soundtracks are great background music to write with, and the keyboard sounds help keep you focused on writing. It's the best possible combination in my opinion, but if you're not a fan, you can always turn them off or select another sound combination that suites your tastes best on the side options that appear when you move your mouse. And, the included backgrounds range from a paper-like texture to plain white, so you can choose one that works best for your writing style, too.
Of all things, OmmWriter does actually still include a file menu, though you'll almost never need to use it. If you'd like to reset the interface to the defaults, or export your document as a PDF, just hover over the top right edge of the program and the file menu will appear. Alternately, all standard keyboard shortcuts work as normal; press Ctrl+S to save the file, Ctrl+N to start a new document, etc.
Best of all, OmmWriter is yet another new Mac app that's now available for Windows, joining the ranks of CloudApp, 1Password, Droplr, Backblaze, and more. It can be frustrating as a PC user to see most of the innovative and creative new apps coming out only on Macs, and is very refreshing to see some coming now to Windows. OmmWriter Dana is available in 2 editions for Windows and Mac: a free version with 3 backgrounds and soundtracks, or a paid version with 8 backgrounds and 7 soundtracks. I'd suggest trying the free version, and if you like it, strongly consider buying the pro version to let the developers know you appreciate their effort. The app starts at $4.11, though you can pay more if you'd like. Once you've purchased a pro copy, you'll need to uninstall your free version and install the new OmmWriter Dana II and activate it with your key.
OmmWriter is a truly impressive and immersive app. Its my new favorite writing app on Windows, and I'm sure many of my upcoming essays, articles, and book chapters will be typed in it. It's forcing me to concentrate on what I'm writing, and only what I'm writing, and that's a refreshing experience. The only thing I need now is a way to disable Alt-Tab so I don't switch away to other programs!
After all, the world won't end if you miss that next tweet.
Written in OmmWriter Dana II for Windows with background #3, soundtrack #4, and keyboard sound #1.
One of the most celebrated texts for writers is William Strunk, Jr.'s The Elements of Style. If you've ever taken a writing class or done any extra studying about writing, you've likely seen this short book quoted or listed as recommended reading. Written initially as a short handbook for his students in 1918, Strunk's work has remained a standard handbook of English writing ever since. It's a brief book, but includes some of the best advice on correct English rules of usage, commonly misused and misspelled words, and
In the years since its original publishing, The Elements of Style has been updated numerous times, and in 1935 E. B. White contributed to the updating, causing the book to generally be known as Strunk and White. You can still purchase the most up-to-date version as a paper book from Amazon today, though oddly enough the latest editions are not available as eBooks. Both the Kindle Store and iBooks include copies of The Elements of Style, but they're actually just reformatted copies of the original edition from others.
Since the original was published in 1918, though, the original Elements of Style is out of copyright in the US and most other countries. Thanks to that, the book was published fully on Wikisource, Wikipedia's site for public domain books. You can read it online there, and since the chapters are quite short, it's a great reference to keep bookmarked so you can check whenever you're writing. Alternately, you can also download The Elements of Style in nicely formatted PDF, mobi, or ePub files from Feedbooks for free. These copies are great to save to your eBook library so you can read the whole book from your computer, iPhone/iPad, Kindle, or other device anytime you want.
The Elements of Style is definitely still a useful handbook for English writing, and I just read through the first section this afternoon as part of my required reading for my current technology communications class. Interestingly, it's also a great companion book to the new book from A List Apart, The Elements of Content Strategy, which is written to help writers craft online content that's as high quality as is demanded of traditional writers.
It's amazing how timeless the advice in The Elements of Style is for it to still be relevant all these years later. Whether you're a full-time writer or just need a few pointers to make your writing flow better, it's a great guide that's quick and easy to read. For free!
There's so many to-do list apps today for all of the major computing platforms that you can quickly get overwhelmed trying to choose one. Most to-do list apps on Windows are old and clunky, while many iOS to-do list apps are an island to themselves and don't let you sync or share tasks. It's enough sometimes to make you just want to go back to just using a pad of paper. But wait: that surely can't be the best solution. It's the 21st century; can't we have our tasks on any platform, synced, and shared with anyone we need? Can it really be that hard?
Enter Wunderlist. Wunderlist is an awesome new to-do list app that's beautiful, feature filled, and amazingly, free! Actually, it's is as much of a platform as it is an individual app. With to-do list apps for Windows, OS X, Android, iPad, iPhone, Android, and the web, you can keep up with everything you need to do no matter where you are or what device you're using. While there are many beautiful and functional to-do list apps on OS X and iOS, Windows typically hasn't had many modern to-do list apps that are both easy to use and stylish. Wunderlist's Windows app alone makes it a winner, but add in the apps for other platforms, and it's even better.
It contains all the features you'll need to keep up with your tasks. You can add lists to organize to-dos, add a star to prioritize them, add a date to make sure you don't forget when your task is due, and add notes to remember more about the task. Need to rearrange tasks? Simply drag and drop them to get them in the correct order. Then, find your tasks with the integrated search box, or reorder them based on priority or due date from the bottom buttons. You can even customize the app with a number of high quality background images. Best of all, you can share lists with others so your family, team, or business can stay connected in a simple Wunderlist to-do list. I've used this to share ideas with coworkers and editors over the past month, and it's worked amazingly flawlessly.
Wunderlist works almost the exact same on every platform, but contains the small touches it takes to integrate great with particular platforms as well. On Windows, it uses a standard window and tray icon; on iPad, you'll see iOS style pop-overs and inertia scrolling. You can enter tasks with keyboard shortcuts in Windows, OS X, and the webapp, while the mobile apps let you swipe to delete tasks and pull down to refresh a page. The same great features are there in each of the apps, though: contact syncing, sharing, organization, and a beautiful, easy to use experience. Best of all, if you've signed in with the same account on all of your devices, your tasks will automatically stay in sync. No more manually syncing or copying tasks between apps; you'll just stay connected to what you need to do.
And, now, Wunderlist is equally at home in your browser! The newly released Wunderlist webapp brings all of Wunderlist's features to any browser, so now you can use it from your Ubuntu computer or Chrome netbook. Or, if you don't want to install a new program without knowing if you'll like it, you could just give it a try in your browser. If you like it, then install it on your Mac, PC, or mobile device. Everything works almost the same as it does in Wunderlist's Mac and PC apps; you can create new lists, drag and drop tasks to rearrange them, search across all of your tasks, and more. You can even change the background just like you can in any of the other apps. Whether on the web, an iOS device, your PC, or almost any other device, the Wunderlist experience is the same. This is easily one of the best cross-platform apps we've seen that merges your mobile device, PC, and browser experience.
But, hey, we could talk all day about getting organized with awesome to-do list apps, but that doesn't help us get everything we need to do, done. Usually it's a tough decision whether or not you should spend money on yet another productivity app. You have to decide if you need your tasks on your smartphone, PC, or online, and whether you can live without everything in sync or not. Today, Wunderlist has made these decisions obsolete. Wunderlist gives you synced, shared, and scheduled to-dos on almost any platform, for free. The only problem I've had is that the Wunderlist apps are somewhat slower than fully native apps that are built specifically for one platform. That said, recent updates have really improved the performance, and the iOS app now runs just as fast as Things or other similar apps. Plus, it lets me share and sync tasks, something few other apps even offered. There's no reason not to give it a try on your browser, PC, Mac, iPhone, iPad, Android phone or tablet today. So go download it today, quit saying you're going to find the perfect to-do list app, and just give it a try.
Apple has set a high bar for iOS apps with their own iPad apps. The bundled apps, including Calendar and Contacts, are nicely designed, but their iWork apps really set the bar with full-featured office programs that are easier to use than most desktop apps but offer much of the same power. The new GarageBand and iMovie apps for iPad 2 take this even further and bring features you’d be hard pressed to replicate on a traditional computer.
That said, hundreds of 3rd party developers have taken the iPad as a canvas for their best work, and have created beautiful and useful apps for the most popular tablet computer today. Sorted for iPad is one such app. It brings iWork’s style to task management, and lets you easily create lists of the things you need to do and stay organized from your iPad. Simple to use with an elegant interface, it seems like it might be what Apple would have created if they’d made a todo list app for the iWork suite. Best of all, the latest version is a universal app that you can use from your iPhone or iPod Touch as well!
Get Your Tasks Sorted
Sorted is a simple and elegant to-do list app that makes it easy to keep up with everything you need to do. It uses a document based interface to organize tasks, unlike many apps that keep all of your tasks together. Its interface works like many apps including the iWork apps; your documents are listed on the main screen, and you can open one by tapping it from the home screen.
Sorted includes a default task list to help you get started, or you can go ahead and create a new list to organize your tasks. Just enter your list’s title, then double-tap on any line to enter a new task. This is much quicker than opening a New Task dialog like you have to do in many apps.
Your default tasks are just a plain text to-do, but Sorted lets you add much more info if you want. Just tap the blue arrow on the left of a task to add a due date, reminder, and select a color to prioritize your tasks. Swipe up to add a note to the task as well. Once you've added extra info, you'll see it in a smaller font under your task. If you're not fond of the default priority colors, you can change them from Sorted's main settings as well.
Sorted's interface is very easy to use. You can rearrange tasks just by dragging them by the three line handle on the right; no need to tap edit or change anything else. Once you've finished a task, you can swipe it with one finger to check it off as completed. Alternately, swipe with two fingers to delete a task.
You'll use the main List view by default, but Sorted can also display your tasks organized by priority or date. Alternately, select Completed to see all the tasks you've finished. If you accidentally swiped a task but aren't actually finished with it yet, just swipe it again here and it'll go back to your main list.
The nicest touch is the stamp on the top corner of the extra pages; it looks just like it was done with a real rubber stamp and ink. The little design touches such as the leather background behind the paper and the torn off paper edge at the top really make Sorted a pleasure to use. Combine that with fast operation and multitouch gestures, and Sorted definitely feels like it was built specifically for iPad much more than most other todo list apps.
Back on the main screen, you can add as many lists as you want to keep up with everything. Best of all, you can duplicate lists you’ve already created to make new lists. I really like this feature, since you can, for example, create a standard todo list for, say, a college class. Then, just duplicate it for each class, and add the info that’s important for that particular class. Once you’ve added a lot of tasks, it might be easy to lose them. Don’t worry, though; just tap the search button at the top to locate anything in your lists. Then, if you want to share your lists with others, you can email a plain text version right from Sorted. The developers plan to add the ability to sync your lists between devices in a future update; this will be especially nice if you have an iPhone and an iPad, since Sorted is already a universal app.
Conclusion
Sorted is a very simple todo list app that makes it quick and easy to keep up with everything you need to do. You can organize your tasks in separate lists, prioritize everything, and mark off the things you’ve done with multitouch gestures. It’s definitely a todo list app that feels like it’s been designed from the ground-up to work great on iPad. To me, it feels like a great addition to the iWork suite of apps! Best of all, it’s only $0.99, which is much cheaper than most iPad todo list apps. If you’ve used Sorted on your iPad, or on your iPhone since it’s now a universal app, let us know how it's worked out for you!
The iPad is often referred to as a consumption device, and it is great for reading and watching videos. But your iPad can be a serious productivity tool, too, and I use mine all the time for writing. We recently looked at iA Writer, which is still one of the best apps for writing plain text in a distraction free environment. Sometimes, though, you might want to be able to add more features to your text without having to resort to a full word processor like Pages.
Until recently, there were no rich text editors in the App Store that made it easy to just write rich text without a full Office program. The new Essay App cures this problem. It’s a rich text editor that’s already been featured by Apple in the App Store even though it’s only been out for little over a month. We were excited to get the chance to review Essay for iPad, so let’s take a look and see what’s so great about Essay to get this much attention!
Rich Text Editing Made Simple
Essay App serves a simple purpose: it makes it easy to create and edit rich text on your iPad. There are tons of plain text editing apps, and then there are Office apps like Pages and QuickOffice. Essay sits right in the middle; it gives you a way to create beautifully formatted text without creating a new Office document. Best of all, Essay is both simple and elegant. When you launch the app, the following splash screen appears for a moment.
The editor interface then slides in, and you’ll see a new Welcome document ready for you to read. As you can see, the document includes headings, italics, and bold text; this is just a sample of what you can do with the app. The left pane stores all the documents you create, while the middle is the main editor interface, and the right holds the editing tools. The interface is very smooth and delightful to use; the panes slide into position, and when you open a new file, it slides in on top of your previous file. It’s little touches like this that go a long ways towards making an otherwise boring task exciting.
All files you create are saved in HTML format, and can be printed or emailed directly from the app. You can also save them to your Dropbox account so you can access them from anywhere. Just press the settings gear icon and link your Dropbox folder. By default, your files will be synced to a /Essay folder on the top of your Dropbox, but you can change this if you wish. If you want an easy way to publish formatted basic HTML documents from your iPad, you could even set your Public folder as your linked folder. Then, just open the Dropbox app and copy the link, and you’ll have an essay ready to share with the world!
Writing in Essay
Writing a new document in Essay works just as you’d expect from many text editor apps. Press the plus button on the left to add a new file, then enter your title at the top. Then, just press Done or tap in the white editor area to start typing.
As you’re writing, you can maximize your editing space by pinching to zoom out. This closes the left and right panes, letting you edit in full screen mode. Alternately, swipe in from the right to open the editor pallet. Here you can choose to make your selected text bold, italicized, underlined, striked out, or highlighted with the ! button. If you have an external keyboard, you can also enter press Alt+Space and then use standard function keys such as b and I to change text to bold or italics just like you would on a PC. This is a nice touch that most apps don’t include.
Alternately, choose Section or Subsection for H1 or H2 headlines in Helvetica, or Paragraph for standard paragraph formatted Georgia text. You can also insert a blockquote that will be indented and italicized. This covers almost everything you’ll need to create beautifully formatted text, and you might even start writing your homework essays in Essay! Plus, the developer plans to add support for bulleted lists, links, and more in future updates.
If the fonts feel too small for you, just tap the A button under the printer to choose from three font sizes. The highlighted A shows the current size choice. The largest size makes Essay app a nice reading app, too!
As mentioned before, you can print or email your documents right from Essay App. Mail on iPad doesn’t include any text formatting options, so this is a great way to create more formatted emails than you could otherwise. And the included font choices look great in print, too.
Conclusion
After using plain text editors for so long, you can get used to living without rich formatting for standard note taking and writing on iPad. Essay proves how useful the basic formatting options can be, and brings them to iPad in an elegant yet simple interface. It’s no wonder Essay has already gotten so much recognition! Whether you need to write real essays on your iPad, are looking for a better way to jot your thought down and keep them formatted, or want to email fully formatted messages, Essay is a great app to cover all this and more. Plus, it’s just getting started; with future updates, it’ll be even more useful for writing rich text wherever you are!
Would you like to make a customized theme for your Tumblr site, or create new Tumblr themes to sell? While there are many reasons a WordPress blog is more versatile and powerful, Tumblr is still one of the easiest blogging systems to use. If you just want an easy way to publish your pictures, videos, thoughts, and more, Tumblr makes it easy to do. Best of all, it’s much easier to create new themes for.
That’s where the Rockable Press eBook Theme Tumblr Like a Pro comes in. This 138 page eBook, along with around 3 hours of included tutorial videos, takes you though everything you need to learn to start designing themes for Tumblr. You can learn to create beautiful themes for your own use, or to sell to the more than 14 million Tumblr users that have blogs online today! Even major theme developers like WooThemes have created themes for Tumblr, and there's over 30 different Tumblr themes for sell today on ThemeForest by freelancers and small businesses. There’s a huge opportunity to create and sell new themes on marketplaces like ThemeForest, and this eBook will teach what it takes to go from zero to hero.
What’s Included?
The book first teaches about Tumblr’s origins, and the basics of designing themes for the service. It then progresses through the different types of posts in Tumblr, and how to customize your theme for each of them. Next, you’ll be able to take your theme knowledge to creating static pages, as well as adding customization options so your customers can tweak the font’s colors, fonts, and more. Finally, it progresses to more advanced topics, including how to create AJAX enabled themes, utalize the Tumblr API, and much more.
Throughout the text, you’ll see blocks of code to help you understand what’s being explained, as well as images of what the result should look like on your site.
As you’re reading, you’ll see markers that let you know when you should switch to the video. Just like a self-study course, you’ll be immersed in learning to theme Tumblr blogs with both the detailed text and the accompanying videos.
The videos themselves are very informative; you’ll see the most important parts explained directly, and then see the code in action on Tumblr. All together, Theme Tumblr Like a Pro is more like a mini-course on creating Tumblr themes than a traditional eBook. It takes the best of both worlds, and really makes coding a theme seem simpler than you might have thought.
Conclusion
Tumblr is actually amazingly simple to create themes for, and if you’ve found it daunting to create WordPress themes then you’ll be refreshed by Tumblr’s simplicity. Even though it’s simple, you’ll still need to learn the ropes before you can dive in and start creating world-class themes. Theme Tumblr Like a Pro is a great book to get you started. Far from simply teaching the basics, it’ll help you create advanced, dynamic themes. In fact, after reading it, I’m thinking that I should try creating a Tumblr theme even though I don’t use Tumblr myself anymore. I could always sell it on ThemeForest… :)
Theme Tumblr Like a Pro is available from Rockable Press for $29. For this, you’ll get the eBook in PDF format, as well as the sample theme with the source code and PSD files. You’ll also get around 3 hours of tutorial videos. All together, you’ll be fully equipped to learn everything you need to start coding themes. It’d be best if you knew at least some HTML and CSS before getting started. With everything included, it’s definitely a reasonable price, and if you can go sell new Tumblr themes when you’re done, all the better!
Don’t forget … if you do make a new Tumblr theme after reading this book, be sure to leave a comment here and let us see the results!
Would you like to move your Tumblr blog to WordPress, but think it’d be to hard to get everything moved over? Not any more! We ran an article a couple months ago about How to Move Your Tumblr Blog to WordPress, but it was still rather complicated. You had to export your site, import it into WordPress, then manually change each of your posts to the new WooTumblog post formats to keep everything working the same as before. If your Tumblr blog had many posts, it could be a daunting task!
Thanks to WooThemes, it’s now incredibly simple to move your Tumblr blog to WordPress. They’ve recently created the Tumblr2WordPress exporter that will export your entire Tumblr site into format that will work great with any Tumblog WooTheme such as Canvas, Crisp, or the new Auld theme. It’ll also work great with any theme customized with the WooTumblog plugin. Here’s what you’ll need to do.
Get Your WordPress Site Ready
First, you’ll need a website with WordPress and a WooTumblog compatible theme setup to import your site. Check out our details on the original post for more info. If you’ve already had the site setup for some time, you’ll need to upgrade your WooTheme to work with the new post formats. Check this support article from WooThemes for more info on upgrading your theme. Once it’s upgraded, you’ll be able to use the new WordPress 3.1 Post Formats for your Tumblog.
Export Your Tumblr Site With Tumblr2WP
Now, head over to the new Tumblr2WordPress site to get your Tumblr blog exported. Enter your Tumblr blog address; even if you’ve added a custom domain, make sure you use the original yourblog.tumblr.com address. Then, choose your settings; the defaults usually should be fine. Click Export when you’re finished, and save your export file to your computer.
Finally, go back to your WordPress blog and import your posts as your would from any other blog. After a few moments, your Tumblr posts should all be in your WordPress blog, with the correct post formats and all of your content, just as your Tumblr blog was before.
That’s a ton easier than the other method! Thanks to WooThemes, you can now move your Tumblr blog to WordPress much easier than before. So why wait? Move over today and take advantage of all of WordPress’ advantages without losing any of your content you’ve added to Tumblr!
Want to get the most popular mobile game on your PC? Angry Birds has taken the iPhone and Android world by storm, and it was recently released on the new Mac App Store. Windows doesn’t include an App Store by default, so for the most part you have to manually find, purchase, and install new programs you want. That is now changing with Intel’s AppUp Store. The AppUp store is designed to bring new applications to Windows XP and 7 based netbook, but it works fine on normal Windows desktops and laptops as well. Best of all, Angry Birds is now available for $4.99 on the AppUp Store and runs great on any Windows computer.
Note: Angry Birds is now available for all Windows Computers directly from Rovio, so you can now get it without the Intel AppUp store. Just go to http://download.angrybirds.com/, and you can download trial and paid versions of all the editions of Angry Birds!
Install the AppUp Store
First, though, you’ll need to install the Intel AppUp application on your PC. Download and install it as normal on your computer. This should only take a few minutes, and once it’s installed, you’ll have quick access to tons of great, new free and premium apps for your Windows PC.
[box type="info"]Note: While the AppUp Center works great on both Windows 7 and Windows XP computers, it is not working at all on Windows Vista in our tests. If you try it on Vista and get it to work, please let us know in the comments below!
In the mean time, you’ll need to register for an AppUp account. Head over to the AppUp registration site, and enter your personal and credit card info so you’ll be ready to purchase new apps like Angry Birds.
As soon as the install is finished, the AppUp Center should automatically open. If it doesn’t, you’ll find it in your Start menu or on your desktop. You can now browse the store and see the different games and apps that are included. Apps are organized into categories, with featured apps front and center similar to the way the iOS App Store looks in iTunes. Only difference is, this time, the programs are designed for your PC.
Getting Angry Birds
Ok, enough talk. Let’s get the game everyone wants: Angry Birds. It’s currently a featured app, so you could just click Buy App right from the front page. Alternately, click its link or search for it via the top search bar to see more info. Once you’re sure you want to buy it, click Buy App.
When prompted, sign in with the account you made previously, then confirm that you want to purchase the app. The AppUp Center gives you a 24 hour free trial, so you can return the app within 24 hours if you decide you don’t want it.
Angry Birds will now start downloading, and will automatically install once its downloaded. It still uses a standard Windows Installer, and you may have to click an UAC prompt during the installation, but overall it’s quicker and easier than traditional Windows program installs. It’s not as easy as installing apps from the Mac App Store, but it’s not that bad either. And, if you have multiple PCs, you can install the same app on up to 4 computers with the same account for no additional charge!
Smash Those Pigs!
Once its installed, you can launch the game straight from the AppUp center, or from the Angry Birds link in your Start menu. Seconds later, you’ll be playing the world’s favorite touch screen game … on your PC with a mouse! I’d say it’d be rather fun on an HP Touchsmart or other PC with a touchscreen, though I don’t have a touchscreen PC to try it on. If you’ve got a touchscreen PC, let us know how it works on it!
Angry Birds worked great on my main PC, which is a Windows 7 desktop with an AMD Athlon 64 x2 processor … definitely not a netbook! It also works great on netbooks, of course. The only computer I couldn’t get it to work on was a Vista desktop with an Intel processor; hopefully they’ll support Vista in the near future, but for now, the App Center only runs on Windows 7 and XP.
Angry Birds for PC includes everything you love about Angry Birds, including all of the standard levels. The only problem is, you can’t import your score from your iPhone or Android phone, so you’ll have to go beat all the levels all over again! Or, if you haven’t gotten to experience Angry Birds because you don’t have a modern smartphone, it’ll be all new to you.
Since most PCs don’t have touchscreens, you’ll have to drag the screens with your mouse to pan and see the whole level. Then, just click and drag your bird back, aim, and release your mouse to set your bird sailing through the air to the birds.
Oddly, the only major problem I had with Angry Birds for PC was with taking screenshots. It interferes with almost every screenshot program, so the only way I could get shots is to press Alt-tab and then hover over the Angry Birds icon in my taskbar. Camtasia Studio couldn’t take a video screencast of it, either; it just recorded my desktop with my mouse going back and forth and the Angry Birds sounds in the background. But hey, you don’t usually need to take screenshots while playing a game, so this shouldn’t be a problem!
Returning AppUp Center Apps
Of course, Angry Birds isn’t the only interesting app in the AppUp center, so feel free to check out other apps in the store. There’s plenty of free and for-pay options, and you just might find a fun, new app that you’ve never come across before. Best of all, you can try out any app, even paid ones, for free for 24 hours. If you decide you don’t want the app, just open the AppUp Center and click the My Apps tab on the left. Select Transaction History, then click the Options button on the app you want to return. Click Cancel Purchase before your 24 hour timeframe is up to return it. You’ll be asked to tell why you’re returning the app, and then it will automatically uninstall from your computer. That’s tons easier than most ways of trying out new programs!
Conclusion
It’s exciting as a Windows PC user to see new apps coming out for PCs again. Recently it’s seemed like all the developer focus is on mobile and Mac apps, but Intel’s AppUp Center just might turn things around again. In fact, some developers are finding it easier to get their new apps out for PCs than on Apple’s App Stores. TinyGrab, a great freemium screenshot utility for Macs, Windows, and iOS, has recently found Apple’s restrictions on the App Store too restrictive for their app, while at the same time they’ve found it easy to work with Intel on getting their app on the AppUp Center.
Hopefully Intel will continue to improve the AppUp Center and make it fully supported on computers other than netbooks. And, of course, hopefully Microsoft will make their own App Store for Windows and make it easier to get apps on all modern versions of Windows. For now, though, all the apps I tried work great on Windows 7 and XP. And hey, who would have thought that Angry Birds would finally be available for PCs?
Finding a good hosting service and domain name can be two of the hardest things about starting a new site. Once you’ve got a solid hosting service, you can usually use it to host multiple sites. Case in point, both Techinch.com and Maybring.com both run on my same DreamHost account. Once you’ve got a good hosting service that’s running your sites stable, it’s usually quite simple to add another site.
But sometimes, your hosting service may not be the cheapest place to register domain names. Plus, if your hosting service did go bad, it’s a lot easier to move your data than your domain name. For these reasons and more, many people choose to register their domains from a domain registrars and host their sites at another hosting service. You can use this to take advantage of specials as well; Media Temple, for example, currently offers $5 .com domain name registrations to new customers, which is about half price of standard domain registration price.
So how do you get your domains working with your hosting service if you’re keeping everything separate? Here I’ll show you how to add your domain from Media Temple to a DreamHost account, and the steps should be very similar with other registrars and hosting services.
Change Your Domain’s Nameservers
First, you’ll need to change the nameservers on your domain. Login to your account at your registrar where you purchased your domain, and open your domain tools. Here you should find an option to edit the nameservers listed for your domain. This will let you point your domain to your existing hosting account so you can do something useful with your domain name.
[box type="info"]Want to learn more about nameservers? This Wikipedia article should help you out.
In your options to edit nameservers, you should find listings to enter 2-3 nameserver names. By default, these will be the nameservers for your registrar’s hosting, but you want to change them to your hosting account’s nameservers. So, in another tab or window, go to you hosting company’s site and find their nameservers, which should be listed under your account’s domain settings. If you can’t find their nameservers, contact their support team. Once you’ve got the name servers, enter them in the nameserver fields on your domain registrar. Below you can see my settings for DreamHost’s default nameservers.
[box type="info"]It can take up to 24-48 hours for your DNS nameservers settings to propagate, though often today it only takes a couple hours.
Add Your Domain to Your Hosting Service
Ok, so now your domain is pointing to your hosting service, so it’s time to add it to your account. Head over to your hosting service, and open your domain management panel. If you're using DreamHost, you'll see a Manage Domains link on the top left side of your hosting dashboard. From the domain page, select Add New Domain. Don't worry; you won't have to pull out your credit card. This is just to claim the domain that you've pointed to your hosting service and add it to your account.
Now, on the Add New Domain page, you'll have a number of options. If you're wanting to start a new site from this new domain, then enter it in the top field under Fully Hosted. You'll have the option to set which folder your site's data will be saved in, specify which user has access to the domain, and whether or not you want to add Google Apps to your domain.
Alternately, if you just want to redirect your new domain to a site you already have, scroll down and enter your domain under Redirect, then enter the domain you want to redirect the new address to. That's what I've currently done with my new domain below, until I have a new site started for it.
That’s all! Now your domain should be running on your new fully hosted site on your existing hosting account, or redirecting to your site. Either way, you’ll be able to keep your domains registered wherever works best for you, while taking advantage of hosting you already have. For me, it enabled me to get 2 domains cheaper than Dreamhost’s default registration cost and add them to my account without much hassle at all.
As far as the best hosting or domain registration service, I’m afraid I can’t give you any absolute recommendation. Media Temple is highly regarded among designers and bloggers, and I’ve seriously considered using them to host Techinch.com. They offer many more advanced hosting offerings than most hosting companies, so if your site is going Pro, they’re definitely an option to consider. Plus, their current special on $5 new .com registrations is a great deal if you’re got a new domain you’d like to snag. Then, DreamHost offers great shared hosting at a very reasonable price, with an amazingly responsive and actually helpful help team. Techinch.com has been hosted on Dreamhost for over half a year now, and has had around 98% uptime which is not too bad. At the end of the day, though, you’ll get different reports from everyone about different hosting companies. The great thing is, your domains can always be moved to the hosting provider you want even without transferring them!
I've been looking for ways to make it easier to write and blog from my iPad, trying to make it my one-stop computing solution as much as possible. For the most part, there are tons of ways to accomplish most of the tasks we've traditionally used a PC for right from iPad. If there's one thing I've found less than intuitive, though, it's screenshot editing. I use iPad in landscape mode most of the time, but if you take a screenshot in landscape mode, iOS saves it in portrait mode. So, if I'm reviewing an app or writing a tutorial with screenshots, I have to take screenshots, rotate each one, and then insert each shot into my post. If you rotate each shot individually, it would take forever.
Why Batch Edit Images?
But it's not just a problem for reviewing apps. If you use your iPad for organizing or editing pictures from the Apple iPad Camera Connection Kit, or draw tons of pictures in apps like Adobe Ideas, then you'll likely want a way to bulk edit images. Wouldn't it br nicer to crop or rotate them all at once, then upload the entire batch to Dropbox without any extra steps? Good thing is, there's a way you can do this from iPad.
Meet OneEdit
After a search on the App Store, I was pleased to discover OneEdit for iPad, a simple and fairly powerful batch image editing too for iOS. No, it's not the most powerful batch image editor in the world, but for iPad, it's a huge improvement on other basic image editors if you want to tweak tons of pictures at ones. And if you'd like to batch edit images from your iPhone or iPod Touch, OneEdit for iPhone has you covered there, too.
Batch Editing in Action
Here's how it works:
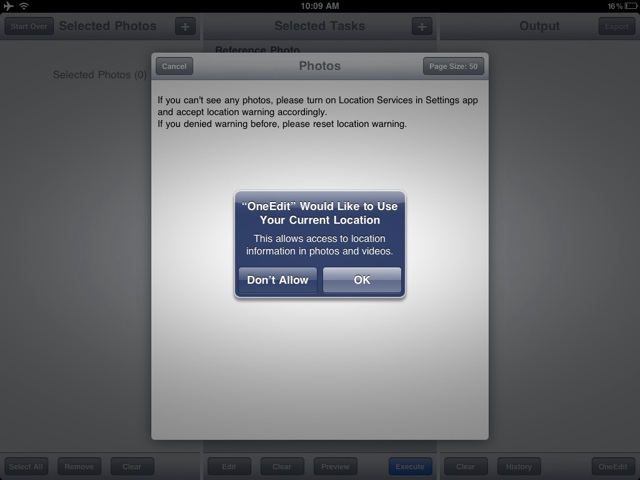
First, tap the plus in the left column to add pictures to OneEdit. Make sure to allow OneEdit to access location data so it'll be able to access and edit metadata on images
Now select the images you want from your photo library. If your folder has more than 50 images, you'll be asked to select which group of 50 images to choose from. Then just tap the images that you want to bulk edit and import them. One nice feature, especially for my needs, is the ability select just landscape or portrait images. If you need pictures from multiple sources, just import from the first folder then come back and add more images.
You're now ready to add bulk editing tasks to your images. Tap the plus in the middle column, then select from the available editing options. You can resize, rotate, crop, add text, border, logo, shadow, timestamp, color effects, or convert your image to greyscale. Then you can choose the task specific options for mosts of the tasks.
Some of the options offer a number of settings, such as the Add Text and Color Effects, while the shadow and border options are less full-featured. There's still plenty to explore here for everyone. For the rotation settings, which was the feature I wanted most, you can rotate an image left or right, flip it upside down (curiously labeled Rotate Down). Best of all, you can choose to have OneEdit only rotate Portrait or Landscape orientated images! Yes!
Did you say you wanted to do more than one thing to an image? Don't worry; OneEdit lets you add as many tasks as you want to your batch editing. Here, I've got it ready to rotate my screenshots, resize them to 640 px width, and add text to the bottom of the images. You can change the order of the tasks from the Edit button on the bottom. Finally, choose which format you want to save your pictures in; you can choose from PNG, JPG (with the quality you want), or PDF. When you're ready to start editing your pictures, press the blue Execute button on the bottom of the middle column and then confirm it in the popup.
Hold tight, and after a few moments you'll see thumbnails of your freshly tweaked pictures on the right column. All edits are done non-destructively, so your original shots are still safe in your pictures library. To get your new edited pictures out of OneEdit, tap Export on the top right and select to save the pictures to your iOS Photo Library, upload to Dropbox or Facebook, or transfer them to your computer.
If you choose to upload the pictures to Dropbox, you'll need to link your account, and then you'll be able to upload all of the pictures at once to any folder you want in your Dropbox account. Talk about easy; that shaves off so much time you would have spent otherwise uploading them individually from the Dropbox app! Alternately, if you want to just copy them directly to your computer, you'll get a unique IP address to enter in your computer's browser address bar. Either way, seconds later you'll have your pictures saved and ready to be used however you want!
That's all there is; OneEdit is quick and simple to use, and makes it a breeze to bulk edit images, screenshots, and more from your iPad or iPhone. I'm very impressed with it, and think the investment was already worthwhile. If you find yourself editing pictures or uploading them to Dropbox regurally, you should definitely give OneEdit a try. It's sure to make your photo editing workflow flow much better on iPad!
Oh, and if you were wondering, all of the screenshots in this review were rotated, resized, and uploaded to Dropbox with OneEdit. ;)
 For the most part, OmmWriter doesn't have a traditional program interface. There are some tools on the side, and an iOS style scroll bar on the right. You can change the font, chosing from a serif, sans-serif, script, or monospaced font, as well as choose from 3 font sizes. On the bottom, you'll be able to save your file in plain text format or open a new document.


![sshot-2011-3-11-[120]](https://techinch.com/wp-content/uploads/2011/03/sshot-2011-3-11-120.png "sshot-2011-3-11-[120]")


![sshot-2011-3-11-[122]](https://techinch.com/wp-content/uploads/2011/03/sshot-2011-3-11-122.png "sshot-2011-3-11-[122]")


![sshot-2011-03-07-[15-50-09]](https://techinch.com/wp-content/uploads/2011/03/sshot-2011-03-07-15-50-09.png "sshot-2011-03-07-[15-50-09]")


![sshot-2011-02-25-[2]](https://techinch.com/wp-content/uploads/2011/02/sshot-2011-02-25-2.png "sshot-2011-02-25-[2]")
![sshot-2011-02-25-[3]](https://techinch.com/wp-content/uploads/2011/02/sshot-2011-02-25-31.png "sshot-2011-02-25-[3]")
![sshot-2011-02-25-[5]](https://techinch.com/wp-content/uploads/2011/02/sshot-2011-02-25-5.png "sshot-2011-02-25-[5]")
![sshot-2011-2-25-[54]](https://techinch.com/wp-content/uploads/2011/02/sshot-2011-2-25-54.png "sshot-2011-2-25-[54]")
![sshot-2011-02-25-[3]](https://techinch.com/wp-content/uploads/2011/02/sshot-2011-02-25-3.png "sshot-2011-02-25-[3]")
![sshot-2011-02-25-[4]](https://techinch.com/wp-content/uploads/2011/02/sshot-2011-02-25-4.png "sshot-2011-02-25-[4]")
![sshot-2011-02-22-[2]](https://techinch.com/wp-content/uploads/2011/02/sshot-2011-02-22-2.png "sshot-2011-02-22-[2]")
![sshot-2011-02-22-[28]](https://techinch.com/wp-content/uploads/2011/02/sshot-2011-02-22-28.png "sshot-2011-02-22-[28]")
![sshot-2011-02-22-[4]](https://techinch.com/wp-content/uploads/2011/02/sshot-2011-02-22-4.png "sshot-2011-02-22-[4]")
![sshot-2011-02-22-[6]](https://techinch.com/wp-content/uploads/2011/02/sshot-2011-02-22-6.png "sshot-2011-02-22-[6]")
![sshot-2011-02-22-[29]](https://techinch.com/wp-content/uploads/2011/02/sshot-2011-02-22-29.png "sshot-2011-02-22-[29]")
![sshot-2011-02-22-[30]](https://techinch.com/wp-content/uploads/2011/02/sshot-2011-02-22-30.png "sshot-2011-02-22-[30]")
![sshot-2011-02-22-[19]](https://techinch.com/wp-content/uploads/2011/02/sshot-2011-02-22-19.png "sshot-2011-02-22-[19]")
![sshot-2011-02-22-[32]](https://techinch.com/wp-content/uploads/2011/02/sshot-2011-02-22-32.png "sshot-2011-02-22-[32]")
![sshot-2011-02-22-[21]](https://techinch.com/wp-content/uploads/2011/02/sshot-2011-02-22-21.png "sshot-2011-02-22-[21]")
![sshot-2011-02-22-[26]](https://techinch.com/wp-content/uploads/2011/02/sshot-2011-02-22-26.png "sshot-2011-02-22-[26]")
![sshot-2011-02-21-[1]](https://techinch.com/wp-content/uploads/2011/02/sshot-2011-02-21-1.png "sshot-2011-02-21-[1]")
![sshot-2011-02-21-[2]](https://techinch.com/wp-content/uploads/2011/02/sshot-2011-02-21-2.png "sshot-2011-02-21-[2]")
![sshot-2011-02-21-[3]](https://techinch.com/wp-content/uploads/2011/02/sshot-2011-02-21-3.png "sshot-2011-02-21-[3]")

![sshot-2011-02-21-[5]](https://techinch.com/wp-content/uploads/2011/02/sshot-2011-02-21-5.png "sshot-2011-02-21-[5]")