No, really. The first thing you should do when you want better pictures is not to buy a better camera. Instead, learn how to take the very best pictures you can with the camera you have.
If you have a smartphone from the past several generations (say, an iPhone 4 or newer) or a point-and-shoot camera that’s no older than a half-decade, you can take very good shots with the camera you already have. What you need is practice and techniques to get better pictures with your camera. Learn how to focus and adjust exposure—yes, even your relatively basic camera can do that, and more if you’re using a smartphone with photography apps.
Now, learn to organize and tweak your photos on your own. Don’t use pre-made filters: use tools that’ll let you adjust brightness and contrast, tweak the highlights and shadows, and more. Don’t try to make your photos look old or artificially blurred—instead, try to tease the best colors out of the photos themselves. On your phone, you can use apps like VSCO Cam for that, but again, focus on tweaking the photo itself, not the filters in the app. On your Mac or PC, consider getting Lightroom—it’s a great app to organize and tweak your photos, and even works on iOS these days, and you can get it with Photoshop for just $9/month with a Creative Cloud Photography Program subscription. Again: don’t go buy Lightroom presets, the desktop version of mobile photo filters; practice tweaking your photos by hand instead, and even take a course on Lightroom itself instead if you really want more. You’ll learn far more, save money, and have one less thing to not worry about.
Organize everything you want to keep, tweak those shots to make sure they’re the best they can be, and organize them and back them up so you’ll keep them forever and be able to find them easily later. You’re taking photography seriously now, remember.
If you want more than that, pick up a book about the art of photography—perhaps even one with that exact name: (The Art of Photography: An Approach to Personal Expression)[http://amzn.to/1m4SA5X] (which, by the way, is as good an eBook as a paper book, and works great on the Kindle since its photography examples are Black-and-White). You’ll learn how to frame your subjects and use light and tone to get the best pictures possible. And you just might find that the camera you have is quite enough—or you might get lured even deeper into the art of photography, and end up back at square one wanting to buy a better camera. That’s ok: this time, you’ll know more about photography—what aperture and ISO and focal length and more mean—and will be ready to actually put your new camera to better use now that you’ve maxed out your iPhone or point-and-shoot photography skills.
Then, and only then, consider buying a camera. And here’s where you’re going to get overwhelmed. There’s a million point-and-shoot cameras, which you can ignore. If you want better than your phone, you either want a larger sensor (see Wikipedia for a comparison of common sizes, and marvel over how tiny your phone or point-and-shoot’s sensor is) which allows more light in—and which means far more than megapixels (in fact, go ahead and quit worrying about stats: they stop mattering for the most part right here). That means you want an interchangeable lens camera, and likely means you want a DSLR.
But here’s where you need to stop and think for a minute, before you go read any reviews or compare cameras. The new fad is mirrorless cameras—they’re smaller and lighter than DSLRs, and often feature cool retro styling. And they can be nice. But the cheapest ones often don’t have a viewfinder, which takes away one of the very things a better camera usually has that can help improve your photography, and their lenses and accessories are often more expensive. And, aside from Sony and Fujifilm’s offerings, they all use Micro Four Thirds sensors, smaller—thus letting in less light—than the sensor in a DSLR.
Entry-level DSLRs are also cheaper, almost always, for similar features—and here we’re looking for photo shooting performance, not extras like Wifi that don’t truly matter when you’re taking a picture. And any DSLR from the last several years will be great—I own a Canon Rebel T5i (otherwise called the 700D or X7i), but the T3i or T3 from a few years back are still great. On the Nikon side, there’s the 5000 series that’s the most similar to Canon’s Rebel line, and the 3000 series that’s a tad cheaper. There’s a ton of other models for both brands (typically, the shorter the number, the more professional—and expensive—the camera from both Canon and Nikon). You’ll find a number of models from each in the $3-500 range in Amazon’s best-selling DSLR list, or could even get one used.
Don’t worry too much about which one to buy. If you want to focus on specs, you can endlessly compare—and if you want to do so, The Wirecutter’s DSLR and Mirrorless camera guides are a great place to start. But really, don’t worry too much about which camera you get. Any decently new Canon or Nikon will be great. In fact, I’d most strongly suggest checking what camera your friends own; if they mainly have Canon, get Canon. You’ll be able to share tips, and perhaps lenses and more.
I promise: I thought way too much about which camera to buy, made comparison charts and asked countless people for help. And in the end, the camera I bought was the Canon a friend recommended at first—I went the whole way around and, even though it wasn’t the top spec’ed camera, it ended up being the one that made the most sense for me. But any of the cameras could have made sense. Just buy one, and start shooting photos.
Wait: don’t shoot photos just yet. You need one more thing: a prime lens. Your camera likely will come with a so-called “kit lens” that’ll go from somewhat wide to somewhat zoomed-in shots. It’ll be ok, but not amazing. For those amazingly sharp photos, and ones with a sharp focus on one object and a blurred bokeh background behind, you’ll want a prime lens—a fixed lens that only lets you shoot at one focal length (so you can’t zoom in or out). For that, the default choice is the 50mm or 35mm prime for your camera—or for Canon, there’s a 40mm “pancake” prime that’s smaller, and right between the focal length of those two (and that’s the lens I bought). If you can, try them out in a store and see which one feels nice to you—and buy it. That’ll cost you less than $200, and will be the key to taking far better pictures than ever before. Do not buy any other lenses yet; use the ones you’ve got now until you know enough to know for sure exactly what you’d use another lens for.
So, all told, you’ll buy a entry-level DSLR, a prime lens, and that’s it. Unless it’s free, don’t bother getting a camera case and SD card just yet; you can likely pick them up cheaper later, and you’re almost guaranteed to not get a better deal with a set of stuff. You’ve also likely got an SD card laying around somewhere, and the case isn’t that big of a deal—you want the camera around your neck most of the time anyhow.
Now, put that prime lens on your camera, and start taking pictures. Lots of pictures. Shoot in Raw, shoot at your maximum aperture to get the great effects you’ve so desperately wanted from a better camera—and then experiment back up until you know what you can achieve with each aperture—and tweak your photos in Lightroom. Don’t buy a book about your camera itself—read the manual that came with it. Then go back to your photography book, and practice. And practice. And have fun.
It’s tough to start over, to throw out what you already have and start anew. And yet, that nimbleness is seemingly the most required trait of successful software companies today. Desktop software that made sense a decade ago often needs far more than just updates today—it needs rethought for the needs and use-cases of today’s mobile world. You can either change, or watch a nimbler new startup take away the new version of the market you used to claim.
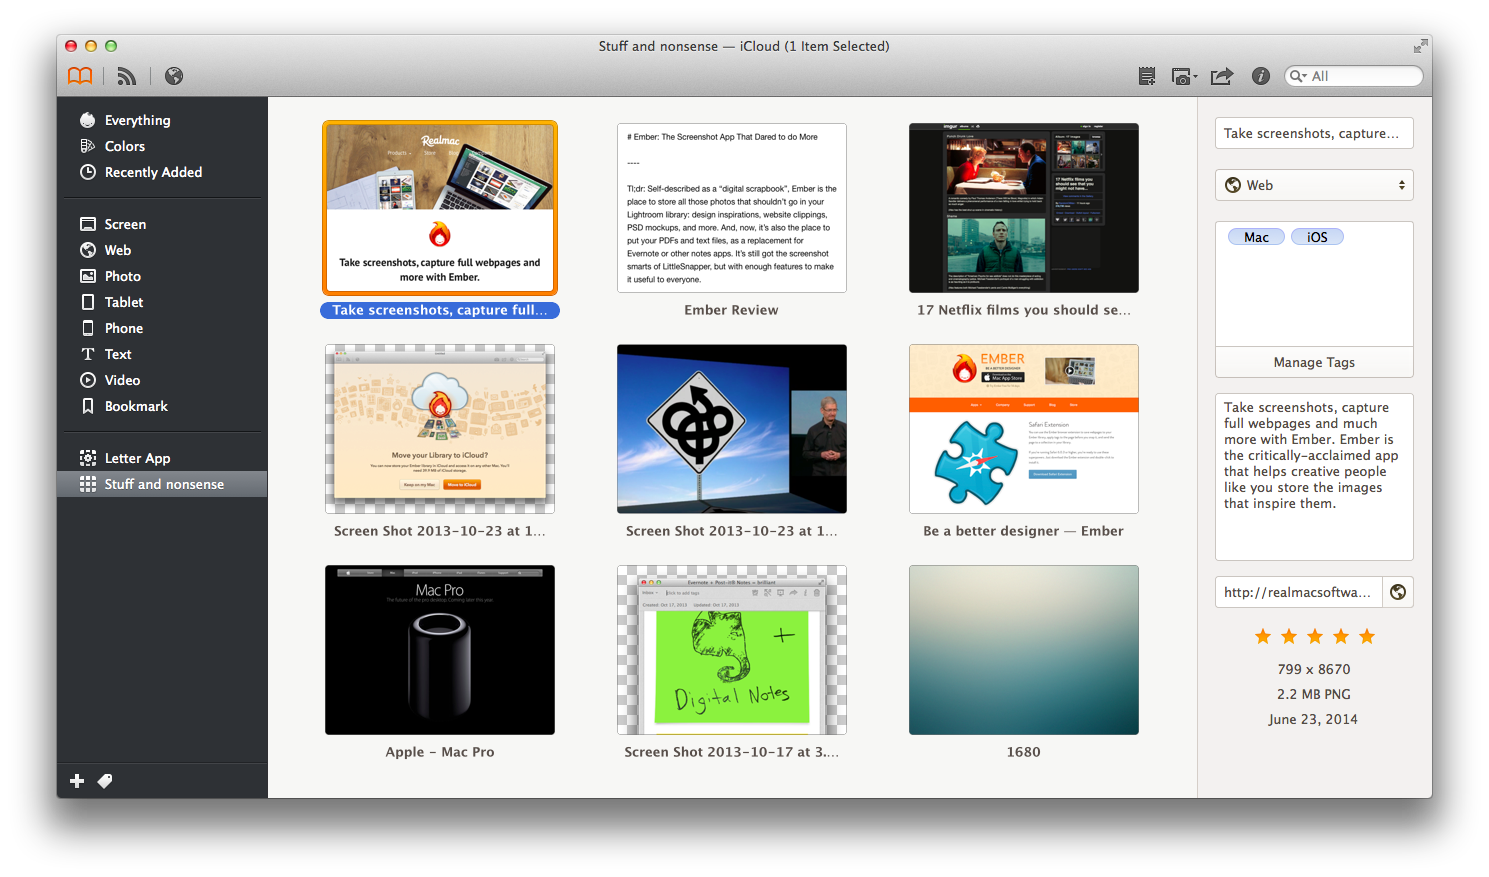
Thus, it’s far from surprising that Realmac Software decided last year to kill LittleSnapper, their screenshot tool that made it simple to grab screenshots, annotate them, and store them together in a library, in lieu of the new, lighter and leaner Ember. Instead of being a tool just for screenshots—something that almost only appealed to geeks, who themselves are almost as likely to use the built-in Mac screenshot tools anyhow—Ember was designed as a tool that almost anyone could use. If you ever save images that don’t quite fit in your Lightroom photo library—whether design inspiration clippings or screenshots or font samples or color swatches or anything else—you’ll find a use for Ember.
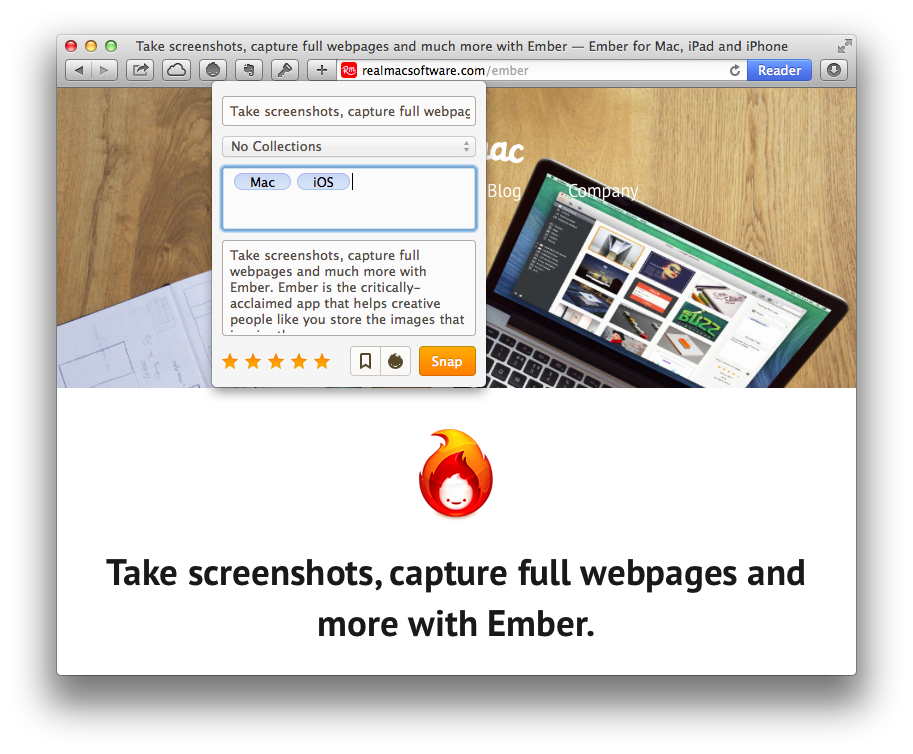
Here’s how it works. You use its built-in screenshot tools—holdovers from LittleSnapper—to clip anything you see on your screen, or drag and drop any image, video, PSD, AI, or text files into Ember. Or, you click the web tab in Ember or install its browser add-ons, then open a page you want to save and click the Ember button, then choose to just bookmark the page (which saves any site metadata and notes you added, along with a small clip of the front page), clip the entire page (which saves a full-length image of the website, along with its full source code), or in the Ember app’s browser you can select just a portion of the site to save.
Now, you should head over to the main Ember app, where you’ll see your clipped items—screenshots, images, bookmarks, and files—all in the middle of the window, with an inspector on the right side of the screen that lists the metadata from the selected items. On the left, you’ll find quick collections of your items based on the type of clipping, along with any other collections you add to organize your own items. Then, select an item, and you’ll get mockup tools to quickly tweak your clips and share them using iCloud, CloudApp, and more.
There’s features for screenshot geeks. You can snap full-length websites, for one, and then annotate them with simple tools like the Smart Drawing tool that’ll automatically turn your squiggles into arrows and circles and more. Then, as mentioned before, you can view and edit the full source code of sites you’ve clipped, a great way to see how exactly the designers worked their magic in making the site that inspired you. Then, in the built-in browser, you can even resize the browser view or pick from standard device screen sizes to test responsive sites and screenshot them in the way they’d look on mobile.
There’s features for organization geeks who might go for a bucket app otherwise, but who’d also like Ember’s simplicity. You can bring in most of the files you use, now that it supports text and PDF, and can jot down simple notes right in Ember or select and copy text from PDFs if you want. Then, you can organize everything in smart collections that’ll automatically show items with specific tags, titles, format, rating, and even colors that Ember automatically detects. There’s also search—though for now, it only looks at the items’ metadata: their file names, date created, rating, tags, note, and type of clipping.
And then, of course, there’s features for design geeks, the ones the original launch of Ember seemed to emphasize. You can drag in all your inspiring pictures and clip the sites with the styles you like, then organize them into your own categories. Better yet, you can automatically get inspired with RSS subscriptions to image feeds from Dribbble, Inspired UI, 500px, and more, and add images you like to your library (and the UI feeds there will likely catch the eye of screenshot geeks that might have initially dismissed the design features as silly extras).
The original image-only release of Ember wasn’t quite enough to satisfy many, as can be seen in the comments on our Mac.AppStormreviews of Ember. Simplicity, it seemed, was not enough to stand on its own. But still, there were plenty of people who embraced Ember for its focus and simplicity, and the Ember site has a ton of stories of how designers and more the world over have found it useful.
And now, I suspect, with the addition of bookmarking and support for other file types, Ember will prove itself useful to a far wider range of users. If it’d only let you search through the full-text of clipped sites, PDFs, and text notes (since right now it only lets you search through file names and their metadata), and perhaps include Markdown rendering for notes—along with support for web clipping on iOS—it’d essentially be everything you need for a simple bucket app that looks nicer than Evernote. Already, it’s the perfect graphical bookmarking app as long as you add any info you want in the description box, easily as good as Evernote plus the Web Clipper for that.
Ember won’t be the same app for everyone. For some, it’ll continue to be a place for design inspiration, while for others it’ll be a new graphical bookmarking app, and for others it’ll be the place to put all those pictures and other files that don’t quite make sense anywhere. That’s the magic that can happen when you strip an app down to its bare minimum and build up from there. You can make an app that’s more useful to a far wider range of people.
And that’s exactly what Ember is. Screenshots alone aren’t enough to get most people to buy an app—even me, and I take screenshots all day long with OS X’ built-in tools—but combine those features with a library, annotation features, and file support that goes far beyond screenshots into a bookmarking and basic notes app, and Ember ends up being an app that almost anyone can use. And enjoy.
Purchasing Ember
You can buy Ember from the Mac App Store or directly from the Realmac Store for $49.99. Both versions are the same, with the exception of syncing services: both versions can sync your library via Dropbox, but only the App Store version can sync via iCloud.
Ember for iOS is a universal app for iPhone and iPad, costs $4.99, then offers a $1.99 in-app purchase to automatically import screenshots and a $4.99 in-app purchase to add annotations to images. Altogether, that makes it cost $11.97 for full functionality on iOS.
You get something, you lose something. That’s how it always is with new tech. Digital photography lost quality and something more abstract—grain and physical paper-and-chemicals and emotion, perhaps—compared to film, and it took decades to catch up (and, of course, there will always be the purists who prefer film, ‘till kingdom come). Typewriters took away the uniqueness of handwriting, word processing took away the instantaneous feel of letters pressed into paper, eternally unchangeable. Records and radio took away something from live performances, and digital audio took away—crazily enough—the fuzziness that made the former feel “authentic”. I’m sure the wheel must have taken something away from brute-force work and, well, walking.
And thus it is with transportation. Horseless carriages were an obvious improvement over horses: they didn’t get tired, they were far faster, and they gave us smog instead of dung-filled streets (the former giving lung problems and global warming, the latter causing disease endemics. Ok, this point might be a toss-up.). But they were things. Horses are living beings that, almost, became one with the rider. You had an emotional connection with your horse—it was a real living and breathing creature that you’d feel bad for when it was sick. We mostly just feel annoyed when our cars end up needing fixed.
That very livingness gave something horse-based transportation something else that their technologically superior replacement never gave us: consciousness. It’s what gave us an emotional attachment to horses, but is also what kept people safe on them. Countless movie scenes have the rider dozing off or planning ahead or anything else while their horse trots on, no guidance needed. You’d start your horse off on the right path, then let it go on its own pace through the bulk of the journey. Get near your destination, and you’d switch back to more actively controlling your horse—or if there ever was danger, the horse would alert you to it and you’d take the reigns again, literally. And it’s not just horses: that very concept of the animal you’re riding being able to go on its own for the bulk of the boring stretches of your trip is always picked up whenever there’s a story scene with someone riding something intelligent: How to Train Your Dragon 2 illustrated this perfectly with Hiccup nearly falling asleep while Toothless continued flying to their destination, but then taking control again once there was danger. Self-driving vehicles, for the most boring stretches of the road.
This is what motor vehicles lost. Cars demand full attention, all the time, no matter how straight and boring the road. And yet, we’re terrible at paying attention all the time, gazing instead at billboards and the models of cars around us and—scarily enough—even at phones and newspapers and more. Our minds drift off, and then suddenly there’s something in front of us and we have to slam on the brakes. Surely countless accidents could be avoided daily if only our cars were as smart as horses.
As smart as horses. Imagine cars that could drive themselves on the straight stretches, when we feel save relinquishing control, and then let us take control again when we want. It’s not so hard to imagine, even: light-SciFi for years has shown cars that can drive themselves, but then let you take back control when you want to (of course, for action scenes when we’d want to root for the human who’s controlling said car). See the car in I, Robot, for example. It’s smart, but ultimately still a tool to be controlled by a human.
For there’s something human about being able to steer our own destiny, control our fate, and decide precisely how we want to turn into a curve and avoid the bad guy. We like tools that extend us—keyboards and musical instruments and cameras and hand tools. Automation is hard to trust—we all know that you can’t trust Google Maps absolutely, and are far better off supplementing the GPS with your own knowledge of the roads. How then can we expect people to trust fully automated cars, driverless cars that can take us to a GPS destination but don’t listen for our input otherwise?
That, I think, is why Google’s self-driving cars hit an uncanny valley for so many. We’d perhaps like a smarter car, a car that follows the lines and automatically brakes if we’re going to hit something. Perhaps we’d even accept “smart” cruse control that can drive the straight stretches, the boring parts of our commutes and road trips, for us, as the new Cruse is offering next year for $10k, and that we’ll undoubtedly see in many premium cars as a default feature within this decade. If there’s still a steering wheel, and if we’re still asked to make active decisions about our final destination—by hand, mind you, not just by abstractly punching in a GPS location—we’ll feel ok. The car will feel like a further extension of ourselves than the current gas pedal and steering wheel do. But if the car can only follow a GPS route, and must be fully automated—if it doesn’t give us any more control than entering an end destination—it’ll be far tougher to get us to accept it.
Tesla excites me, because it’s pushing the tech of cars forward in a mechanical way—it’s the most advanced dumb horseless carriage yet. Google Self-Driving Cars scare me in a way I know deep down they shouldn’t, because I happen to love driving, and love the control of being behind the wheel. There’s got to be a middle ground, where we can take back control at will, and give freewheeling directions to our cars—say, by saying out loud “Ok, Car, keep driving until we’re 1 KM from Exit 256, then let me know”. That’s a future of personal transportation I’d be ok with.
But I wouldn’t very much like being strapped to a horse that’s taking me to a destination, without any way to change the course or direct it. High-tech whiz-bang won’t change that.
In an odd twist on my normal writing this month, I wrote a tutorial for Tuts+ that was sponsored by LG to promote their new extremely wide monitor. It’s a beautiful piece of hardware, to say the least, and I’d be sorely tempted to pick one up to stick beside a Mac Pro if I were in the market for hardware of that price range. I’m not, and happen to be quite content with my MacBook Air that I use for all of my work.
But that’s not the main part of the tutorial. The tutorial itself is about apps that let you easily use multiple apps side-by-side on your Mac, PC, or Linux computer. If you’re tired of just running every app in full-screen mode, this tutorial is for you.
It’s been two years since Adobe killed Creative Suite and switched all of their apps to a one-size-fits-all subscription: Creative Cloud. Best known for annoying long-term Creative Cloud customers who felt they were getting a worse deal, and for confusing most people that the Cloud in meant Photoshop et al were now web apps (quick tip: they’re not), Creative Cloud easily generated more negative press than positive. Everyone was used to paying over a thousand dollars to start using a bundle of Adobe’s apps, or $700 just for Photoshop—though many of us got started a lot cheaper thanks to student pricing—and then saving on upgrades that were a fraction of the original price.
Creative Cloud leveled the playing field: new user or old expert, everyone would pay $49/month for every app Adobe offered—or $19 for one app—plus some extras like online file storage and Typekit fonts. Over time, it’d work out cheaper than Master Collection or purchasing and upgrading an individual app, but it would work out somewhat more expensive in the long run if you only needed a few of the apps that could have been purchased in a smaller Creative Suite package. But even still, it was infinitely more affordable up-front, and the apps were still the same desktop apps we were already used to, with enough new features that most of us would have justified buying an upgrade anyhow.
Adobe justified the move to subscription licensing by saying they’d ship updates more often, and add more cloud features. Love the switch or not, Adobe has kept to its word on the former, shipping actual new features in Photoshop every 4-5 months. That’s far better than the old model, where new features only shipped in new Creative Suite releases on a 12-18 month schedule with a paid upgrade. The cloud features have taken longer to make sense, but with this spring’s launch of Lightroom for iPad—a free app, if you have a subscription—made Creative Cloud’s cloud storage make a bit more sense, as did the earlier launch of Typekit font sync.
And now, with 2014’s Creative Cloud major updates, the entire subscription strategy finally makes more sense. At first glance, nothing has changed: there’s a slew of apps, this time including quite a number of iOS apps, that you get for a monthly subscription, along with some cloud storage and Typekit fonts. But just go look at Adobe.com and you’ll instantly realize that everything has really changed. Gone are the mentions of boxed products and even separate products. Left in its place is a sign-in button for Creative Cloud, along with product pages that are essentially tutorials to help you start using the various apps creatively. There’s no ifs, ands, or buts. If you ever wondered if Adobe’s going to change its mind about Creative Cloud, the answer is a prominent no.
But along with that no, there’s ample reason to think that Adobe’s not just sitting back and letting their apps coast while reaping the subscription benefits. There’s nice updates in each app, including a tool that selects the parts of the picture that are in Focus and new Smart Object features in Photoshop. And, while Adobe hasn’t made new suites of apps in Creative Cloud as I’d hoped, they have made the Photography Program a permanent option in CC—which at $9.99/month for Photoshop and Lightroom is one of the best deals in software (and is cheaper than the old boxed Photoshop, no matter how you cut it—and is the CC subscription I have). The international pricing for Creative Cloud is even somewhat better; while their plans are still about 30% more expensive in Europe, they’re essentially the same price in North America, Asia, and Australia—a big win for the latter.
They, they’ve started fulfilling the Cloud part of Creative Cloud by advancing ever so slowly into the realm of real cloud computing with their software. Yes, every Adobe app for Mac and PC still run 100% native and offline on your computer, but their new Photoshop Mix app for the iPad has desktop-level Photoshop features, and it offloads the computational power to Creative Cloud. That’s a showcase for the new Creative SDK, which developers can now use to tap Photoshop features and cloud computing from their apps. Adobe now has quite a lineup of iPad apps—and Lightroom now runs on the iPhone as well—and they even made a stylus for the iPad, so combine that with the Creative SDK and it’s apparent that they’re making an incredibly strong play for the future of creative apps.
Creative Cloud isn’t perfect. It’s still pricey, of course, and there’s the oddities like the fact that this year’s Creative Cloud updates are called “Creative Cloud 2014” and install as separate programs—despite the fact that CC was supposed to do away with hard versions. I still hope someday they offer, say, a $25/month Creative Cloud with just Photoshop, InDesign, Illustrator, and Lightroom, but at any rate: Adobe’s still an interesting company that’s far from boring. I still find alternatives like Pixelmator and Sketch both fascinating and useful—competition’s great, always—but Adobe’s not worth writing off. Not yet.
One More Thing: CC 2014 Splash Screens
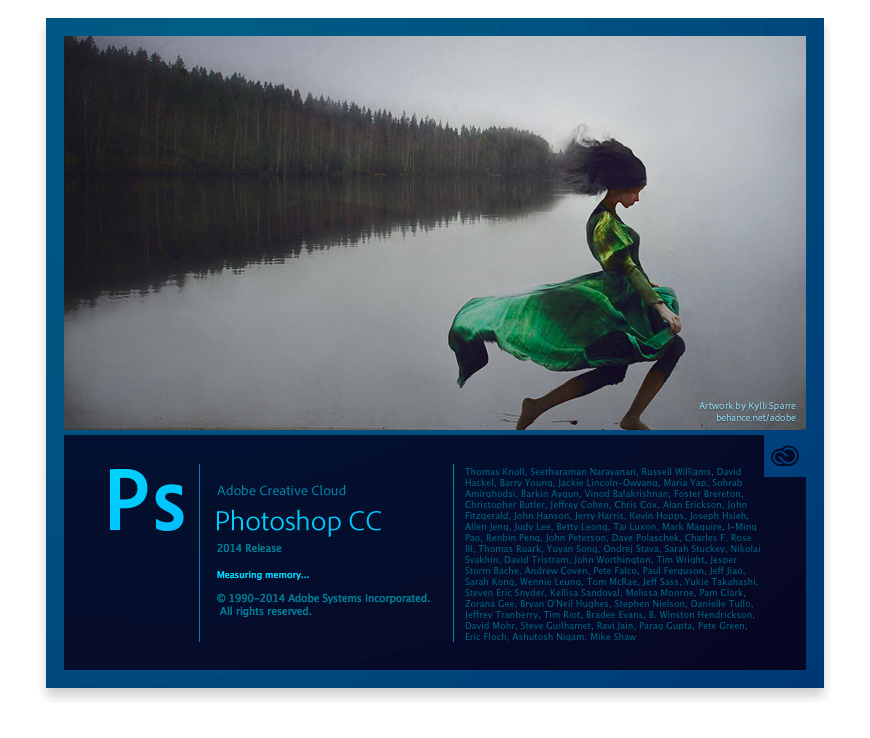
Adobe has a time-honored tradition of making the most dramatic splash screens for their apps, both long before they were fancy and long after they were in style. And they’re still here in the latest CC releases, only this time with less flare for the most part. Each CC 2014 app’s splash screen is a rectangle in the colors of its icon, with artwork from Behance on the top half and app info on the bottom half. Here’s the Photoshop CC 2014 splash screen, featuring a photo from Kylli Sparre, and you can see the other apps’ splash screens at this link.
Lightroom got updates, but it isn’t a fully new version this time around—likely a hat tip to it being still available as a stand-alone non-subscription purchase, and those customers would likely not be so happy about paying for an upgrade just yet. At any rate, the current Lightroom 5.5 retains a splash screen that looks a bit more like the original Photoshop CC splash screen with extreme 3D shapes jutting out of the edges.
Form apps are one of the most interesting type of web apps since they open up so much potential. Combine a form with logic jumps and calculated fields with any other apps you’d like via Zapier, IFTTT, or the form’s own 3rd party app integrations, and you’ve essentially made your own custom app. They’re simple to master, and infinitely powerful.
And, there’s so many form apps out there, it’s well nigh impossible to pick the best. I happen to love Typeform for its design, and Google Forms for their simplicity and inherent power by being part of a spreadsheet app, but there’s tons of other great form apps out there. After rounding up the best chat apps for the Zapier blog, I’ve done the same again for form apps.
A few months before Steve Jobs took to the Macworld stage unveil the iPhone—the device that’d take the PC’s former role as the computing device at the center of our lives—Bill Gates took to the CES stage to announce Microsoft’s device for the future of computing: the Home Server.
It wasn’t such a terrible idea, and if anything, was the first time Microsoft was hinting that, in the future, something other than the PC would be the center of your computing life. Data was now more important than the apps you used to manipulate said data, and with everything from your pictures to your purchased movies, music, and books being digital, you needed a lot of storage space to keep up with it all. Your laptop—even Microsoft saw that the future was mobile, even if they didn’t see that it’d be powered by tiny devices—didn’t have space to keep it all.
Thus the Home Server. Make a consumer-grade desktop PC without a screen, let it automatically backup all the PCs on the network and let you remotely access files, sell it for around $500, and Microsoft’s dream of “a PC in every home” could suddenly become “a server in ever home.” Said dream came complete with a children’s book to ostensibly sell the idea to parents who’d balk at the idea of dropping half-a-grand on a box that, for all intents and purposes, would appear to do nothing to the average user.
Meanwhile, we the people outsourced our backups to Backblaze and our file sharing to Dropbox, and iTunes and Amazon were just as happy to let us keep our digital purchases in the clouds to redownload on a whim. PCs were complicated enough to manage, and they sure weren’t fun—and a server was only more complexity that would only be welcomed by geeks. Smartphones quickly became the center of everyone’s digital lives, with our data stored in the imperceptible cloud, and Microsoft’s been trying to remind us ever since that we really, surely still need their software in our lives. Remind me who needed those massive storage banks at home?
And yet, the actual idea of the Home Server wasn’t such a bad idea. It wasn’t game changing on the scale of the iPhone, but the fact still is that backing up and sharing digital files is a pain. Upload speeds are still slow, most of the time, and who really wants to pay $100 a year for a 100Gb hard drive in the cloud when you could buy a 1Tb hard drive for less? But then, you’ll still want your files on the go (and at home) from your smartphone and tablet, and most people don’t really want to fiddle with a server (or otherwise they’d have already repurposed an old desktop into a Linux server).
That’s an overly lengthy intro to set the stage, but essentially it all boils down to the fact that backup and file sharing are still hard, and we need something simpler. Some way to share your files from a device you own solves the uploading speed problem, and if it could be as simple to use as Dropbox or Droplr, it’d surely be a winner.
That’s why I’m intrigued by the Sher.ly project. It’s an app that lets you share files from your own computer, NAS, existing online storage accounts, or the Sherly box—a Raspberry Pi-powered mini home server of sorts that can even run other Linux apps if you so wanted. It’s a self-hosted way to backup and store and share all the files you want, in an app that, at least at first glance, looks nice enough that you’d want to use it. And, yes, it’s got mobile apps, so it’s solving the file problem for the devices you’d really use, not just traditional computers—and here’s to hoping that, come iOS 8 release day, its iOS apps will integrate as a storage provider so you could easily use it to store files in any app.
Sherly’s a Kickstarter project by people with a proven track record, and it’s already passed its minimum goal with over twenty days to come. It should be coming, for real.
It could be another letdown in the attempt to make hosting your own files make sense, but I happen to think this one’s going to do better than the others because it’s simple. Dropbox made sense to everyone because it’s just a folder that automatically syncs and shares what’s in it—none of the complexity of other file sharing tools. iCloud has people backing up their iOS devices because it just automatically does it in the background. Sherly, while still being perhaps more aimed at the “Maker” crowd that’d be interested in making their own Raspberry Pi powered devices, looks simpler than any other personal server type system I’ve ever seen. It’s just about making it easy to privately share files—large files at that—with the devices you already use, without having to pay per-gigabyte in the cloud. And if you get their oh-so-cute Sherly box to store your files, it, too, promises to be so simple it only requires 3 taps to setup, and then will work as easily as any other cloud storage app.
Simple stuff is almost always better. I can’t wait to take the Sherly app for a spin.
One of the most difficult things about reviewing apps is that there’s some things about an app that just can’t be quantified. Feature lists might make one app look better than another, but specs never tell the full story. It’s true with computers, camera, smartphones, cars, and yes, it’s true with software.
And so I’m subjective. I’m most likely to write on Techinch about the software I love and rely on daily. I try out tons of apps, and the ones I stick with are the ones that fit my needs like a glove. Other apps might have more features or something that makes them appeal to others, but the apps I use daily have the stuff I need.
And that, perhaps, means I end up ignoring other apps. This was brought to my attention vividly when discussing the new OmniFocus 2 for Mac on Twitter. I mentioned at random that OmniFocus’ recurring task features were “better” than any other app I’d tried—and at the time, that was what I remembered from the last time I’d taken Things for a serious try at managing my tasks. Turns out, Things has far more granular options for recurring tasks than OmniFocus, but the reason I’d remembered it as being worse was because I don’t like the way it handles recurring tasks (i.e. by putting them all in the Scheduled list, which oddly only shows recurring tasks rather than any tasks with a due date).
Things didn’t fit what I needed. That doesn’t mean it’s a bad app, it just means that OmniFocus is better for my needs. And if I’m going to review a todo list app, I’m far more likely to share with you why I love the app I rely on daily, especially with the limited time I have to review apps. If I were to review Things, as I likely will when the next version comes out simply because it interests me, I’d be careful not to misrepresent its features as I accidentally did on Twitter—and then, after that, somehow I bet I’d go back to using OmniFocus since it’s just home to me.
Somehow this has been hanging over my head this week, and kept me from publishing my full review of OmniFocus 2. And that’s silly. We’re all opinionated, and yet, being opinionated can be a great thing. I really do try to keep my biases at bay when reviewing apps, but if there’s anything that’s going to get me motivated to hit Publish on a new article here, it’s going to be something that excited me—something that either solves a problem in a new and unique way (like the Keep Everything app I reviewed recently, even though it’s not exactly part of my daily workflow since I rely on Instapaper and Evernote already), or something that’s such a big part of my life (like OmniFocus or Ulysses III) for whatever reason that I can’t help but want to share it.
I’ll review other stuff, but it’s those things that excite me—that do something good enough that you can overlook the other features they don’t have—that keep me wanting to write about apps. Without Techinch being my full-time job, there’s only so many apps I can review, and I’m far more likely to want to take the time to write about an app when it’s something that really excites me enough that I want to share it with you.
OmniFocus 2 for Mac is finally here, and it’s great. I’ve written an in-depth tutorial on getting started with OmniFocus on Tuts+, so whether you’re 100% new to OmniFocus and would like help getting started with it, or have used it for years but want to learn your way around the new version, here’s the tutorial for you.
It’s a big day for Mac app releases; OmniFocus 2’s been announced for release today, and then Pixelmator 3.2. Pixelmator wasn’t nearly as overdue for a new version as OmniFocus; after all, v3 was just released 7 months ago, and a point release in January brought support for the Mac Pro and other improvements. v3 brought Layer Styles and and liquify tools, while v3.1 added support for 16-bit per channel color—but that latter most-coveted feature for pro photographers was only available on the Mac Pro. Now, that gap with Photoshop (and other competitors like GIMP and Acorn) is closed, as today’s release of v3.2 brings 16-bit per channel support to all Macs.
Along with that, you’ll find a much improved Repair tool in this update that is a much stronger rival to Photoshop’s Content Aware Fill. Select the Repair tool, draw over the objects you want to remove, and it’ll automagically try to replace them with the picture’s background. You can now change the size of the brush, along with its speed-vs-quality, and can get quite good results with it if you’re willing to tweak your brush and settings depending on the picture. I tried removing the parents in a screenshot of the picture used in Pixelmator’s Repair tool demo video to see if I could reproduce their results—removing the father was as simple as they showed, but removing the mother took about 4 tries before I got decent results. Either way, that’s still rather impressive.
In Photoshop, the thing I use Content Aware tools for most is for extending a pattern or section of a picture (for example, making a continuous rectangle pattern from a smaller square, or extending the sky upwards after expanding an image’s canvas). For that, I’ll select the area I want to add that pattern to, and delete it with Content Aware delete. 9 times out of 10, that works perfectly. In Pixelmator, you can use the Repair tool in much the same way, this time just drawing over the area you want to fill—but it won’t work if the area you’ve selected is transparent (the default if you’ve just extended your canvas). You’ll first need to fill that area with a color, and then select it with the Repair tool and let Pixelmator work its magic.
And then, there’s a final extra goodie: a Lock Layers option. This tiny little feature will make sure you don’t accidentally edit the layers that should already be finished, and is a handy tool that was again widely requested.
If you don’t already have a copy of Pixelmator, and aren’t already reliant on Photoshop, it’s the best $29.99 you could spend. It’s simply incredible how much of Photoshop’s functionality is packed into this tiny app these days.
Oh, and if you’re just getting started with Pixelmator, be sure to check out the new Tuts+ tutorials on Pixelmator. Pixelmator has enough of Photoshop’s features that you can follow many Photoshop tutorials in Pixelmator, but going through some Pixelmator-specific tutorials is a great way to get acquainted with its features.