The newest app to help you keep up with articles you'd like to read, Readability started out as a bookmarklet to clean up articles online. It's grown up now, with a full-blown HTML5 mobile app so you can read offline from your browser.
Evernote, one of the best cross-platform note taking apps, has just unveiled their newly redesigned webapp. While there are Evernote apps for Windows, OS X, iOS, Android, and more, the webapp is the easiest way to edit your notes from any computer. Until now, the Evernote webapp has been the service's weakest link. It was rather difficult to use, and the design quality was much lower than their desktop and mobile apps.
[caption id="attachment_2987" align="aligncenter" width="640" caption="The newly redesigned Evernote webapp"][/caption]Not anymore. Evernote unveiled a new design for their webapp today that makes it almost as powerful as the desktop app. It looks like the desktop app, shows thumbnails of your notes in the middle and lets you read them in the right column. Edit notes with one click, without having to go to a new window. Best of all, edits auto-save as you type, so you'll never lose the data you've entered. And, you can share notes right from the webapp with others with a link or Facebook integration. It just might be the most full-featured online notes app.
Now, of all things, I've personally have been switching to more plain-text note apps like SimpleNote, mainly because the Evernote Windows app is still rather pokey, even after tweaking it to speed it up a bit. Hopefully they'll now focus on improving the desktop apps again, too! For now, though, the Evernote webapp is almost nice enough to use on its own, sans desktop apps. With the Chrome Web Clipper for Evernote, it's a great way to remember everything you come across online.
My review of Automattic's new VaultPress WordPress backup service is now published on Web.AppStorm. Short version: it's the best backup service I've touched, period.
Techinch.com is now backed up with VaultPress, and it's so much better than other WordPress backup solutions it's not even funny. Now with Jetpack bringing all the other Automattic addons to WordPress, and Akismet keeping spam out of our comments (including the very odd comment spam we get daily advertising Bing and the Zune...), we're all set!
Microsoft may have killed off the fabled Courier Tablet, but if two enterprising developers have their way, it may live again ... as an iPad app! 2 Boeing engineers are on a quest to redesign the Courier interface on the iPad with an app called Taposé, and you can pledge $10 or more from now until May 21st to help make sure the project gets developed.
The Courier Tablet was a Microsoft Research project designed to make a dual-screen tablet where you could browse the web, email, and more on the left screen and then manage your notes and add content on the right screen. It was one of the first Microsoft products in a while to make even Apple fans excited. Or at least it was going to be. Unfortunately, Microsoft killed off the project, so Courier as we knew it will never see the light of day.
That's where the Taposé Project comes in. It'll be an app that will let you gather info from a left pane, and save it in a notebook on the right. The developers plan to let you share notebooks, so presumably there will be a Taposé webapp as well. Either way, it'll be exciting to see what they cook up! As a PC and iPad user, it'll be very interesting to see if Microsoft does end up making a Courier-style tablet in the future, but until then, this might be the killer productivity app we've been waiting for.
BraveNewCode is one of our favorite WordPress developers, and their WPtouch 2 Pro plugin it what powers the awesome mobile and iPad versions of Techinch. One of their other, less well-known plugins is the equally awesome WordTwit. This simple plugin lets you automatically publish your new posts on Twitter without setting up a third-party service. I've featured it before in an article about Moving Your Tumblr Blog to WordPress, since Tumblr automatically tweets new posts by default and WordTwit gives you that same feature.
WordTwit just got a bit more awesome today with the release of the new WordTwit 2.6. This new version lets you configure your site as a custom Twitter application! This means, when you publish a new post, it'll be tweeted immediately, listing your site as the app it was tweeted from. This is great for branding, and plus, for anyone who loves to tweak everything they touch, it's a fun way to customize your site's tweets.
[caption id="attachment_2956" align="aligncenter" width="640" caption="And.... it works!"][/caption]To enable this, you'll need to register your site as a new Twitter application at http://dev.twitter.com/apps. Then, update WordTwit on your site, and enter your OAuth unique codes from Twitter. Finally, activate it with your account, and your site will now automatically tweet your new posts and let the world know they were sent from your site!
[caption id="attachment_2954" align="aligncenter" width="640" caption="Can Techinch access my personal Twitter account? Sure!"][/caption]For more info about the new features in WordTwit 2.6 and setting up the Twitter custom app feature, check out BraveNewCode's blog post about it from today. There's a new pro version of WordTwit that BraveNewCode will be releasing in the near future, so it's especially neat they went to the trouble to add the custom app feature to their free plugin. Thanks, BraveNewCode!
It's been a great year for Techinch.com, and after being online for 15 months, it is time for some changes. Reading Seth Godin's excellent Poke the Box eBook inspired me to work harder than ever on Techinch and start new projects that will broaden the scope of the site while keeping it focused on Making Tech Simpler. I'd already been planning on updating the site, and have been tweaking a theme refresh for a while, but couldn't take the leap and go ahead and try the new theme.
First Year Update
Techinch started out as a WordPress.com-powered blog that I created for a class project in early 2009. I was dumbfounded that one post I wrote on adding a network printer to a Windows 7 x64 computer quickly rose to the top of Google for several related searches, and got around 100 views per day. I'd never considered doing tech writing as a job before that, but my writing professor pushed me to put my best work into my online writing, since you never knew what might come from it. Later that summer, I started writing at Labnol.org, and am very grateful to Amit Angarwal for giving me a chance and helping me get started writing on a larger scale.
Then, in January 2010, I moved my WordPress.com site to a self-hosted WordPress site and rebranded it as Techinch.com. I started out with a dark, smooth theme from ElegantThemes, and set to work getting more helpful content written than ever before. I started out adding AdSense, but quickly saw that the ads were seldom relevant to the content, cluttered the pages, and didn't even pay out that much. That's why I was so excited to be able to join the Yoggrt Ads network once the traffic had built up, and have been constantly pleased with the quality and content of the ads they serve.
[caption id="attachment_2938" align="aligncenter" width="640" caption="Techinch.com 1.0 with a stock ElegantThemes theme"][/caption]Over the past year, Techinch's content has been featured on a wide number of websites, from Lifehacker to Techcrunch's Crunchgear blog, and my recent article about the iPad being like a microwave of computing was on the front page of Hacker News and Reddit's Apple section for hours, and even mentioned on the 5by5 podcast and MacStories. Edit: And, in the past 2 days, it's been featured on Wired.com and CNN, too! It's been exciting and humbling to see my writing linked across the web, and has motivated me to keep writing quality articles and building Techinch.
Techinch.com 2.0 Beta
That brings us to today. The original theme for Techinch has served us well, but the default fonts and layout made it somewhat difficult to read. Hey, I even used Instapaper sometimes to clean up my own articles. That's bad. Last winter, I'd invested in WooThemes Canvas theme with the intent of switching the site to a cleaner theme. Months later, I've finally bitten the bullet and switched to my own tweaked version of Canvas. Of all things, I chose an actual canvas-looking background, and then used Google Fonts to add character. So, the new theme you see is all new just for Techinch, and I think it really goes good with the site's goals of making tech simpler. After all, if articles are difficult to read, it can't be much simpler!
[caption id="attachment_2939" align="aligncenter" width="640" caption="Techinch 2.0 beta - WooThemes Canvas powered, typography centric theme"][/caption]At the same time, I've made several other changes to the site over recent months. I added WPtouch Pro late last year, and the recent update brought iPad support as well, so Techinch should look great on any device. Now I've just got to port the new design to the mobile theme! Additionally, I was able to consolidate many of the plugins I use on Techinch with Automattic's new Jetpack, and also started backing up the site with Automattic's new VaultPress service (more on both soon). So, between WordPress and Automattic's services, WooThemes, WPtouch, and DreamHost, the site's in good hands and now I should be able to just focus on writing!
The Job is Never Finished
There's still a lot that needs changed, but I personally think it's heading in the right direction. Over the next days and weeks, I'll be tweaking the theme and site more, especially:
A new logo. Techinch really needs a new logo. If you're a logo designer and would like to design it, I'd be excited to talk!
Cleaning up the sidebar. I think it'd look better narrower, with less bright icons and smaller fonts. Thoughts?
Fix the menus. They look awful right now. Please, don't hover over them yet ... it'll hurt your eyes.
Adding a search box. Just noticed that's missing.
Adding a Featured Post slider; for some reason, it's not working in the theme right now. I'll need to investigate that.
Switching over most of the icons and theme images to the Pictos Font, since I'm using it with CSS @font-face on Techinch now.
Making sure the typography is standardized throughout the theme. Right now, there's still some Arial/Helvetica sticking out, especially in widgets.
Add WooTumblog support, and then I'll start sharing more links and small tips about tech right here on Techinch.
Add a MailChimp powered newsletter to Techinch so you can read without visiting the site.
And more!
Let's Talk!
So, this is your chance to give your opinion about Techinch.com. Do you like the new theme, or was the old one better in your opinion? What social sharing, read later, and bookmarking tools do you use regularly and want integrated? Evernote, Instapaper, Facebook, Twitter, or others? Do you think the fonts are easy to read now? If not, what would look better?
At any rate, it's exciting to be pushing Techinch.com to the next level, and with the new theme design, I hope I can make more gradual changes and keep Techinch.com working great for years to come. Everything here is written to help you understand tech better and integrate it into your life without having to spend years learning it. If there's every anything you'd like to see explained or reviewed, please let me know in the comments below or on the contact form. Thanks for reading, and here's to many more years of tech tutorials, reviews, and more on Techinch.com!
This week, there's an amazing deal from our friends at Valio: the Valio Bundle. For $49, you can get a bundle of Mac apps and design tools that individually would cost $438! It seems like there's always a new bundle coming out nowadays, filled with Mac or web design products at way less than the standard retail price. Usually, though, most bundle deals include a ton of products you'd be very unlikely to purchase otherwise, but the Valio Bundle is filled with popular products you've likely wished you had. This bundle is an especially good deal for web developers and Mac users, and between Billings, Hypersaces, the Design Then Code tutorials, beautiful Tumblr themes from UpThemes, and the amazing Pictos font, there's likely something you already want in the bundle.
Best of all, the bundle is from Valio, which is the company behind the Yoggrt ads that helps sponsor Techinch.com. I've been very impressed with the quality of their service, and the Valio Bundle is yet another proof of that. The entire checkout process is handled by Valio's Quixly digital delivery service, and once you've purchased the bundle, you'll get an email with a link to download all of the products at once along with another email listing all of your product keys. As a nice touch, the final checkout email looks like a cute receipt replicated in your browser!
As a PC (and iOS) user, the Valio bundle didn't include as many products that I could use, but even still, the themes, icons, Design then Code tutorials, and Pictos font can be of use to all designers and web developers. But if you're a Mac user, and especially if you don't already have Billings and Hyperspaces, the Valio bundle is a no-brainer. Now, some of the included tools are basically extended trials: the Virb and Livestats accounts included, for example, are only for 3 months and so if you're not really planning on using those service, that won't be very valuable. But there's plenty in the bundle to make it a good deal for most designers and developers. For once, it's a bundle that I can promote without hesitation!
In 1967, American consumers were introduced to the new, must have item for their kitchens: the microwave oven. This device, manufactured mainly by defense contractors such as Raytheon due to their expertise with the magnetron, the device that generates microwaves in a radar system or microwave oven, was now supposed to be a fixture in every home, restaurant, and more. It could heat food faster, use less energy, and be less likely to burn your house down than a traditional oven. And it cost just under $500. What more could you ask?
Actually, there was a lot customers could ask. First, why in the world do you need yet another way to heat food? Kitchens already have an oven and range, plus perhaps a toaster, waffle iron, or a grill on the back porch. And the coffee pot can keep coffee hot anyhow. Do you really need another oven? Plus, surely it won't work quite like an oven, or quite like a stove. It's like something in the middle. How could we need that?
Looking just at the specs, a microwave didn't make sense to many. So manufacturers bundled them with cookbooks that detailed the many things you could cook in a microwave. Look, you can make this great Chinese dish in a microwave! Our microwave lets you bake a cake! Need a hot cup of this complicated spiced cider? It'll only take 15 steps in our microwave! They thought the microwave needed to be a full oven, and more.
But, wonder of all wonders, people started buying microwaves and using them regularly. In the store, a microwave didn't seem like a must-have item to many, but once you incorporated it into your daily life, it was irreplaceable. How in the world did we used to heat up leftovers? Sure, people tried out the crazy, complicated recipes, but for the most part, they found new uses for microwaves. The microwave didn't have to be a regular oven or stove; it was a wholly new category of cooking device that made cooking accessible to even the least talented guy on earth. Who would have ever put an oven in a hotel room, but it makes perfect sense to put a microwave in one.
The microwave isn't easier for every cooking task, and perhaps it takes longer to prepare a complicated meal in a microwave. Perhaps no award winning meal will be created in one, unless it's a special contest for microwave cooking. But it simplified simple cooking, and consumers around the world saw it as a necessary piece of equipment within in years of it becoming popular. It didn't need to be an oven, and didn't need to be better than an oven. It just needed to be the best for some certain cooking scenarios, and that was enough to win the hearts and minds of people around the world.
Last year, Apple introduced the iPad, a computing device many have struggled to classify. It's bigger than a smartphone or iPod, smaller than a computer, but can do some things you'd otherwise do on both of these. You can type a document in Pages or find your way with GPS and Google Maps. So what makes it so special? From a specs perspective, tablets don't make sense. It cost just under $500, but if you've already invested in a computer and a smartphone, it's just another expense. Plus, netbooks only cost $300, right?
Everyone thought the iPad needed traditional computer programs to be successful. After all, if you can't use Office, what's it good for? And so Apple made the iWork apps for iPad, and amazingly managed to capture the best of office productivity with the best of touch screens. Then VNC apps were all the rage, and tabbed browsers, and everything else you could think of that made the iPad like a PC.
And then customers bought them, took them home, and something special happened. They realized that reading eBooks or browsing the internet from their couch was nice on a tablet. They found things they would have never thought to do on a computer were fun and simple. Apps that never made sense on computers with keyboards and mice, like GarageBand and finger paint apps and eReaders, suddenly found life on a 9.7" slate of glass and metal. Flipboard would have never become as popular on a desktop, and who would have thought of Twitter for iPad's interface without an iPad? People that would have never touched a computer suddenly found ways a computing device could help their lives, and techies that spent 10+ hours a day in front of their glaring monitors could now break away from their hefty PCs easier. Not doing the same old stuff, but new, innovative things that you would have never thought of on a traditional PC with a screen, keyboard, and mouse on a desk. As Marco Arment said, it's time to move on from office productivity apps; the iPad opens the window for all types of creative, interactive, personal programs. Finally, the term Personal Computer actually makes sense.
The world has discovered that the iPad doesn't have to be a full computer to be successful. It's a new form factor that makes computing more accessible to more people than ever. Sure, you might not create a new app on it, and there's still not Photoshop on iOS. You can't bake a medium-rare roast in a microwave, either. But now instead of waiting for your computer to boot, you can read the news, type a short document, and get on with your day all in the time your aging desktop takes to boot. And for millions, it'll be their primary computing device; there's simply no reason they need email to be more complicated than a couple taps and a device that runs days of normal usage on one charge.
Come to think of it, sounds like preheating your oven versus taping Quick-On 2 on your microwave to warm up your food...
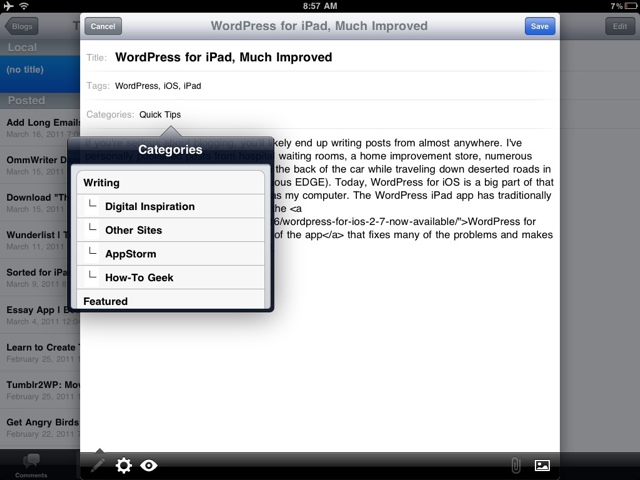
If you're serious about blogging, you'll likely end up writing posts from almost anywhere. I've personally published posts from hospital waiting rooms, a home improvement store, numerous coffee shops and restaurants, and from the back of the car while traveling down deserted roads in the middle of nowhere (thanks to ubiquitous EDGE). Today, WordPress for iOS is a big part of that as I now use my iPad almost as much as my computer. The WordPress iPad app has traditionally been fairly frustrating to use, but today the WordPress for iOS team released the new 2.7 version of the app that fixes many of the problems and makes it much nicer to use, especially on iPad.
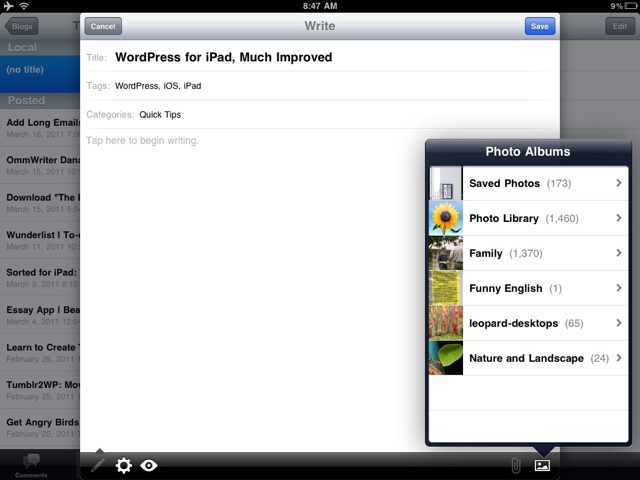
The new WordPress for iOS uses Core Data to store your post info, and seems to be much more stable. Then, the post editor is fully revamped on iPad as you can see in the shot above. Now, when you start a new post, an editor pane will open above the app, much like the Mail app on iPad. Add categories and more with native selector panes, and even upload images right from the editor without switching back and forth between different screens. New pictures are automatically added to the end of your post without any extra taps, either. For this post, I took screenshots, rotated and resized them with OneEdit, then uploaded them directly with the new WordPress for iPad.
Ready to schedule your post? You can still schedule your post or upload it as a draft. This has been changed slightly in the latest version, and now you'll need to tap the gear button on the bottom of the editor to change the publish settings. This isn's a problem though, as now it's much easier to schedule posts as you want with the native menus. Plus, uploading draft posts still works great!
As before, you can edit existing posts and pages from WordPress for iPad, as well as manage comments on all of your sites. This works the same as before, but everything feels much faster and more stable in the new version. WordPress for iOS is still not perfect; I'd love to see either a WYSIWYG editor or an extended code editing keyboard, as right now, adding links or HTML formatting to posts is very frustrating. Also, I'd love to see support for the new WordPress post formats, as well as direct integration with WordPress.com Stats, VaultPress, and more. But, the new changes are encouraging, and they show that the Automattic team isn't wasting time in trying to get their apps improved. The changes in this version set the stage for more features in future versions, and it finally works good enough that I'll definitely be using it more. If you're using WordPress on your iOS device, make sure to update or download WordPress for iOS today!
Over the past several months, I've shifted all of my long-form online reading to Instapaper. I keep the bookmarklet in my bookmarks bar on Chrome, where it's always a quick Ctrl+Shift+B away. Whenever I come across an article I'd like to read but would take more than a minute or two, I'll add it to my Instapaper queue to read later. That way, I can get rid of all the distractions and just sit down and read on Instapaper, whether in the browser or on the iOS app.
There's only one thing I haven't been able to switch to Instapaper: email newsletters. Now, most email newsletters I get go straight in the trash, but some are definately worth reading. From Smashing Magazine's email newsletter to Om Malik's Om Says, I get plenty of high quality writing in my inbox that I'd like to take time to read. I just don't want to have to read it in Gmail. But, if you try the page to Instapaper, you'll get an error message in your reading log instead of the newsletter you wanted to read.
But, there's a solution...
After several tries, I finally hit on a way to get email newsletters into Instapaper: the old Print trick. Many articles online are broken into multiple pages, so the best way to get them into Instapaper is to click the Print button in the page and then add it to Instapaper. And guess what? This works in Gmail too. Just click the Print All button to the right of your email, and it'll open in a plain HTML page in a new tab.
Close the print window that opens, then just click your Instapaper bookmarklet or browser addon in the new tab. Check your Instapaper list, and you should see your newsletter or longer email in Instapaper, ready to read with all of your favorite text settings in your browser, iPhone, or iPad.
If you're a dedicated Instapaper fan, or have just been looking for an easy way to make it easier to read long emails, this little tip can save you some time and frustration. I've personally found it much more productive to add longer reading items to Instapaper and read them later, and now that can include everything from long emails from friends, newsletters, and great long-form articles. Online reading's never been so nice before!


")