Tired of all the me-too todo list apps on your iPhone or iPod Touch? Sometimes it seems like everyone tries to make their apps look as much like other popular apps as possible, especially for productivity apps. Today Todo is a fresh change that takes your tasks into a new day, literally. Apple recently featured Today Todo in their list of essential College Survival Kit apps, so let’s take a look and see how it will help you manage your time, assignments, and more.
Yesterday, Today, Tomorrow, and the Future
When you first install and start Today Todo, you’ll be greeted with a bright sun and blue sky, with todo’s floating on top. The default tasks are a tutorial that help you quickly get up-to-speed on how Today Todo works. Once you’ve finished a task, just press the circle on the left to check it off.
On the top of each screen, you’ll notice a small white pull-down shade. This shows your lists of tasks, where you can separate your tasks, say, into school, home, work, or other categories. Tap the category you want to see the tasks it contains, or tap All to see all the tasks you’ve added to every list.
To add a new task, just tilt your device to the left or right and start typing. You can press the plus button to add a task, but just turning the device is much simpler! Type in your task on the top, then select a date for it on the bottom. You can also tap one of the three bars on the top right to select a priority for the task. There’s no tagging, notes, or location … just your task, the priority, and when it needs done. Once you’re done, just flip your iPhone back up to see your filled task list, or just press save and immediately enter another task.
To view your tasks scheduled for the future, swipe the sun icon on the top to the left. Swipe again to see tasks scheduled for Someday without a specific date to be completed. Then, once you’ve completed tasks, you’ll see them show up in the Yesterday screen which you’ll find by swiping the sun to the right from the Today screen. This is a cute way to keep everything organized by the time you need to do it.
Edit and Backup Tasks from your PC
One frustrating thing about many todo list apps is that they leave your todos on your iPhone. Whether or not you enjoy typing on your phone, sometimes it’s easier to type on a full keyboard. Plus, sometimes you can just copy and paste tasks you need to do from a webpage very quickly from a full computer. Today Todo includes a neat web server mode that lets you add and edit tasks from any computer or browser. Just tap the I icon in the bottom right corner of the app, then tap the slider beside Enable web server.
Now, browse to the address listed on your device on your PC or Mac, and you can view and edit all of your todos on your iPhone directly from your PC. Changes are saved to your device directly, so whenever you’re finished just tap Stop Webserver on your iPhone or iPod Touch and you’ll immediately see your updated task lists on it.
Today Todo doesn’t include an iPad version, but you could run it on an iPad in iPhone mode. Or, you could always view and edit your todos in the webserver mode in Safari on your iPad. This way, you can view, edit, and add todos to your iPhone or iPod Touch from a larger keyboard without using a PC at all!
Conclusion
Truth be told, I didn’t expect as much from this app as it offers, and figured it wouldn’t be as serious of a to-do list app with the whimsical background images. I was pleasantly surprised to find that Today Todo is one of the most intuitive todo list apps I’ve tested. I especially liked the way you can just tilt your device to add a task, the tilt it back to see your list without pushing any buttons or closing dialogs. Plus, the backgrounds actually add a nice, carefree attitude to the app. For once, managing tasks is actually fun!
My only complaint would be that Today Todo doesn’t keep a log of the tasks you’ve already completed, so you can only see your tasks from yesterday. That said, if you’re looking for an affordable and simple way to keep up with the things you need to do today and in the future and don’t want to fuss with notes, tags, or anything extra, this is a nice app you should definitely try. It’s scheduled tasks at it’s best!
Additionally, if you’d like a free todo list to just keep up with what needs done today, you can download Today Todo Basic, which lets you only add tasks for today and see what you did yesterday. It’s a great way to try out Today Todo’s interface for free, too.
When's the last time you did a chemistry experiment? Truth is, most of us do chemistry experiments more often than we imagine. Every time you try tweaking a recipe or try to cook something new, you're doing a chemistry experiment. Best thing is, you can use the basic properties of food to make new dishes and recreate your favorite foods.
This can be difficult to do on your own, though, and most cookbooks are designed to just help you make individual recipes and don't overly teach you how to design new ones. Cooking for Geeks is a great book that does exactly that. Author Jeff Potter guides you through the basic ways foods work so you'll understand how everything from eggs to high temperature cooking works. It includes tons of recipes, but best of all, it'll leave you with an understanding of what made that recipe tick and how you can use the ideas from it on your own. You'll even learn better ways to make boiled eggs, of all things!
Whether you're cooking on your own or using it with a school group to teach, Cooking for Geeks empowers you to take your cooking to the next level. Sure, cooking is not a technology centric thing, but this book makes cooking appeal to those of us who enjoy hacking and tweaking. Plus, when's the last time you saw the Mac vs. PC debate mentioned in a cookbook? My family and I have found this book very educational and enjoyable, and if you find cooking any bit interesting, I believe you'll be fascinated by this book, too.
Have you ever wondered if staying in college or going back to college long enough to get a MBA would make a significant difference in your career? Making the choice to stay in college longer and spend tens of thousands of dollars for something of an uncertain benefit can be a very difficult thing to do. The truth is, though, what you need is not another degree: you simply need to learn more about what makes business tick and how to improve your own ventures or the company you work for. Now you just need to figure out what to study, and you'll be ready to learn all the skills an MBA would give you on your own.
Why do you need to learn more about business?
First, though, you'll need to decide if you really need to learn more about business. When I personally started college, I never thought I would end up taking business classes. I was shocked when my college required a number of business and economics focused classes, and initially resented having to take them. I then started seeing how the classes had helped me look at the world of business differently, and I found the info in them benificual in everything from running my own site to working as a freelancer to my ministry work in Thailand. The thing is, business permiates every part of life, and the more you can learn about how to start your vision, progress it into something others are willing to pay for, and then grow the business to fit your and the market's needs, you'll find it easier to do your own job or start the business you've always wanted to.
That's where The Personal MBA comes in. Author Josh Kaufman has been sharing tips and training on his website, PersonalMBA.com/blog, for years, trying to help people learn all they can about business from the best authors and online content. From highlighting the best business books to distilling his own business knowledge in informative blog posts, the Personal MBA site has a wealth of info to help you learn everything from an MBA without having to go back to school. Then, building on this knowledge, Kaufman has distilled it into his new book, The Personal MBA: Master the art of business. This book is being released today, but I had the privilege to receive a pre-release copy for review and was very impressed at how thorough and informative this one book is.
An MBA in a book
The Personal MBA book is a nearly 400 page book that lets you explore all the topics you'll come across about business and economics related to running your own company. But rather than being a dry book that tries to teach you a whole field of knowledge in each chapter with different concepts mixed in throughout the whole thing, this book is designed to let you learn about individual concepts thoroughly with mini-essays about each. It's laid out similar to 37signals' Rework or Getting Real, with short sections that pack in a powerful concept and make you ponder its implications for your work. From ROI to Bias to Risk reversal to Association marketing, you'll learn about an amazing variety of business concepts on your own pace with interesting and easy to understand explanations and applications.
Then, each section of the book includes a Share This Concept link at the end. Each individual idea has a companion page on the book's site, which includes a video explaining more about the topic, and an outline of what that section of the book discussed. For example, page 180 discusses what bootstrapping means, how it's benificial to your business, and more. This section's Share This Concept link, http://book.personalmba.com/bootstrapping/, both gives you more info about the topic and lets you share what you've learned with colleagues and friends. If you take the time to explore this extra content, you'll find that you learned even more from the book than you could from the text alone.
I was very impressed with the depth of business topics that The Personal MBA covered, and was very excited to see that it didn't make business dry or difficult to understand. Unlike a textbook, The Personal MBA is designed to let you explore a topic you need to learn more about, even if you haven't read the whole book. Whether you're a business student or want to learn more on your own, you'll find this book a great reference guide to help you master business better than you could on your own. Best of all, it's a great example of how much you can learn today online, from books, and in self study, without spending tens of thousands of dollars or wasting years of your life in school. For once, technology and its related older cousin, paper books, have made life simpler and can help make you more productive! The most important part isn't about where you learn, or how you learn, but it's what you learn and what you do with it. The Personal MBAempowers you to understand the business world and drive your visions into profitable ventures, and if you're motivated, you can use it to learn more than an undedicated person would in a traditional business program.
Black Friday and Cyber Monday may have come and gone, but there's still tons of specials and giveaways online now for the Christmas season. Here’s some of the best I’ve seen, and please chime in with any others you come across.
Themify – 30% discount on any theme or subscription though Dec. 31 with coupon code holidays
Digging Into WordPress 3 – $5 off PDF eBook with coupon code LetItSnow, or $10 off print book with coupon code HoHoHo.
Books and eBooks
O'Reilly – Buy 2 books, get the third for free + free shipping. They also have rather good daily deals all the time, including 60% off Microsoft Press eBooks today. Worth mentioning as well is their ongoing Blogger Review Program which give free eBooks for reviews.
Looking for more good reviews of apps you might want to try out? In addition to my How-to Geek writing and posting reviews and tutorials here, I've begun writing articles for Web.AppStorm.net and iPhone.AppStorm.net. These sites contain exclusive reviews of webapps and iOS apps, respectively, covering only the best apps in each category.
I'm excited to be working with the great teams at each of these sites, and have already written over a dozen articles between the two sites. Just like I do with all of my writing, I've been regularly tweeting my new articles as they're published. If you'd like to keep up more directly with my writing at these sites, you can find my articles at the links below:
Additionally, sometime in 2011 I'll be updating Techinch's theme to include tumblog style posts. Once that's done, you'll start seeing link posts to any new articles I write around the web.
I hope you find my articles interesting and helpful. If you ever have a program, webapp, or iOS app you'd like to see reviewed, or something about tech you'd like to see explained better, feel free to contact me or leave a comment anywhere on the site.
Would you like to move your blog from Tumblr to your own WordPress blog? There’s no one-step way to do it, but you can move everything from your Tumblr blog and make your new setup as nice or nicer than your old Tumblr blog. Let’s see how you can move everything and get your new WordPress blog working as much like Tumblr as possible.
1) Getting a New Site
First, you need to get a new site. If you already have a hosting account, simply make a new WordPress install for your new site. Otherwise, you’ll need to sign up for hosting account. I highly recommend DreamHost – they’re hosting this site, and have done a much better job than other hosts I’ve used. Other highly recommend options from others include Media Temple and HostGator. They all offer one-click installations of WordPress so it’ll be easy to get your site up and running.
Here’s 2 articles that can help you install WordPress if you’ve never done it:
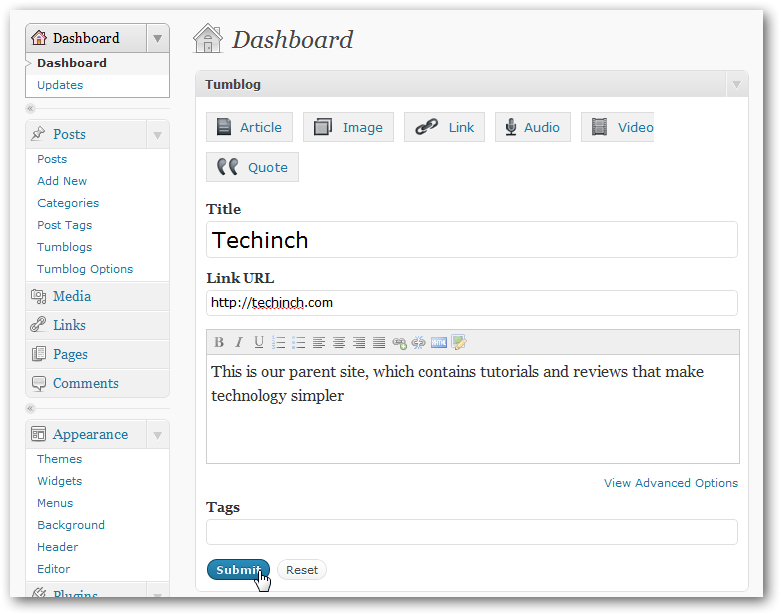
Once WordPress is installed, you’ll need to get a theme running to make your site look like you want. Any WordPress theme would work fine for a normal blog, but if you want to keep using Tumblr’s unique post types, including image, link, and quote posts, then you’ll want a theme designed for a tumblog blog. You can either turn any WordPress theme into a tumblog theme, or you could purchase a premade tumblog theme from WooThemes. These include Canvas, Retreat, Slanted, Cinch, and Crisp, my personal favorite. Once you’ve got a Tumblog theme running, you should see Tumblr-style editing options on your WordPress Dashboard.
3) Export Your Tumblr Content
Now it’s time to start moving your posts from your old Tumblr site to your new WordPress site. Head over to Benapps.net, which contains a free tool that can export your Tumblr posts. Enter your Tumblr blog address, select HTML export format, and then select how you want your post addresses to be imported. For most purposes, the first option is fine.
Scroll down, and under Export for, select Self-Hosted WordPress Installation. You could leave the other options as default or change them as you wish; it’s up to you. Finally, press Export. Seconds later, you should be prompted to save a tumblr_yourblog.xml file; save it to your computer, as you’ll need to import the data from this file into your new site.
4) Import Everything Into WordPress
Back in your WordPress dashboard, select Tools on the left sidebar and click Import. Then, click WordPress on the list of Import options. The tool you used before put your Tumblr posts into WordPress format, so this is the best way to import them.
You’ll now be prompted to install the importer. Click Install Now so you can get your content imported.
Once it’s installed, click Activate Plugin & Run Importer.
Click Choose File, then select the file you just downloaded from the Tumblr export site previously. Click Upload file and import to get all your posts moved over. Moments later, all of your posts should be imported into WordPress!
Now, select the author to assign these posts to, and check the Download and import attachments to get your images copied over too.
You can see all of your imported posts from the Posts menu. As you can see here, all posts were organized into categories based on what type of post you’d created in Tumblr.
There’s only one problem: your posts aren’t taking advantage of your theme’s tumblog features. This is fine; your posts will still be fully readable in WordPress. However, if you want to take advantage of the tumblog features of your theme that let you have link, image, quote, and other post types, you’ll need to edit them. To do this, you can bulk edit the posts by category.
On the top of the posts page, select the category you want to change and click filter. Then, select all the posts and click Edit under Bulk Actions.
Now, select the correct Tumblog post for the category you selected, and click Update. You’ll now need to repeat this for each of your categories. Once you’re done, though, your blog will look much more like it did before.
5) Move Your Domain and Redirect Old Posts
If you had your own custom domain in Tumblr, you should now move it to your new hosting account or redirect it to your new site. If you’re unsure about how to do this, you can follow the directions at the first part of this post, this time directing your domain to your WordPress site rather than Tumblr.
Then, you can redirect the links to your old posts by editing your .htaccess file, or with a simple WordPress Plugin. To do this, install the Simple 301 Redirects plugin in WordPress.
Open the Simple 301 Redirects tool under Settings once it’s installed. Now, enter your tumblr post link on the left, leaving off the initial domain name (the link should look something like /post/123456789/name), then enter the correct address for that post on your WordPress site. You’ll need to repeat this for each post. This is tedious, so if your content isn’t very important then you may not want to do it. Otherwise, though, if your posts have been linked on many other sites, this will keep your traffic flowing to your new site.
6) Add Plugins to Automatically Share your Content
One of Tumblr’s best features is that it can automatically share your new posts with your friends on Facebook and Twitter. With two new plugins, though, WordPress can do the same. Just install the WordTwit and Wordbook plugins from the Plugins menu, and activate each of them with your personal Twitter and Facebook accounts, respectively. Now when you publish a new post, it’ll automatically be shared with your friends around the world.
Additionally, if you had enabled Disqus comments on your Tumblr blog previously, you can now install the Disqus for WordPress plugin. It will automatically move your old comments over, so you can keep the discussion going on your new site.
7) Post from Anywhere
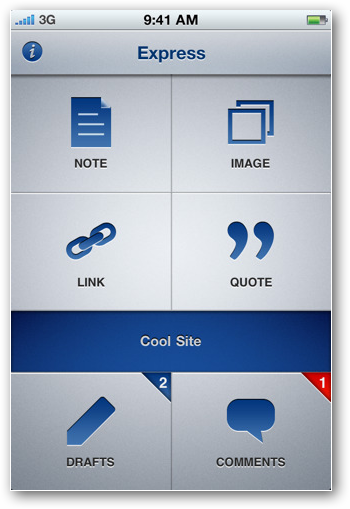
Tumblr’s mobile app makes it easy to post to your Tumblr blog from your iPhone or iPod Touch. Thankfully, you can get the same features on WordPress. You can install the WordPress Mobile app on your iOS, Android, Blackberry, or Symbian device, so no matter what phone you’re using you can always share the latest things that are going on. The only problem is, the default free WordPress app only lets you post normal blog posts, not newer Tumblog posts. For that, you’ll need the Express app for iPhone, which is an app from WooThemes specially designed to post to Tumblog blogs. Check out my review of Express on AppStorm.net, or head over to the iTunes Store to download it today.
Conclusion
Phew, you made it! Congratulations, your Tumblr blog is now safe on WordPress. Hope the move went good for you, and if you hit any snags, feel free to ask questions in the comments below and I’ll do my best to help you. Or, if you’d like to see a WordPress blog that was imported from Tumblr, check out my tumblog at www.maybring.com. I just got it moved to WordPress this week, and it’s working great.
Would you like to keep up with all of your tasks in orderly lists? Today we’re going to look at Zenbe Lists, a simple to-do list app that lets you keep up with your tasks without the fuss of more complicated apps, and then keep everything backed up online with the free Zenbe Lists webapp. Let’s dive in and see if this is the ideal to-do list app for you.
Staying Organized With Zenbe Lists
Zenbe Lists sports a clean and easy to use interface. When you first open the app, you’ll be greeted with little popup messages that help you learn your way around the app. This task manager is built around lists with tasks, so you can tap the top to add some lists for things you need to keep up with. You do it all right there on the front screen; no jumping between screens required.
Entering tasks is just as easy. Just tap the list name to see the contents, then press the top to add a new task. One feature I really liked is the ability to add tasks without going to a different screen; everything’s entered and checked off right there on the same screen.
Once you’ve entered tasks, tap them to edit the task, prioritize it, or add a due date. Or, back in the list view, press Edit to rearrange the notes or bulk check them off. While you can rearrange tasks in the same list, the app currently doesn’t let you move tasks to a different list. Thankfully, Zenbe just announced that this feature is coming in a update that should be in the App Store soon. This will make it much easier to manage all of your tasks and get them in the lists you need.
If you have an iPad, Zenbe Lists works just as good on it. Actually, you’ll have even less switching back and forth since everything’s right there on the same page. And if you add online sync as we’ll see below, you’ll be able to keep your tasks synced between all of your iOS devices. Zenbe Lists is a universal app, so you get all of this for the same price!
Syncing and Sharing Tasks Online
One of Zenbe Lists best features is that you can sync your lists and tasks online for free with Zenbe List’s webapp. Press the Sync button from any list to sign in with your Zenbe ID, or tap Signup to create a new account for free. Once you’ve created the account, go back to Zenbe Lists and sign in. Seconds later, your lists and tasks will be synced between the cloud and your device.
Now, you can sign in at lists.zenbe.com and access all of your lists and tasks online. This is a great way to quickly enter a ton of tasks from a full sized keyboard. Actually, if you’d like to use Zenbe Lists but don’t have an iOS device, you can signup for a free account online. You can take advantage of almost all the same features, and can even collaborate with others on list all from your desktop. The webapp even looks much like the iPhone app and’s just as easy to use. Then if you ever get an iPhone, you’ll be ready to move your tasks over in only a couple taps.
Conclusion
Zenbe Lists actually offers much more than you’d think on the surface. It’s a very simple task list app, but that also makes it very easy to use. With support for iPhone, iPod Touch, and iPad in the same app, as well as a free webapp that runs on any desktop browser, Zenbe Lists is great way to keep up with everything you need to do no matter where you are. If you like keeping all of your tasks in organized lists with just the most essential info, this app is a great one to check out. It includes less features than more advanced task managers like Things, but that also makes it simpler and easier to get used to.
There’s to-do list apps for every style of task management, so stay tuned for the rest of our reviews and a final roundup!
You’ve got tons of things to do today, next week, and on projects that you’re not sure when you’ll get around to them. Sometimes simple to-do lists won’t cut it, and you’ll want a more powerful tool to take on your tasks and organize them into something you can really accomplish. Today we’re going to look at Things, a popular task manager for Macs and iOS devices, and see how the Things for iPhone app can keep you productive, even if you’re a PC user and only use Things on your iPhone or iPod Touch.
Getting Started with Things
When it comes to to-do lists on the iPhone or iPod Touch, there are two main varieties: simple to-do lists that are quick and easy to use, and more advanced task managers that help you manage your full life and work load. Things is firmly in the second camp, but is still almost as simple to use as a basic to-do list app. Things began life as a Mac app in 2009, and has since become one of the most popular task managers on OS X. It’s now available for iPhone, iPod Touch, and iPad, and brings the same award winning simplicity to task management on iOS.
When you first launch Things, you’ll be greeted with several lists that will be familiar to anyone used to GTD apps: Inbox, Today, Next, and more. The Inbox is where all of your to-dos will go by default, and you could actually only use it and still get a lot of use out of Things.
First, though, you need to add some tasks. Press the plus button on the bottom left to add a to-do item. Just enter the item and press Save to save it to your Inbox. Alternately,press Show Details to add tags, notes, and a due date to your task. Tagging notes is a great way to organize them as you need, and you can add as many tags as you need to keep everything organized. If you’ve just got a second, just jot the task down and then you can come back and add more info later if you need.
You’ll quickly start filling up your Inbox this way. Press the arrow on the right to view extra info you’ve added to a note. You’ll see a tag icon on tasks that were tagged, as well as the due date on those you’ve added dates to. If you want to get your tasks in the order you want, press the Edit button and rearrange them as you need. Once you’ve completed a task, press the checkmark to mark it as finished.
As you may have noticed on the first Things screen, you can also organize your notes into Projects. These work like folders that you can move notes to so all of your tasks stay grouped with other tasks that go along with them. Actually, though, the projects themselves are to-do items, so you can check of individual tasks in a project, or check of a whole project when it’s finished. Once you’ve added projects, you can choose to add a new task to the project when you create it.
The only problem is, with tasks in the Inbox, projects, and more, how do you keep up with what you need to do Today? Things includes a great way to get everything you need to do today moved to the Today list. Simply press the star button in any folder or the Inbox, select all of the items you want to do today, and press Done when you’re finished. These items will now show up in the Today list, and you’ll see a badge on the list showing the number of items you need to do in blue and the number of overdue items in red. Even if you’re not using Things, you can still easily see how many tasks are left today by the icon badge on your iPhone home screen.
Once you’ve finished a task, it’ll be automatically moved to the Logbook at the end of the day. You’ll be able to review all the things you’ve done here, so hopefully you’ll be able to see how much more productive you’ve been with Things!
What’s Missing?
The best thing is, Things is not a static product that’s not getting any new features. On the contrary, Cultured Code has several new features in the pipeline for Things on all supported platforms. These include support for repeating tasks on Things for iPhone and support for Cloud sync, both of which are currently in development and planed for updates in the near future. We currently don’t know what the cloud sync will offer; will it include a Things webapp, or just be a syncing option between the versions versions of Things? I personally a Things webapp is in the works, but either which way, these updates will add welcome new features to Things’ already rich feature set. If you’d like to see what else Cultured Code has up their sleeve, check their Status Board which shows upcoming features and products like an arrival board at an airport.
What About PC Users?
Many iPhone and iPod Touch users like myself use our iOS devices along with Windows PCs. For the most part, this works great, but with apps like Things, you miss out on the included support for Mac apps. However, in this case I don’t find this to be a major problem. I’d love to use Things on Windows 7, and will be very excited if it is ever released for Windows, but for now, managing my tasks on iOS only works great. All of your to-do list data is backed up to your PC whenever you sync with iTunes, so your data is still safe. As long as you’re wanting to manage tasks only on iOS, this is still a great tool and you won’t be missing out on too much.
Conclusion
Things is a very powerful and versatile task manager that makes it easy to organize all of your tasks and still stay on schedule with them. It’s amazingly simple to use considering how much power it offers. I have been using Things as my primary to-do list and project manager for the past weeks, and it’s definitely helped me stay on track and kept me from forgetting important assignments. I’m looking forward to seeing what the Cloud Sync solutions turns out like, and will review it when it’s out. Even as it is now, though, Things is a great tool for keeping up with everything you need to do. It’s more expansive than most other to-do list apps, but it’s also much more powerful. If you’re curious but not yet sure, check out the Things website and watch the video of it in action to get a better feel if it’s the task manager you need to stay sane, on track, and organized!
Have you ever wondered what the famous inventers had that made them different than you? Are the technological marvels of our days something greater than we, ordinary humans we are, could ever be capable of producing? The Myths of Innovation is a fascinating book by Scott Berkun that digs through the history of invention and brings out the common misconceptions about the process of innovation.
After first reminding us that the word Innovation means “significant positive change” and is thus not something that ordinary services or products display, Berkun then shows you how many of the “innovations” of today are simply the result of centuries of smaller advances. He uncovers the myths behind many famous creative moments, and shows us that there’s no magical trick to invention. Rather, the inventive and creative people that we eulogize simply worked and worked, putting their best effort with the cumulative advances of civilization into something we’d use today.
I found this book to be a very enjoyable history of the major milestones of invention throughout history. History is the best tool for teaching us from other’s mistakes and progresses, and this book helps expose where our folktales often stray from the true way breakthroughs were discovered. After arming them with this knowledge, Berkun inspires readers to go and keep striving instead of waiting around for the mythical creative spark. Whether you’re simply curious about the process behind invention and true innovation, or want to be inspired to go out and create something yourself, this is an entertaining and educational book you’ll enjoy.
So you want to show off the latest app on your blog or help your sibling figure out what menu they’re supposed to be opening on a program. The handy Prt Scr key should be your answer, but unfortunately, it doesn’t take very good shots of the Aero interface in Windows 7 or Vista. Today let’s look at the latest version of Window Clippings that was just released today and see how easy it can be to make your screenshots look professional and modern.
Window Clippings was one of the first screenshot apps that was designed to capture the full Aero glass and shadows interface in screenshots. You can use it to capture shots of windows, menus, or even a free-form selection quickly and easily.
Getting Started
Window Clippings is simple to install and use. Just run the installer and accept the license as normal.
Launch Window Clippings after it’s installed, select the About tab, then enter your license key. If you don’t have a license yet, you can run it as a trial but all of your shots will include a watermark on the bottom.
Now you can tweak your settings to make Window Clippings work just like you like. The UI has been fully updated in Window Clippings 3, so if you’ve already used a previous version you’ll be pleased how nice and easy to use the new settings dialog is. From the Actions window, you can choose what you want Window Clippings to do after you take a screenshot. It can automatically save shots to disk, copy them to the clipboard, send them to OneNote or Paint.NET or more.
You can also choose from capture options that let you include your mouse pointer, remove font smoothing, and more.
Taking Great Screenshots
To take a screenshot with Window Clippings, just press your Prt Scr key or click the Create Screenshot button in the Window Clippings window. Your desktop will fade out similar to the way it did when opening the Shutdown dialog in XP. Now click on the windows you want to capture, or just click and drag to draw a rectangle selection. To capture multiple windows, hold down the Ctrl key while selecting windows.
Or, if you want to capture a free-form area, hold down the Alt key while drawing with your mouse. Once you’ve satisfied with your selection, press Enter to save your capture.
If you already know which window you need to capture, you can simply select its name from the Window Clippings app and snap it directly.
No matter what you need to capture, Window Clippings makes your shots look just like they did on your screen when you shot them. This shot was taken with a background image set and windows right against the taskbar, but Window Clippings still captured the full transparency and shadows of the aero preview and tooltip.
Just to demonstrate how flexible these screenshots are, here’s the same shot on top of two background images in Paint.NET. Notice the beautiful transparency makes it look like the preview was running on this background!
No need to layer your screenshots in an image editor afterwards, though; Window Clippings can capture all the windows you select at once if you wish.
It works great for freeform screenshot too. Notice that freeform and rectangle clips won’t include drop shadows, as Window Clippings only includes the Aero shadows on windows and menus. No matter what shape you capture, it’ll look great with PNG transparency and smoothing on the curved areas.
Window Clippings works great for capturing menus; just hold the Ctrl key down while selecting all the elements you want to appear in your shots. However, we did have some trouble with menus closing after pressing Enter but before the shot was saved. To alleviate this problem, you may want to enable delayed capture. Then, if your menu closes, re-open it before the time’s up and your screenshot is fully captured.
If you ever need to change your settings again, just right-click the tray icon and select Open Window Clippings. Alternately, double-click on the tray icon to take a quick screenshot.
Conclusion
Window Clippings runs on Windows 7 and Vista, and is available for download for $35 per user. If you still need to take screenshots in XP, you’ll also receive a license for Window Clippings 2.1 which works similar but will also run on Windows XP. Also, if you’ve bought a Window Clippings 2 license previously, you’ll be receiving a free upgrade key for Window Clippings 3 soon.
This app is cheaper than many competing screenshot tools such as SnagIt, and captures screenshots of modern apps better than most other apps we’ve tried. I did experience a few issues in testing, such as screenshots that included the edge of another app on the bottom, but in general it did this less than most alternate screenshot tools. It’s also extremely lightweight, using less than 2Mb of ram when running in the taskbar, so you won’t need to worry about keeping it running.
Window Clippings 3 is definitely one of the best screenshot tools in my opinion, and the only thing that SnagIt still does better is that you can edit and catalog your screenshots directly in the app. But when you can auto-save and directly edit screenshots in Paint.NET with Window Clippings, there’s not much to miss. Give the trial a shot, and then get a license if you’re needing a great way to take high quality Aero screenshots.


![sshot-2011-01-12-[1]](https://techinch.com/wp-content/uploads/2011/01/sshot-2011-01-12-1.png "sshot-2011-01-12-[1]")


![sshot-2010-12-09-[1]](https://techinch.com/wp-content/uploads/2010/12/sshot-2010-12-09-1.png "sshot-2010-12-09-[1]")
![sshot-2010-12-09-[4]](https://techinch.com/wp-content/uploads/2010/12/sshot-2010-12-09-4.png "sshot-2010-12-09-[4]")


![sshot-2010-12-02-[2]](https://techinch.com/wp-content/uploads/2010/12/sshot-2010-12-02-21.png "sshot-2010-12-02-[2]")
![sshot-2010-12-02-[3]](http://techinch.com/wp-content/uploads/2010/12/sshot-2010-12-02-31.png "sshot-2010-12-02-[3]")
![sshot-2010-12-02-[4]](https://techinch.com/wp-content/uploads/2010/12/sshot-2010-12-02-4.png "sshot-2010-12-02-[4]")


![sshot-2010-11-29-[1]](https://techinch.com/wp-content/uploads/2010/11/sshot-2010-11-29-1.png "sshot-2010-11-29-[1]")
![sshot-2010-11-29-[3]](https://techinch.com/wp-content/uploads/2010/11/sshot-2010-11-29-3.png "sshot-2010-11-29-[3]")
![sshot-2010-11-29-[23]](https://techinch.com/wp-content/uploads/2010/11/sshot-2010-11-29-23.png "sshot-2010-11-29-[23]")
![sshot-2010-11-29-[25]](https://techinch.com/wp-content/uploads/2010/11/sshot-2010-11-29-25.png "sshot-2010-11-29-[25]")


![sshot-2010-11-29-[20]](https://techinch.com/wp-content/uploads/2010/11/sshot-2010-11-29-20.png "sshot-2010-11-29-[20]")
![sshot-2010-11-29-[27]](https://techinch.com/wp-content/uploads/2010/11/sshot-2010-11-29-27.png "sshot-2010-11-29-[27]")


![sshot-2010-11-29-[22]](https://techinch.com/wp-content/uploads/2010/11/sshot-2010-11-29-22.png "sshot-2010-11-29-[22]")
![sshot-2010-11-29-[16]](https://techinch.com/wp-content/uploads/2010/11/sshot-2010-11-29-16.png "sshot-2010-11-29-[16]")
![sshot-2010-11-29-[17]](https://techinch.com/wp-content/uploads/2010/11/sshot-2010-11-29-17.png "sshot-2010-11-29-[17]")
