WordPress.com is a great place to get started blogging. You can get a free blog with all of WordPress’ great features, themes, and support without having to deal with hosting and the frustrations of keeping your own site secure and updated. However, if your blog grows and you decide to take it to the next level, you’ll likely want to move on to running your own site self-hosted on your own hosting account or servers. If you were blogging at WordPress.com with your own domain (yourname.com), then it’s very easy to move: just import your export file from WordPress.com, redirect your domain, and you’re all set.
However, if you were blogging with a WordPress.com domain (yourname.WordPress.com), it’s a bit trickier to move. You can still just import all of your old posts, but any links to your blog will be dead and you’ll lose much of the traffic you previously had. If you don’t want this to happen, you’ll need to redirect your WordPress.com links to your new blog. Used to, this was very difficult. You had to add your domain to WordPress.com, which itself was a difficult task, then go change your CNAME records back to your new hosting account. With the delays in DNS propagation, it could often mean your site was more or less offline for a full day. That’s no fun!
The New, Easy WordPress.com Redirect
This past year, WordPress.com added a brand new Offsite Redirect upgrade option that makes it much easier than before to redirect all of your old WordPress.com traffic to your new self-hosted blog. Your site won’t be offline at all during any of the process, and it’ll actually take less than 5 minutes to get it redirected. Plus, your old links will be HTTP 301 redirected, which will make search engines pick up on your new links and not keep your old site’s links around.
Ready to get started? To redirect your blog, just login to your WordPress.com dashboard and open the Upgrades page from the left-hand menu.
You’ll find the Site Redirect upgrade option near the bottom of the page. You can read more about the upgrade, or just click Buy Now to get started redirecting your WordPress.com blog to your new domain.
Enter the domain name you want to redirect your site to, then confirm that you entered the site correctly.
Now, just select whether you want to pay directly with your credit card or through your PayPal account.
Enter your payment info or login to your PayPal account, and then authorize and complete the transaction.
As soon as your payment goes through, you’ll see your new domain listed on your Domains page. Unlike the old domain redirect hack, this method will actually show that this domain is for a site redirect. If for some reason you decide to switch to a different domain, you can change the redirect domain from this page as well. You can also enable Auto Renew so you won’t have to remember to authorize the payment again every year.
Now, just try visiting your old WordPress.com domain. It should immediately redirect to the new domain you added. It’s that easy!
Adding the New Redirect After Using the Old Redirect
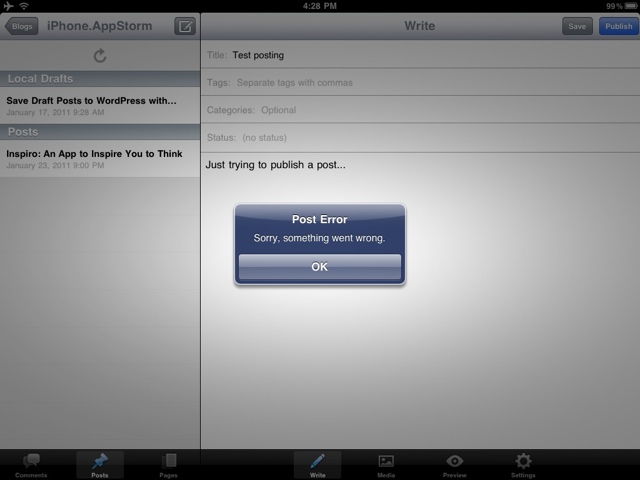
If you had previously setup your WordPress.com blog to redirect by manually adding your domain and then changing the CNAME records, you could just keep paying for your Domain Mapping upgrade every year, and it’ll continue working the same. However, it’s the same price to redirect, so I decided to switch my site to the new redirect. There’s only one problem: you can’t add a redirect to a domain you already have mapped to your account. If you try to add one, you’ll see an error like the one below.
If your domain mapping is almost ready for renewal, you could go ahead and remove the old mapping, then add the new site redirect. Just scroll down on the Domains page, choose your old yourname.wordpress.com domain as the primary one, then delete your domain mapping. Once this is done, you can add your new Domain Forwarding as above.
Conclusion
WordPress is one of the most versatile blogging and CMS systems, and I’m certain that the free WordPress.com blogs have gotten many people (such as myself!) started using WordPress over other similar tools. Now that it’s so easy to redirect your old blogs, there’s really no major difficulty to moving your blog to a self-hosted setup if you wish. And, hey, if you ever decide that managing your own hosting is too difficult, you could go back to WordPress.com just as easily and add your domain there. The choice is yours, and that’s how it ought to be!
If there's one major thing on iPad that keeps me from using it fully instead of my PC, it's the fact that iOS doesn't let you access the main file system from apps. Most obviously, this means that, aside from pictures in the Photos app, it's very difficult to move a file from one app to another. More importantly for me, though, is that you can't upload files from the browser. As a writer that uses WordPress daily, that's a major problem for me.
We've already seen how to upload draft posts directly from the WordPress iPad app, but there is still one thing you can't do from the WordPress app: you can't set a featured image for your post. The only way to do is is from the WordPress dashboard, and since you can't upload new images from the browser, you can't do it there, either.
A Workaround
Where there's a will, there's a way!
So, you can't upload images to WordPress from your browser, but you can still add images from the WordPress app, right? Here's what you need to do to add a new image and get it set as your featured image but without including the image directly in your post.
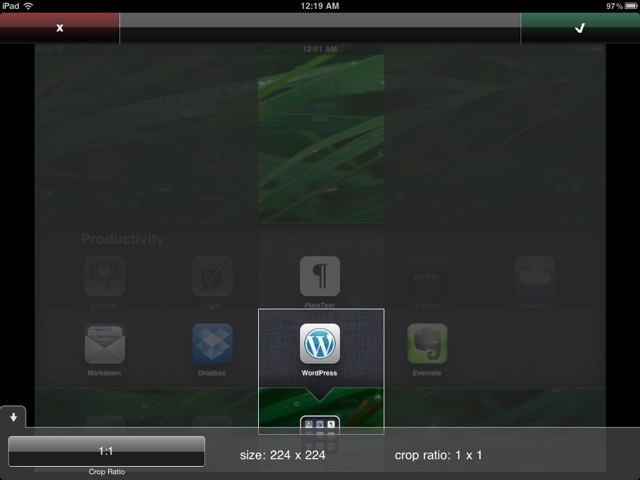
First, rotate and crop your image to the correct size for your post. I use square, 200x200 PNG or JPG images for my featured images, but this will be different depending on your theme and preferences. I prefer to use the free PhotoPad for cropping images since it lets you see the exact pixel size of your cropped image as you're cropping it.
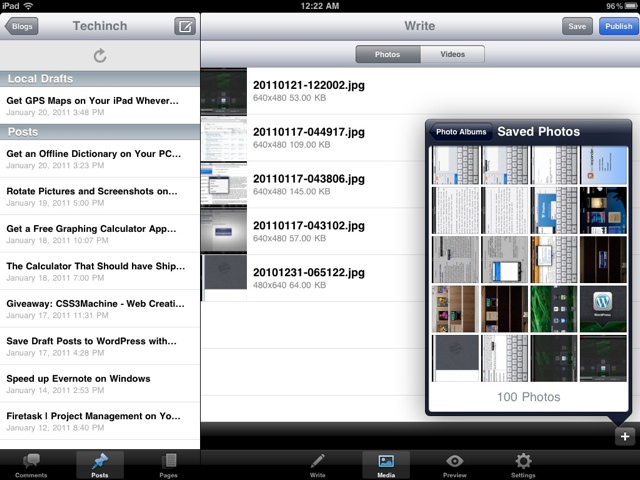
Now, head over to the WordPress app and write up your post as normal. Then, when you're finished, tap on the Media tab and add your cropped image you want to use as a Featured Image in your post. Select to upload it in original size, since you already have it the shape you want. Once it's finished uploading, just go back to your post editor and upload your post as you like, scheduled, draft, or fully published.
Finally, head over to your WordPress dashboard in Safari. Open your new post for editing, and tap the Set Featured Image link. You'll find the image you added as your featured image right there in the top of the Gallery tab, ready for you to select it as the Featured Image. Save your changes in WordPress, and your post will be ready to go, just as good as if you'd written it the whole way from a PC.
Now, granted, this isn't the easiest solution, but it does let you do one more thing directly from iPad that you couldn't have done otherwise. In fact, this same trick would work just as good on an iPhone or iPod Touch. Mobile blogging no longer means that your posts have to look second class! And by the way, I used this trick to add the featured image to this post as you might be able to tell from the images. It worked!
What would be nicer is if the WordPress iOS app added an option to set your featured image directly. Maybe eventually...
Do you find yourself needing to check a dictionary from your PC, iPhone, or iPad? While there are many dictionaries available for both Windows and iOS, many of us just default to looking up definitions online. This works, but when the internet goes down, so does your dictionary. Amazon Kindle is my personal favorite eBook reader on both Windows and iOS, and with the latest versions, it includes a free copy of the New Oxford American Dictionary. Here’s how you can put the dictionary to use so you don’t have to purchase a separate dictionary or stay online to find definitions.
Offline Dictionary in Kindle on iPad and iPhone
When you first run Kindle on your iPhone, iPod Touch, or iPad, the New Oxford American Dictionary will automatically download and be added to your Kindle library. You’ll see it right along with all of your other books, and can open it to look up words whenever you need.
Whenever you're reading a book, you can simply highlight the word to see a quick definition of it in a small popup. Tap the definition to view that page in the dictionary.
Alternately, you can open the dictionary itself to search for words, so no matter what you need to look up, you'll be able to get the definition in seconds. Best of all, if you're not certain of a word's spelling, you can flip though the dictionary like you would a paper dictionary.
And it’s not just on iPad … the Kindle dictionary works just as good on an iPhone or iPod Touch. Now no matter where you are, you won’t need to be without a dictionary.
Another good thing to remember is that many other iOS apps, including iBooks and Pages for iPad include dictionaries themselves. This really makes iOS devices great learning tools!
Using Your Free Dictionary in Kindle for PC
If you don’t have the latest version (Kindle for PC 1.3 as of this post’s publication), Kindle should automatically update. Alternately, head over to Amazon’s Kindle for PC page, download the latest version, and install it over your existing copy. The next time you start reading a book, select a word and you’ll see a small popup letting you know that the New Oxford American Dictionary is downloading. This may take a few minutes, but once it’s done, you’ll have the full dictionary ready to help you understand anything you read better.
Whenever you’re reading a book in Kindle for PC, you can now select a word and instantly see its definition in a small popup. You can then select to Google the word or look it up on Wikipedia, or alternately click Full Definition to see the whole section for that word in the included dictionary.
Oddly enough, the dictionary won’t show up in your Kindle Library in Kindle for PC even though you’ve got the full eBook on your computer. So, if you want to look up any random word, you’ll need a little workaround. Just open any book in your Kindle Library, then select any word at random and click the Full Definition link. Now, to look up any other word, just enter it in the search box on the top left. No matter where you are, you’ve now got a full dictionary offline on your PC for free!
Other Devices
While Kindle apps are available for Blackberry, Windows Phone 7, Android, and Macs, the other apps currently don’t support dictionary lookup. The PC app didn’t either until the most recent 1.3 update, so hopefully Amazon will add Dictionary support to the other apps in the near future.
Conclusion
All of us need to look up words to find their correct spelling and definition from time to time, and sometimes even today it’s not so easy to get online. Kindle makes it easy to find definitions from a Kindle device, iPhone, iPad, iPod touch, or PC, and best of all, it’s free! I’ve found the Kindle dictionary very handy on my iPod Touch, since I can look up definitions even when I’m offline.
Now that you’re ready to write drafts and posts from anywhere on your iPad or iPhone, you’ll be wanting to post more than ever. One thing I post all the time is screenshots. Whether I’m writing a review or how-to tutorial, I always illustrate my posts with screenshots of the Windows program, webapp, or iOS app I’m writing about. But if you’re blogging with screenshots from your iDevice, you may hit a snag.
Taking a screenshot isn’t a problem; just press your home and power button at the same time, and a screenshot will be saved to your Photo roll. Now, you can easily find your screenshots in the Photos app or any other program that allows you to import images. The only problem is, if your device was in landscape mode when you took the screenshot, then your screenshot will be flipped on its side. iOS takes the shot as though the device was in standard mode with the home button on the bottom, even though on iPad almost every app supports any rotation mode.
Flip Those Screenshots
Good thing is, that’s not something you can’t fix. There’s a number of free photo editing apps that let you rotate, crop, and flip pictures quickly. Two I use frequently are Adobe Photoshop Express for iOS and PhotoPad. Both of these are free universal apps that work on all iPhone, iPod Touch, and iPads. Let’s see how to rotate a shot using Photoshop Express; it’s my personal favorite, and has a nicer UI in my opinion. Feel free to try out other apps and see which one fits your workflow best, though.
Ok, so first, grab the shot you want to crop. You’ll find all your screenshots you’ve taken in the Saved Photos album.
Tap the crop icon in the bottom left corner, then select Rotate to, well, rotate your shot. Or, of course, if you need to crop your screenshot, select that instead. You shouldn’t need to straighten screenshots, though… :)
Now just drag a corner of your picture with one finger to rotate it like you need. I’d love to have a multitouch rotate and crop too, but I haven’t found one yet … if you know of an app that is more touch-orientated for photo touchup, let us know in the comments. Once you’ve got your shot rotated as you need, press Ok in the bottom right corner to accept the changes.
Now your picture is the correct orientation and is ready to be blogged. Press Save on the top right, and you’ll see your new, corrected screenshot in the Photo Roll as before. And, as before, this works the exact same on any iOS device, so even though the example shots here are on iPad, it’ll work the same on your iPhone too!
Flip Them Back in Windows
If you copy your screenshots to your PC before blogging them, you can still rotate them easily without opening Photoshop or other intensive apps. Just open your shot in the default Windows Photo Viewer or Windows Live Photo Gallery, and click the Rotate button on the bottom. Exit the window to save your shot once you’ve got it rotated as you want. Now you can upload it directly to your WordPress editor or write a new post in Live Writer … Quick and easy.
Got more tips for blogging on the go from your iPhone or iPad? Sound off in the comments!
Does Windows Calculator not quite cut it for you? Calculator has been a default app in Windows ever since the release of Windows 1.0, and while Calculator was given a total refresh and gained tons of new features in Windows 7, it’s still not powerful enough for most Algebra and higher math. The free Powertoy Calculator that was released with XP does not work on Windows 7 or Vista, and for a while, the only other good free graphing calculator solutions for PC users have been online tools like WolframAlpha.com.
That’s now changed, however, as Microsoft recently released Microsoft Math 4. Previously a commercial program, Microsoft Math 4 is now fully free for Windows users. It’s a great app that lets you solve equations, differentiate or integrate, and create 2D and 3D graphs. Whether you’re using your keyboard or a tablet input device, you’ll be able to get your math facts figured out quickly. Plus, the entire app uses the ribbon interface, so it’s easy to learn how to use.
Microsoft Math can solve equations, differentiate or integrate them, and even show you the steps needed to find the answer. While some teachers might fear it being used for cheating, it’s actually a great way to understand how to solve more complex problems you might have stumbled through otherwise.
Then, from the Graphing tab, you can create beautiful 2D and 3D graphs in seconds. Zoom in or out with your scroll wheel. The graphics are amazingly smooth for a utility app like this!
All work and no play … well, you won’t have to worry about that either. Microsoft tucked away 7 cute calculator skins in the View tab ranging from flowered to flaming to traditional calculator styles. There’s even a cute sketched skin as you see below.
It’s a pretty handy app to have around, especially if you or anyone in your family’s still in school. In fact, the only problem with it is that you might get tempted to just use it to solve your tough math instead of using your grey matter!
One of the first things I noticed on my iPad was the lack of a calculator app. Not like there's not half a dozen gadgets around that also have a calculator built in, but somehow it just seemed odd to not have one built in. Apple did a great job making Notes, Calendar, and Contacts look awesome on iPad, why not Calculator (and Voice Memos, Stocks, Clock, and Weather)?
At the same time, even on the iPhone or iPod Touch, the calculator app could be improved. In general, the iPhone Calculator app is good enough, and for a basic calculator with standard and scientific mode, it's about as simple as they come. But still, wouldn't you like to have calculator history, be able to see your expression's result as you're typing, and more?
Calcbot from Tapbots is a great solution to both of these problems. It's an elegant universal calculator app that makes it simple to do any calculation you need on your iPhone, iPod Touch, or iPad. This app was designed to make doing math take even less time on your devices. Is this even possible? Let's take a peek under the hood and see if you really do need a new calculator app for iOS.
Calculating with a Robot
Calcbot describes itself as a “simple, yet intelligent calculator”, and I definitely found it to live up to its name while reviewing it. You’ll see a quick Getting Started guide when you first launch the app that will help you get up to speed on how to get the most from Calcbot. Whether you load it on your iPhone, iPod Touch, or iPad, you’ll get the same great features.
The main interface looks much like you’d expect. You’ll see standard calculator features on the main screen, but swipe to the left to see advanced, scientific mode features such as sin, square roots, and more. Tap the orange Shift key to see the inverse of the functions of the light blue buttons, such as sin-1. Best thing is, you can find any root or raise a number to any power you need. For example, if you need to calculate 74, enter 7, then swipe left and press yx, then swipe right and tap 4. With that, you’ll find the answer is 2,041, and you’ll still see the equation underneath in light blue!
Calcbot automatically computes your equation as you’re entering it, so you can see everything in light blue underneath your solution at the top. If you make a mistake, swipe left over the calculator screen on the top or press the red delete button on the bottom to delete the last thing you pressed. No more blindly pressing C or MC anymore; who could even remember what they did, anyhow?
Once you’re finished, press the equal button on the bottom to save your answer. Everything you enter is saved in Calcbot’s history, so you can easily jump back and see everything you’ve calculated by pulling down on the top of the app. This will open a history tape that remembers both the answer and the equation you’d entered, much like many scientific calculators such as the popular TI-30X. That calculator saved me in highschool, and I don’t know how much time I saved by being able to go back and grab something from the history. It’s every bit as helpful in Calcbot, and once you’ve used it, you’ll wonder how you lived without it.
Supersize Me
As mentioned at the beginning of this review, Calcbot is a universal app and works great on iPad, too. In Landscape mode, you can get the same great calculation features on the left with your history tape on the right. This makes it quick and easy to run a ton of calculations and quickly jump between the ones you need. Whether you’re a student in math class or are getting ready for tax season (oh my…), the history on the side is incredibly handy. Just tap one of the entries to use the result or equation again, or to email the problem to your professor, accountant, or archrival! You can even send the entire tape history as an email or copy it to your clipboard from the gear button in the top right.
Want the largest calculator you’ve ever used (well, at least the largest one that still looks stylish…)? Just turn your iPad to portrait mode, and Calcbot will fill your iPad screen. Oddly enough, you can’t access history this way, but just turn your device to the side to see your history as before. Everything else works the same … swipe left to see extra functions, or tap the i button to change settings and get info about the app. Somehow, this reminds me of a cash register, though if that’s what you’re actually using your iPad for, you’d likely be better off with Square ;)
Conclusion
It’s hard not to love Calcbot. Tapbots did a great job integrating beautiful design with advanced functionality that just makes it easier to check out a quick calculation. You’ll never have to second-guess if you entered your equation correctly, since it shows up right up under the answer, and you can always go back and check it in the history. It still doesn’t give your iPad or iPhone all the features of, say, a TI-89, but it does give you most of the features of a standard scientific calculator such as the TI-30X, including History mode. Finally, it’s a universal app, so you won’t have to purchase a different app for each of your devices. If you’re looking for a great calculator for your iPad, and wouldn’t mind getting a better iPhone one at the same time, this is the calculator app to get.
Even though the iPad was released almost a year ago, the jury’s still out on whether it’s a device for consumption or creation. I personally feel it’s a great creative app, and even find it great for writing in Pages or PlainText. Today we’re going to look at an exciting app, CSS3Machine, that can take your creativity on the iPad to new levels and let you design animated sites all in native CSS3. We’ve even got 5 free licenses for a giveaway, so keep reading to find out how to enter.
Getting Started
CSS3Machine starts with a site selector hovering over the main screen. You can pick from 2 impressive premade demo sites to try out, or tap the plus icon to create a new site. If you want to copy a site to your computer, press the arrow button to email it to yourself.
Alternately, tap the gears icon to see CSS3Machine’s settings. You’ll notice a web address listed; this lets you access your CSS stylesheet from your desktop browser. You can also set a default email address to send templates to, or get more info about the app.
Flash? Who Needs Flash?
Let’s dive in and see what you can do in CSS3Machine. Once you’ve opened the template you want to play with, you can immediately see the impressive animated transitions built in, or start tweaking the code to get it to work like you want. Each property is listed on the left, and all of its functions are on the right where you can quickly tweak them as you like. As soon as you tweak a property, the preview on the bottom will update to reflect your changes.
Tap the plus icon in the properties list to add a new property to your site. There’s tons to explore here, and with time, you can make some truly impressive animations powered only by CSS3.
The preview box only shows a static copy of your rendered code, so if you want to see the animated CSS in action, tap the Animations button on the bottom of the left pane. Now tap the play button at the top of the preview window to see your CSS animation fully rendered on your device. If you’d like to see a video of it in action, check out the CSS3Machine official site.
Not Just Fancy Animation
If you’re not trying to create the most amazing CSS animations and effects, CSS3Machine is still for you. You can create a new basic style, and then add your own text CSS to tweak as you want. Here I’m tweaking the H2 style on the default text used on document samples in CSS3Machine.
Drag sliders and tap color swaths to find the perfect look for your shadows, colors, background gradients, and more. The great thing is, you can try out so many different options and then immediately see what it creates in the preview on the bottom. I’ve never seen a web editor that works like this on a PC; it’s a fun and creative way to make your code look just like you want!
CSS3Machine is also a great way to learn more about CSS. Just tap the i icon in the top right of any property editing screen to find out more about that CSS property. You’ll get a quick overview of its history and what it does, as well as which browsers currently support that property.
Want to switch to your own text or change something else about the base document? Tap the arrow button in the bottom left corner of the site preview box to open the HTML template editor. The editor includes common HTML characters and snippets so you can type in what you want without shuffling between iPad keyboard layouts. You can then copy the text to your clipboard from the top arrow button if you wish, or just save the changes to CSS3Machine.
Get Your CSS on Your PC
Now, to put your code into use, browse to the address in the settings screen we saw before from your desktop browser while CSS3Machine is running on your iPad. You can then copy the code directly to your favorite code editor, WordPress Dashboard, or whatever you use to manage your site. From a touch interface to standards-compliant code, CSS3Machine is a pretty awesome tool. The app did crash on me a couple times while I was testing it, but other than that, it was a very cool way to try out all of what CSS3 has to offer on my iPad!
Enter the CSS3Machine Giveaway
Edit: Giveaway now closed. Thanks everyone who entered!
If you’d like to win a free copy of CSS3Machine for iPad, just leave a comment below with a valid email address. The contest closes at Midnight EST, Thursday, January 20th, so make sure to leave a comment before then. If you don’t have an iPad but want to comment, please state so in the comments so we’ll be sure to pick someone that can actually use the app. Want another shot at winning? Tweet the following (or something similar with a link to this post), then leave a second comment with the link to your tweet.
If you don’t win, don’t worry … you can still pick up a copy from the App Store for $4.99. It’s a great way to explore what CSS3 has to offer while learning what each property does. If you create some awesome web art or a new site using CSS3Machine, be sure to let us know in the comments … we’d love to see it!
Whether you're carrying around an iPhone or iPod Touch in your pocket or have a new iPad you'd like to make into a mobile writing powerhouse, chances are you'd like to write blog posts on the go. The WordPress for iOS app is the obvious blogging choice for iOS devices if you've got a WordPress blog. You can quickly edit existing posts, write new ones, and even add pictures and screenshots directly from your device.
The only problem I faced when using the WordPress app was the lack of a "Save as Draft" feature. By default, the WordPress app saves draft posts to your device, but doesn't give you the option to upload the draft. When I write a post, I prefer to upload a draft of the post to make sure I don't lose what I wrote and also so I can easily add to it online. Additionally, I write for several different tech blogs, and on most of them, I can only upload a draft post and submit it for review, and the editor then publishes the post on the site's schedule. Many freelance writers have a similar setup, so the lack of a draft upload feature makes the WordPress app almost unusable.
[caption id="" align="aligncenter" width="576" caption="Maybe I can't upload posts from my iPad..."][/caption]
Behold the Hidden Draft Upload Feature!
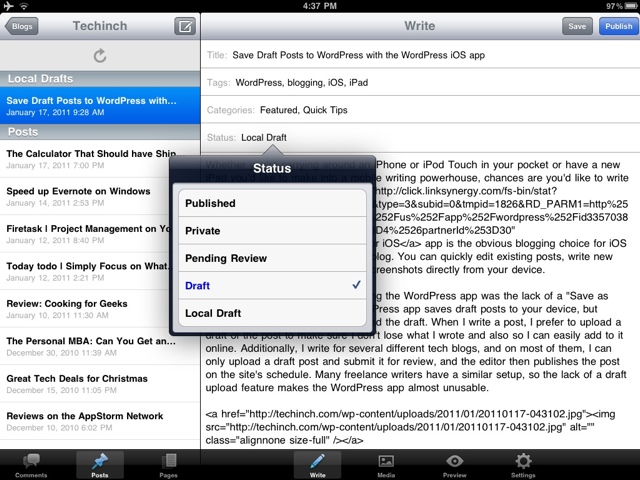
Turns out, draft uploading is only hidden, not missing. WordPress for iOS lets you set a post's status, so you can get your post saved online just like you want. If you simply press Save by default, you'll get a draft of your post saved locally. Tap the Status bar, however, and you can choose exactly how to save your post. Select Draft to post a draft to your blog so you can continue editing online, or select Pending Review to submit your fresh post to your editor. No matter what you want to set your post's status as, you can choose it here. Awesome!
[caption id="" align="aligncenter" width="576" caption="Post Status? We have Post Statuses ... wait, is that a word?"][/caption]
Once you've done this, you'll simply see a Save button in the top right corner of the app instead of the Save and Publish buttons you had previously. Press Save, and seconds later your post will be online, ready for further editing, scheduling, and more.
Editing Posts Online
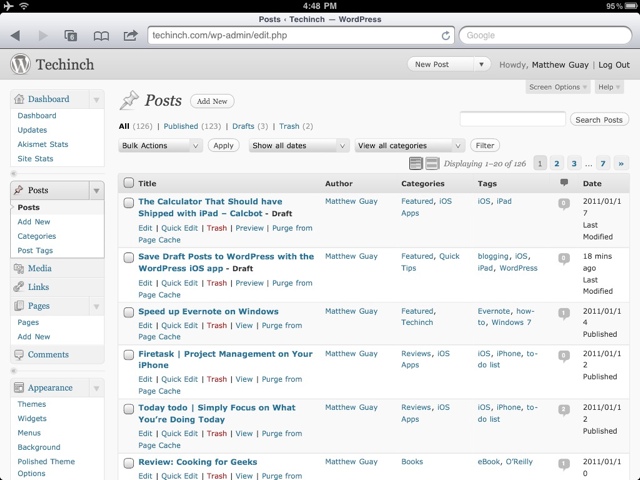
Speaking of which, if you ever want to edit a post on your WordPress dashboard directly from your iPad, you may have noticed that the editor box doesn't show you the entire post. Don't worry ... You can still edit any part you need. Just drag inside the box with two fingers to scroll as you would from a laptop touchpad, then tap to start editing where you need. Everything else on the WordPress dashboard works fine. You can tweak plugins and themes, edit posts, and even add new plugins from the Plugin Directory all from an iPhone or iPad. However, you can't add new photos, plugins, or themes directly from your device, since iOS doesn't let sites or apps see the main filesystem. Hopefully they'll enable this in the future ... At least we can hope!
[caption id="" align="aligncenter" width="576" caption="Draft posts uploaded from iPad, ready for editing and more"][/caption]
So, with these tips, your iDevice can become a much more useful blogging tool. Do you find yourself blogging from your iPhone or iPad often? Let us know your blogging habits in the comments!
And, for the record, I wrote this whole post directly on my iPad in the WordPress app...
Have you ever fired up Evernote for Windows to find something you’ve jotted down only to find that it’s running glacially and takes forever just to open a note? Even with the new and improved Evernote 4, sometimes it still is one of the slowest apps on my PC. So much so, in fact, that I’d nearly switched to using Evernote web instead of the desktop interface.
Today, thanks to an Evernote forum thread, I found a couple tricks that can help speed up Evernote. Follow along, and we’ll see if you can get Evernote feeling snappy again.
Activate Detective Mode
Ok, it’s not quite that dramatic, but Evernote does have some hidden developer tools that can help improve Evernote for Windows’ performance. First, if you have Evernote running, exit it from your system tray.
Now, open the Run command by pressing your Windows key and R at the same time (Win+R). Enter the following in the box, the press Enter or click Ok:
Evernote.exe /DebugMenu
When Evernote opens, you’ll notice a new [Debug] menu on your toolbar. This includes two options that really seemed to speed up Evernote on my computer: Optimize Database and Recreate Note Images. Optimizing your database is likely to help Evernote’s performance the most, though if you have some notes that have odd thumbnails (or no thumbnails), then you might try recreating the note images as well.
Both of these options will take several minutes to run, during which time you’ll see the status updated in a progress bar. If you’d like to give both options a shot, just run one, then the other.
Once it’s finished, you can continue to use Evernote as normal, or restart it to get rid of the [Debug] menu. Evernote still isn’t the fastest app, but it’s much improved after optimizing my database. I've got tons of notes in Evernote, and love the Evernote apps on iOS, so would really hate to quit using it. I really hope Evernote works to optimize Evernote for Windows and make it run faster, but in the mean time, this at least provided a bit of help for me. Hopefully you’ll find this helpful too … let us know in the comments!
Looking for a way to manage your projects on the go with something more advanced than a standard todo list app? There’s a fine line between having too little or too much info about the things you need to do. Today we’re going to look at Firetask for iPhone, a detailed project management app that lets you keep track of all the details of the tasks in all of your daily projects.
Keep Track of Everything About Your Tasks
Firetask is a task and project manager that lets you keep up with a surprising amount of data about the things you need to do from your iPhone or iPod Touch. One nice thing is that it’s rather easy to get started with. Whenever you open a screen for the first time, you’ll see a hint notification that explains what to do there.
Add a new task from any screen by tapping the plus icon in the top right corner. Just type in your task name and press Save, or scroll down to add a wide variety of extra data to your task. You can set the task’s priority, due date, flag or categorize it, add notes, or assign it to different people in your team. The only problem here is that Firetask is a single-user app without a cloud interface, so it really doesn’t work well for managing tasks for a whole team.
Many of the options open a separate dialog where you can select the category, status, or more for your task. Unlike most todo list apps, your tasks are not limited to simply done or not done. With Firetask, you can track a task from start to completion like a full-blown project management system.
Now, from the Today screen, you can see all of your upcoming tasks and those due soon. Tap Focus to see only the tasks without dates and those scheduled for today or tomorrow. You can also view all of the tasks in categories from the bottom menu. If you took the time to categorize tasks, you’ll easily recognize tasks with their icons on the left even from the Today screen.
Dates and categories aren’t enough sometimes, so Firetask also lets you organize your tasks into projects. I’ve found this very useful, as I can quickly get all of my tasks into a group and see related tasks in 2 taps. When you add a new task in a project, you can still add categories, notes, flags, due dates, and more to each task.
Once a task is in progress, tap the box on the left to mark it as In Progress with a tiny graph icon. Tap again to mark it as complete. Or, press Edit List to reorder or remove tasks from the list. Firetask works great with projects like this, and you’ll still be able to see upcoming tasks from the Today screen and in their respective categories. No matter how much you have to do, Firetask can handle it.
Conclusion
If you’ve wanted to be able to keep up with more about your tasks and projects, organize them efficiently, and more, you may have found most iPhone todo list apps too feature-limited for your needs. Firetask includes tons of ways to organize and sort your tasks and projects, and it feels more like a mini-Basecamp than than a todo list. The only problem is, all these features make Firetask more cluttered than competing task management apps, and it has a somewhat steeper learning curve. If you prefer to just keep up a quick todo list, you may find one of the other todo list apps better for your needs, but if you’re wanting to keep better track of everything you’re doing, the extra steps and learning curve may be worth it. Additionally, if you have a Mac, you can purchase Firetask for Mac and keep your tasks in sync between your computer and iPhone.
![sshot-2011-01-21-[6]](https://techinch.com/wp-content/uploads/2011/01/sshot-2011-01-21-6.png "sshot-2011-01-21-[6]")
![sshot-2011-01-21-[7]](https://techinch.com/wp-content/uploads/2011/01/sshot-2011-01-21-7.png "sshot-2011-01-21-[7]")
![sshot-2011-01-21-[9]](https://techinch.com/wp-content/uploads/2011/01/sshot-2011-01-21-9.png "sshot-2011-01-21-[9]")
![sshot-2011-01-21-[15]](https://techinch.com/wp-content/uploads/2011/01/sshot-2011-01-21-15.png "sshot-2011-01-21-[15]")
![sshot-2011-01-21-[16]](https://techinch.com/wp-content/uploads/2011/01/sshot-2011-01-21-16.png "sshot-2011-01-21-[16]")
![sshot-2011-01-21-[17]](https://techinch.com/wp-content/uploads/2011/01/sshot-2011-01-21-17.png "sshot-2011-01-21-[17]")
![sshot-2011-01-21-[11]](https://techinch.com/wp-content/uploads/2011/01/sshot-2011-01-21-11.png "sshot-2011-01-21-[11]")
![sshot-2011-01-21-[12]](https://techinch.com/wp-content/uploads/2011/01/sshot-2011-01-21-12.png "sshot-2011-01-21-[12]")


![sshot-2011-01-20-[1]](https://techinch.com/wp-content/uploads/2011/01/sshot-2011-01-20-1.png "sshot-2011-01-20-[1]")
![sshot-2011-01-20-[4]](https://techinch.com/wp-content/uploads/2011/01/sshot-2011-01-20-4.png "sshot-2011-01-20-[4]")
![sshot-2011-01-20-[12]](https://techinch.com/wp-content/uploads/2011/01/sshot-2011-01-20-12.png "sshot-2011-01-20-[12]")


![sshot-2011-01-17-[1]](https://techinch.com/wp-content/uploads/2011/01/sshot-2011-01-17-1.png "sshot-2011-01-17-[1]")
![sshot-2011-01-18-[9]](https://techinch.com/wp-content/uploads/2011/01/sshot-2011-01-18-9.png "sshot-2011-01-18-[9]")
![sshot-2011-01-18-[3]](https://techinch.com/wp-content/uploads/2011/01/sshot-2011-01-18-3.png "sshot-2011-01-18-[3]")
![sshot-2011-01-18-[10]](https://techinch.com/wp-content/uploads/2011/01/sshot-2011-01-18-10.png "sshot-2011-01-18-[10]")
![sshot-2011-01-18-[5]](https://techinch.com/wp-content/uploads/2011/01/sshot-2011-01-18-5.png "sshot-2011-01-18-[5]")


![sshot-2011-01-17-[1]](https://techinch.com/wp-content/uploads/2011/01/sshot-2011-01-17-11.png "sshot-2011-01-17-[1]")

![sshot-2011-01-14-[17]](https://techinch.com/wp-content/uploads/2011/01/sshot-2011-01-14-17.png "sshot-2011-01-14-[17]")
![sshot-2011-01-14-[21]](https://techinch.com/wp-content/uploads/2011/01/sshot-2011-01-14-21.png "sshot-2011-01-14-[21]")
![sshot-2011-01-14-[16]](https://techinch.com/wp-content/uploads/2011/01/sshot-2011-01-14-16.png "sshot-2011-01-14-[16]")


