Move Your Tumblr Blog to WordPress
Would you like to move your blog from Tumblr to your own WordPress blog? There’s no one-step way to do it, but you can move everything from your Tumblr blog and make your new setup as nice or nicer than your old Tumblr blog. Let’s see how you can move everything and get your new WordPress blog working as much like Tumblr as possible.
1) Getting a New Site
First, you need to get a new site. If you already have a hosting account, simply make a new WordPress install for your new site. Otherwise, you’ll need to sign up for hosting account. I highly recommend DreamHost – they’re hosting this site, and have done a much better job than other hosts I’ve used. Other highly recommend options from others include Media Temple and HostGator. They all offer one-click installations of WordPress so it’ll be easy to get your site up and running.
Here’s 2 articles that can help you install WordPress if you’ve never done it:
Install WordPress Manually on Your Website
Install WordPress on Your Own Server With Softaculous
Or, if you need help, ask away in the comments!
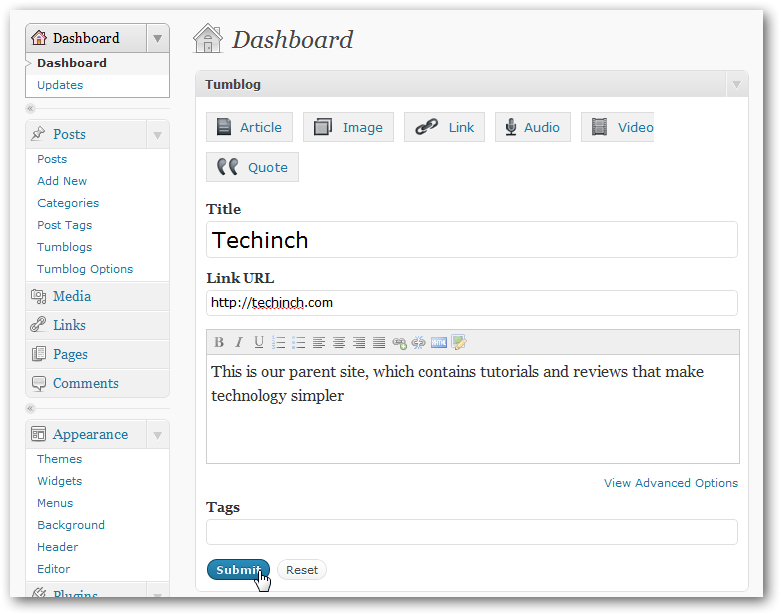
2) Install a Tumblog Theme
Once WordPress is installed, you’ll need to get a theme running to make your site look like you want. Any WordPress theme would work fine for a normal blog, but if you want to keep using Tumblr’s unique post types, including image, link, and quote posts, then you’ll want a theme designed for a tumblog blog. You can either turn any WordPress theme into a tumblog theme, or you could purchase a premade tumblog theme from WooThemes. These include Canvas, Retreat, Slanted, Cinch, and Crisp, my personal favorite. Once you’ve got a Tumblog theme running, you should see Tumblr-style editing options on your WordPress Dashboard.
3) Export Your Tumblr Content
Now it’s time to start moving your posts from your old Tumblr site to your new WordPress site. Head over to Benapps.net, which contains a free tool that can export your Tumblr posts. Enter your Tumblr blog address, select HTML export format, and then select how you want your post addresses to be imported. For most purposes, the first option is fine.

Scroll down, and under Export for, select Self-Hosted WordPress Installation. You could leave the other options as default or change them as you wish; it’s up to you. Finally, press Export. Seconds later, you should be prompted to save a tumblr_yourblog.xml file; save it to your computer, as you’ll need to import the data from this file into your new site.

4) Import Everything Into WordPress
Back in your WordPress dashboard, select Tools on the left sidebar and click Import. Then, click WordPress on the list of Import options. The tool you used before put your Tumblr posts into WordPress format, so this is the best way to import them.

You’ll now be prompted to install the importer. Click Install Now so you can get your content imported.
Once it’s installed, click Activate Plugin & Run Importer.

Click Choose File, then select the file you just downloaded from the Tumblr export site previously. Click Upload file and import to get all your posts moved over. Moments later, all of your posts should be imported into WordPress!

Now, select the author to assign these posts to, and check the Download and import attachments to get your images copied over too.

You can see all of your imported posts from the Posts menu. As you can see here, all posts were organized into categories based on what type of post you’d created in Tumblr.

There’s only one problem: your posts aren’t taking advantage of your theme’s tumblog features. This is fine; your posts will still be fully readable in WordPress. However, if you want to take advantage of the tumblog features of your theme that let you have link, image, quote, and other post types, you’ll need to edit them. To do this, you can bulk edit the posts by category.
On the top of the posts page, select the category you want to change and click filter. Then, select all the posts and click Edit under Bulk Actions.

Now, select the correct Tumblog post for the category you selected, and click Update. You’ll now need to repeat this for each of your categories. Once you’re done, though, your blog will look much more like it did before.

5) Move Your Domain and Redirect Old Posts
If you had your own custom domain in Tumblr, you should now move it to your new hosting account or redirect it to your new site. If you’re unsure about how to do this, you can follow the directions at the first part of this post, this time directing your domain to your WordPress site rather than Tumblr.
Then, you can redirect the links to your old posts by editing your .htaccess file, or with a simple WordPress Plugin. To do this, install the Simple 301 Redirects plugin in WordPress.
![sshot-2010-12-09-[1]](https://techinch.com/wp-content/uploads/2010/12/sshot-2010-12-09-1.png "sshot-2010-12-09-[1]")
Open the Simple 301 Redirects tool under Settings once it’s installed. Now, enter your tumblr post link on the left, leaving off the initial domain name (the link should look something like /post/123456789/name), then enter the correct address for that post on your WordPress site. You’ll need to repeat this for each post. This is tedious, so if your content isn’t very important then you may not want to do it. Otherwise, though, if your posts have been linked on many other sites, this will keep your traffic flowing to your new site.
![sshot-2010-12-09-[4]](https://techinch.com/wp-content/uploads/2010/12/sshot-2010-12-09-4.png "sshot-2010-12-09-[4]")
6) Add Plugins to Automatically Share your Content
One of Tumblr’s best features is that it can automatically share your new posts with your friends on Facebook and Twitter. With two new plugins, though, WordPress can do the same. Just install the WordTwit and Wordbook plugins from the Plugins menu, and activate each of them with your personal Twitter and Facebook accounts, respectively. Now when you publish a new post, it’ll automatically be shared with your friends around the world.
Additionally, if you had enabled Disqus comments on your Tumblr blog previously, you can now install the Disqus for WordPress plugin. It will automatically move your old comments over, so you can keep the discussion going on your new site.
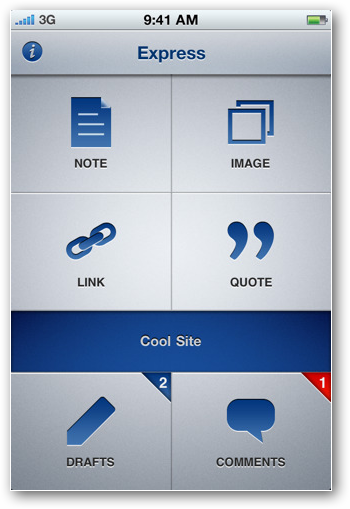
7) Post from Anywhere
Tumblr’s mobile app makes it easy to post to your Tumblr blog from your iPhone or iPod Touch. Thankfully, you can get the same features on WordPress. You can install the WordPress Mobile app on your iOS, Android, Blackberry, or Symbian device, so no matter what phone you’re using you can always share the latest things that are going on. The only problem is, the default free WordPress app only lets you post normal blog posts, not newer Tumblog posts. For that, you’ll need the Express app for iPhone, which is an app from WooThemes specially designed to post to Tumblog blogs. Check out my review of Express on AppStorm.net, or head over to the iTunes Store to download it today.
Conclusion
Phew, you made it! Congratulations, your Tumblr blog is now safe on WordPress. Hope the move went good for you, and if you hit any snags, feel free to ask questions in the comments below and I’ll do my best to help you. Or, if you’d like to see a WordPress blog that was imported from Tumblr, check out my tumblog at www.maybring.com. I just got it moved to WordPress this week, and it’s working great.
Happy Blogging!
Thoughts? @reply me on Twitter.